Authors


Overview
Though history will paint them as villains, the Ascians were driven by a deep and abiding desire to which all men may relate, and the minstreling wanderer cannot help but spare a thought for Elidibus, whose demise spelled the end of his people’s hopes and dreams.
Likening your struggle to that of love, the man weaves a bittersweet tale of passion undying – a tale witnessed by the shimmering spires of the Crystal Tower, to be reflected and retold for generations to come.
The Seat of Sacrifice (Ex) is the new Extreme Trial for 5.3 unlocked after finishing the Main Story Quest by talking to YoshiP the Minstreling Wanderer in The Crystarium.
If you have any suggestions, corrections or feedback for particular phases please let us know at feedback@akhmorning.com.
General Considerations
- Assign clock positions to the party for mechanics requiring players to spread.
- Figure out corner pairs (DPS + Healer, DPS + Tank) and light party (2 DPS + Healer + Tank) groups.
- Numerous mechanics target either all DPS or Healers + Tanks.
- Respect the visual cues for mechanics.
- 2 Damage Down stacks will have you do 0 damage until it fades! Don’t fail too many towers.
DPS
Watch your GCDs, OGCDs and autos when Pyretic applies from Absolute Fire III. 1 Pyretic proc is lenient, 2 procs can be lethal.
Ranged and Casters can preposition in their corners for Deluge of Death Flare markers in Phase 2.
Be Careful With DPS Limit Break On The Boss
If the Warrior of Light is not animation locked nor casting a spell, he will Hallowed Ground immediately in response to a DPS Limit Break thus negating any damage dealt by the party for 10s.
Healers
Terror Unleashed reduces everyone’s HP to 1 and applies Living Dead. This functions exactly like the DRK status and is a quick heal check. Heal everyone up to full hp or they will die.
Healers will each be targeted by Radiant Desperado when the Warrior of Light performs Limit Break with 2 bars. Healers cannot stack together for this and the party must split up to share the damage for each healer. e.g. Healer + Tank + 2 DPS.
In Phase 2 Healers cannot take the towers due to the Fire Resistance Down II from the Katon-San stack mechanic.
Tanks
Cooldown and Tank swap for The Bitter End as it applies a Physical Vulnerability up.
Use cooldowns for Phase 2’s Fatal Cleave and Blade of Shadows Tank busters.
Interject the Berserk and Deep Darkside casts.
Be sure to Tank LB3 when the Warrior of Light’s quote appears and his Limit Break Gauge fills to 4 bars. Being too late will wipe the party.
Mechanics
Here we’ll explain the underlying mechanics throughout the encounter.
Spells
- Terror Unleashed: Applies a party wide Living Dead while bringing all to 1 HP. Not healing to full HP = death.
- Solemn Confiteor: Ground AoEs that target all 8 party members. Stack to bait then spread.
- Absolute Blizzard III: Raidewide. Freezes stationary players. Stay moving to not get frozen once it hits.
- Absolute Fire III: Raidwide. Applies the Pyretic debuff. Don’t move or perform an action while it ticks down.
- Absolute Holy: Party stack. No telegraph.
- Absolute Stone III: Earthshaker markers on multiple party members. Spread to ensure no AoE overlap.
- Absolute Flash: Targets one player with a Gaze marker. Looking at them gives you a Damage Down debuff. Think E2N | E2S and have them move South.
- Quintuplecast: Casts 5 consecutive Absolute mechanics in order of randomised cue appearance. 4 Absolute Elemental + Flash.
- Sword of Light: Summons 3 swords that each mark out a lethal triangle area. 3 of the arena sides will be the base of a triangle. Look for the safe areas on the arena wall with no line drawn along it.
- Summon Wyrm: Summons NotBahamut who will divebomb across the arena from the North side.
- Elddragon Dive: Heavy raidwide. Mitigate appropriately.
- The Bitter End: Tank Buster. Applies Phys Vuln Up. Tank swap.
- Specter of Light: Summons 1 of 4 Specters of Light to perform mechanics.
Sword Abilities
- Imbued Saber: Imbues his sword with an element that will go off with a following Imbued Coruscance. Visual cue for which elements. Can apply 1-2 elements.
- Imbued Coruscance: Elemental aspected Coruscant Saber. Rings around his sword = go in, nothing = go out. Pay attention to which elements are imbued for how to resolve the attached Absolute mechanics.
- Coruscant Saber: Unaspected version of Imbued Coruscance, so either in or out. Rings around his sword = go in, nothing = go out.
Limit Break
- To the Limit: Fills up his Limit Break gauge by a fixed amount (1-4 bars)
- Limit Break: Performs one of the Limit Breaks below based on how many bars are in his gauge.
- Radiant Braver [LB1]: Physical damage cone from the boss targeting a DPS, Healer and Tank.
- Radiant Desperado [LB2]: Targets each healer with Physical stack mechanic that applies Physical Vulnerability Up. Think Seiryu and have 2 DPS + Healer + Tank light parties for each healer.
- Radiant Meteor [LB3]: 4 large Magic damage AoEs that target all DPS OR Tanks + Healers. Overlapping AoEs is lethal from Fire Resistance Down II. Pair DPS + Tank or DPS + Healer for each corner.
- Ultimate Crossover: Intermission ultimate raidwide. Mitigate + Tank LB3 this or it’s a wipe.
- Ultimate Crossover: Hard enrage**.
Adds
- Deluge of Death [Spectral BRD]: Physical damage Flare markers. DPS spread to their respective corners.
- Katon: San [Spectral NIN]: Fire damage stack that targets both healers. Applies Fire Resistance Down II.
- Twincast [Spectral BLM & WHM]: Casts a pair of mechanics to resolve such as Meteor Impact towers.
- Fatal Cleave [Spectral WAR]: Tank buster. Use cooldowns.
- Blade of Shadow [Spectral DRK]: Tank buster. Use cooldowns.
- Meteor Impact [Spectral BLM]: Fire damage from soaking towers. Applies Fire Resistance Down II.
- Berserk [Spectral WAR]: Must be silenced.
- Deep Darkside [Spectral DRK]: Must be silenced.
- Flare Breath [Spectral SMN/NotBahamut]: Wide Fire damage cones on the tethered target. Applies Fire Resistance Down II.
- Suiton: San [Spectral NIN]: Leviathan style tidal spout Knockback. Knockback immunities work.
- Perfect Decimation [Spectral WAR]: Medium damage Physical cone AoE. Aim at cardinals. Don’t overlap it with Flare Breath corners.
- Brimstone Earth [Spectral DRK]: Marks all DPS or Healers + Tanks. Creates an expanding puddle.
Timeline (Timestamps pending)
Phase 1 Timeline (Hard Push @ 50%)
- Terror Unleashed [Heal to full check]
- To The Limit [Always fills WoL to LB3]
- Solemn Confiteor [Stack, bait, spread]
- Absolute Stone III [Earthshakers]
- Radiant Meteor [LB3] [Corner Pairs]
- Imbued Saber [Earth - spread]
- Imbued Saber [Fire or Ice]
- Imbued Coruscance [In or Out]
- To the Limit [Look at WoL’s LB bars filled]
- Sword of Light [Triangles]
- Absolute Holy [Stack]
- Limit Break [LB1 or LB2]
- To the Limit [Look at WoL’s LB bars filled]
- Imbued Saber [Holy - stack]
- Imbued Saber [Fire or Ice. Opposite of the first time]
- Imbued Coruscance [In or Out. Opposite of the first time]
- Limit Break [LB1 or LB2. The last remaining LB]
- The Bitter End [TB + Tank Swap]
- Summon Wyrm [DiveBomb - look north]
- Solemn Confiteor [Stack, bait, spread]
- Absolute Flash [Look away from party member]
- Elddragon Dive [Heavy raidwide]
- Specter of Light [Phase 2 start]
Phase 2: Adds Timeline
- Deluge of Death [DPS Flares] + Fatal Cleave/Blade of Shadow [Tank Busters]
- Katon: San [Healer + Tank stacks]
- Meteor Impact [DPS towers]
- Flare Breath [Healer + Tank tethers] + Berserk/Deep Darkside [Silence/interrupt]
- Fatal Cleave/Blade of Shadow [Tank Busters]
- Adds should be dead by now (there may be extra mechanics after)
- Ultimate Crossover [Tank LB3 the moment WoL hits 4 LB bars]
Phase 3 Timeline
- Specter of Light segment [Random of the available 4]
- Quintuplecast [Random order of all 5 Absolute mechanics]
- Sword of Light [Triple Triangles. Find the safe side.]
- Elddragon Dive [Raidwide]
- Specter of Light segment [Random of the remaining 3]
- Specter of Light segment [Random of the remaining 2]
- Specter of Light segment [The last one left]
- Ultimate Crossover [ENRAGE]
Specter of Light Segments
Spectral Summoner + Warrior Timeline
- Imbued Saber [Fire or Ice]
- Specter of Light [Summons the Specters]
- Solemn Confiteor [Bait, Move] 🡒 Perfect Decimation [Cardinals] + Flare Breath [Corners]
- Solemn Confiteor [Bait, Move, next mechanics swap for people] 🡒 Perfect Decimation [Cardinals] + Flare Breath [Corners]
- Summon Wyrm [Look for NotBahamut on the North wall]
- Imbued Coruscance [In or Out, Fire or Ice] + Divebomb [Dodge to the safe side]
- Elddragon Dive [Raidwide]
- The Bitter End [Tank buster + Tank swap]
Spectral Ninja Mechanics Timeline
- Imbued Saber [Earth or Holy]
- Specter of Light [Summons the Specters]
- Solemn Confiteor [Bait, Move]
- Suiton: San [Knock back from the tidal wave]
- Katon: San [Stack in your pairs away from other pairs]
- Imbued Coruscance [In or Out, Earth or Holy]
- Elddragon Dive [Raidwide]
- The Bitter End [Tank buster + Tank swap]
Spectral Dark Knight + Bard Timeline
- To The Limit [Look at how many LB bars he fills]
- Specter of Light [Summons the Specters]
- Solemn Confiteor [Bait, Move]
- Brimstone Earth [Drop puddle on your corner]
- Deluge of Death [3 Flare markers against cardinals] + Absolute Holy [Other 4 stack middle ]
- Limit Break [Pay attention to the number of bars he gained]
- The Bitter End [Tank buster + Tank swap]
Spectral Black Mage + White Mage Timeline
- To The Limit [Look at how many LB bars he fills]
- Specter of Light [Summons the Specters]
- Meteor Impact towers x8 [Soak sequentially due to Fire Resist Down II]
- Summon Wyrm [Look for NotBahamut on the North wall]
- Coruscant Saber [In or Out] + Divebomb [Dodge this]
- Limit Break [Pay attention to the number of bars he gained]
- The Bitter End [Tank buster + Tank swap]
Phase 1
After the engage stay stacked up close to the boss.
The first mechanic begins when the Warrior of Light casts Terror Unleashed on the entire party. All party HP will be reduced down to 1 while the True Walking Dead debuff will be present on each party member. This is a quick heal check to heal everyone to full HP or else they will die when their True Walking Dead debuff fades.
After he will say “I shall transcend you!” casting To The Limit gaining bars of Limit Break above his head. This is important to keep in mind for which Limit Break mechanic he will perform later when he casts Limit Break. For this one he gains 3 Limit Break bars for Radiant Meteor [LB3] later.
He then casts Solemn Confiteor. Each party member will be targeted by an AoE circle. The easiest method is to have people be stacked up to bait then spread out.
Immediately after this he casts Absolute Stone III targeting numerous players with Earthshaker markers. Spread out to clock positions to avoid cone overlap.
Once this has resolved move to your corner with your partner for Radiant Meteor [LB3]. Your DPS + Healer or DPS + Tank pairs are important as this mechanic either only targets DPS or Tanks + Healers.
Imbued Saber + Imbued Coruscance
The Warrior of Light will eventually teleport middle to cast two Imbued Saber spells one after the other. The first will imbue Absolute Earth III while the second will imbue either Absolute Fire III or Absolute Ice III. Look for the visual cue around him after he casts this to see which element he has imbued into his blade.
Preposition in your clock positions while you next prepare for Imbued Coruscance. Look at his sword for the visual cue - rings around the sword mean to go in (think Dynamo), nothing means to go out (think Chariot). As this action happens he will also resolve his imbued elements of Earth (clock spreads) and either Fire (stay still and don’t attack - 2 procs of Pyretic will likely kill you) or Ice (keep moving). Go back in after for heals.
He will once more cast To The Limit gaining 1-2 Limit Break bars for Radiant Braver [LB1] or Radiant Desperado [LB2] later.
Sword of Light
Sword of Light is the next mechanic as he says “Gleaming steel, light my path!”. This mechanic functions similarly to the story trial, however, there are now 3 swords drawing triangles to keep an eye out on.
Resolving this is fairly simple: look for the one arena wall that is not a triangle edge and only has a triangle point touching its middle. This provides you with two safe spots on either side of the triangle’s point.
Here’s a diagram showing the safe spot regions in green on the North side of the arena while the other sides are marked red to show they are not safe:
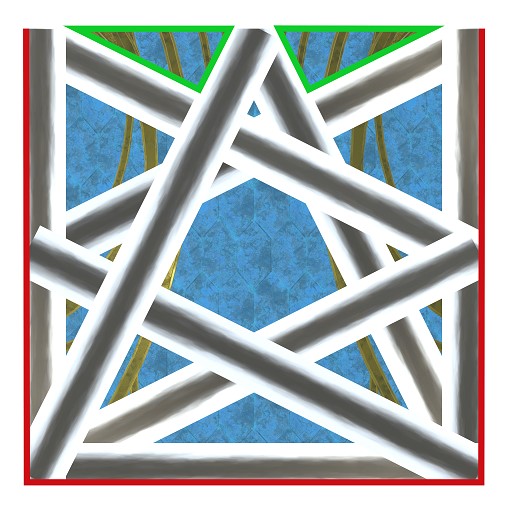
It is important to note that while there are many variatons on where the swords spawn and start drawing their triangles there are only 4 outcomes to keep in mind since only one wall will ever be safe. Either you need to go North, South, East or West. Move and stay together as a group for the incoming Absolute Holy.
See the following clip as an example:
The party must stay together for this as Absolute Holy is also being cast as a party stack mechanic. Heal up and once this has all resolved return back to the middle and prepare for the next mechanic.
Saying “My soul knows no surrender!”, the Warrior of Light will cast Limit Break. It will be LB1 or LB2 depending on the bars gained from To The Limit.
Limit Breaks 1 + 2
Radiant Braver [LB1]
This will target a DPS, Healer and Tank. Stack DPS to one side, Healers to another and Tanks in front. This is easily resolved this way just like with the same mechanic in Stormblood’s Tsukuyomi encounter.
Radiant Desperado [LB2]
Healers are targeted with a stack mechanic that deals Physical damage and applies a Physical Vulnerability Up. Make sure your party is split up accordingly East and West into light parties to ensure survival.
After the first randomised Limit Break he teleports middle and for the third time he will cast To The Limit for a third time saying “Hope, grant me strength!” gaining 1-2 Limit Break bars for the last remaining Radiant Braver [LB1] or Radiant Desperado [LB2].
Similar to before he will proceed to cast Imbued Saber twice into Imbued Coruscance, only this time:
- In or Out. This will be the opposite of the first time
- The first element is Holy (Stack)
- The second element is Fire or Ice. This will also be the opposite of the first time.
e.g. if the first Imbued Coruscance was In + Stay still, this one will be Out + Keep Moving.
It is a good idea to designate a dedicated stack location for when this mechanic requires the party to go Out. Then resolve whether you need to be Still or Move.
He next casts his last remaining Limit Break for the phase.
The Bitter End will follow after the LB mechanic. This tank buster requires cooldowns and a tank swap as it applies a Physical Vulnerability Up.
Shortly afterwards the Warrior of Light casts Summon Wyrm spawning a large NotBahamut on the North edge of the arena. Check whether he is on the East or West side as he will divebomb this half.
Stay stacked in order to bait Solemn Confiteor again. One player will also be targeted with Absolute Flash which other players must look away from or else they will receive a Damage Down debuff. This player can run south on the safe side while the rest of the party moves directly East or West as required.
Elddragon Dive is the last mechanic for Phase 1. Be prepared for the heavy raidwide damage.
After this, or when you push the Warrior of Light to 50% HP sooner - good job you’re now onto Phase 2: Adds.
Phase 2: Adds
The phase will start after the Warrior of Light casts the first Specter of Light. He then goes untargetable and begins to fill up a Limit Break bar from 0 to 100. Reaching to 100 acts as an enrage for Ultimate Crossover.
Two adds will spawn at the start of this phase:
- Spectral Dark Knight (West)
- Spectral Warrior (East)
These must be picked up by Tanks and kept separated or else they will tether and become unkillable.
Roughly 5 seconds later an untargetable Spectral Bard, Spectral Black Mage, Spectral White Mage and Spectral Ninja will spawn and begin their mechanics. Check your aggro list for their casts to get familiar with timings.
First the Spectral Bard casts Deluge of Death. All DPS will get a Flare marker that they must take away to ensure survivable damage. DPS going to their corners is a safe bet, however, some strat variations allow for Melee DPS to retain uptime. Ranged and Casters can preposition before the mechanics come out.
As this happens the Spectral Dark Knight will cast Blade of Shadow and the Spectral Warrior will cast Fatal Cleave. Tanks must mitigate these busters.
Both Healers will be targeted by the Spectral Ninja with Katon: San - a stack mechanic that give them Fire Resistance Down II. This is important as it means they cannot resolve the tower mechanic which also deals Fire damage. Healers must stack with someone until Katon: San resolves.
Two towers will have spawned in the center East and West after the Spectral Black Mage finishes casting Twincast. These towers require 2 people to resolve each.
After Deluge of Death hits DPS, whoever is stacking for Katon: San must move to their respective Healers while the others not stacking move in to the towers to be hit with Meteor Impact. You have a few seconds to resolve this.
The Spectral Summoner will have summoned 4 untargetable Spectral Egi (NotBahamut) adds in each corner. As the towers finish resolving these adds will create tethers attached to players to indicate who they will cast their Flare Breath on. Those who took the Katon: San stacks must take these tethers to their respective corners due to their lower Fire Resistance Down II, facing the NotBahamuts away from the rest of the party.
Both the Spectral Dark Knight and Spectral Warrior will also be casting Deep Darkside and Berserk respectively. These must be silenced/interrupted. A little later they will then both cast another Blade of Shadow and Fatal Cleave if they are still alive.
DPS Corners, Healer + Tank Stack, DPS Towers, Healer + Tank Tethers
This variation on resolving the Flare, Tower and Tether mechanics is a strategy deemed a current standard that was used in earlier clears.
While it loses some DPS uptime on adds it is likely to be the strategy most currently asked for in all regions.
All DPS take their Flare markers to their corners for Deluge of Death.
Healers + Tanks stack together for Katon: San.
After DPS Flares resolve, DPS move in to take Meteor Impact Towers.
Healers + Tanks then take the Flare Breath tethers to face their respective corners.
See the following clip as an example:
DPS Corners, Healer + Ranged Stack, Tank + Melee Towers, Healer + Ranged Tethers
A variation on the above, this one allows for slightly better Melee uptime on adds while retaining DPS corner Deluge of Death Flares.
All DPS take their Flare markers to their corners for Deluge of Death.
Casters/Ranged + Healers stack together for Katon: San.
After DPS Flares resolve, Melee + Tanks move in to take Meteor Impact Towers.
Casters/Ranged + Healers then take the Flare Breath tethers to face their respective corners.
See the following clip as an example:
Uptime (Cardinal Flares)
This variation is among the least known from the previous methods while retaining full melee uptime on adds. It is very similar to the above strategy with one key difference.
Instead of Deluge of Death Flares being taken to their respective corners, Melees stay with Tanks East and West while Casters/Ranged and Healers preposition North and South.
Casters/Ranged + Healers stack together for Katon: San.
After DPS Flares resolve, Melee + Tanks move in to take Meteor Impact Towers.
Casters/Ranged + Healers then take the Flare Breath tethers to face their respective corners.
See the following clips as examples:
Burn down the adds to finish the phase and prepare for the Ultimate Crossover intermission.
Intermission: Ultimate Crossover [LB4]
This must be Tank LB3’d around when the Warrior of Light hits 4 Limit Break bars or the party will wipe to lethal damage. When his quote appears is a good timing.
Be prepared for how high the damage is. Even with Tank LB3 it hits like a truck.
Phase 2 Variations
We’ve since listed multiple variations on how groups may choose to resolve the Flare, Tower and Tether mechanics.
Opt for whichever sequence works best for the people in the party as long as you make sure mechanics do get resolved.
Phase 3
This phase will begin with four different mechanics that can happen in any order each depending on which Specter of Light he manifests. These will be either:
- Spectral Summoner & Warrior
- Spectral Ninja
- Spectral Dark Knight
- Spectral Black Mage & White Mage
Their order of appearance in Phase 3 will be randomised. They will be covered further down.
After the first Specter of Light he will teleport middle saying “I will not fall!” and begin the next big mechanic sequence: Quintuplecast.
Quintuplecast uses all 5 Absolute spell mechanics in a randomised order. While he channels the cast you will see the visual cues and markers for the order of each mechanic. As such this is a memorisation sequence. When the markers are gone he will perform a visible cue that sounds and looks like Black Mage’s Triplecast only with 5 magical orbs.
Due to the permutations there would be a lot to cover for movement for each variation. With this in mind be vigilant with the order of mechanics and remember:
- Earth: Spread clock positions.
- Fire: Stay still and perform no actions.
- Ice: Keep moving.
- Holy: Party stack in the middle.
- Flash: Look away from the one with the Eye marker.
- Earth: The party spread in clock positions.
- Ice: The party then moved to not get frozen (the AST gets frozen due to not moving).
- Holy: They stacked in the middle to share the damage.
- Flash: The white mage with Flash goes south and the rest of the party look away.
- Fire: They then finish Quintuplecast by standing still (the SAM dies to an immediate tick).
Following Quintuplecast will be Sword of Light into Elddragon Dive. Find the safe area and prepare for the raidwide damage.
Spectral Summoner + Warrior
The Warrior of Light casts Imbued Saber into Specter of Light.
Instead of teleporting middle he will teleport a bit more north as the tell that you are facing the Spectral Summoner + Warrior.
4 NotBahamuts will be summoned by the Spectral Summoner - one for each corner like in Phase 2. 4 players will get a marker for Perfect Decimation from the Spectral Warrior and 4 players will get a Flare Breath tether from the NotBahamuts. As this happens the Warrior of Light also casts Solemn Confiteor requiring people to bait their AoEs then move away.
This sequence then alternates so that those who had tethers will now have markers and vice versa.
Each player must resolve each mechanic one step at a time. Here’s a breakdown based on what you get first:
Perfect Decimation (Markers)
- first bait Solemn Confiteor, dodge and resolve Perfect Decimation markers in cardinals.
- swap, grab your corner’s NotBahamut tether, bait the second Solemn Confiteor, move into the corner and make sure Flare Breath is pointed that way.
Flare Breath Tethers (Unmarked Players)
- first bait Solemn Confiteor, dodge, move into the corner and make sure Flare Breath is pointed that way.
- swap, bait Solemn Confiteor, dodge and resolve Perfect Decimation markers in cardinals.
After this dance the Warrior of Light teleports middle and larger NotBahamut returns on the North wall at either the East or West side to divebomb.
The Warrior of Light then casts Imbued Corusance. This functions the same as before - remember what element was imbued and look at the sword to know if it is In or Out. Dodge to the side not being divebombed and resolve the element correctly.
See the following clip as an example of this phase:
This Specter of Light segment finishes up with an Elddragon Dive raidwide into The Bitter End requiring a tank swap.
Spectral Ninja
The Warrior of Light casts Imbued Saber into Specter of Light.
The Spectral Ninja appears near the center of the arena casting a new ability: Suiton-San.
Suiton-San places a Leviathan/Shinryu style tidal spout graphic along the side of one of the walls. This indicates which wall a powerful water knockback will come from.
Katon-San will also be cast on either all DPS or Healers + Tanks. You will want to be knocked back as pairs, or use knockback immunity actions such as Surecast to stay put, in order to resolve the damage coming out.
During this the Warrior of Light will cast Solemn Confiteor on the party. Loosely stack to bait then spread.
Treat this sequence similarly to the Earthquake Knockback Stack sequence from Chaos [O9N/O9S] if you are familiar.
Shortly after the Warrior of Light then casts Imbued Corusance. This functions the same as before - remember what element was imbued and look at the sword to know if it is In or Out.
See the following clip as an example of this phase:
The Specter of Light segment finishes up with an Elddragon Dive raidwide into The Bitter End requiring a tank swap.
Spectral Dark Knight + Bard
The Warrior of Light casts To the Limit followed by Specter of Light. Take note of how many bars are present in his Limit Break gauge.
Bait Solemn Confiteor AoEs. Either all 4 DPS or Healers + Tanks will be marked with Brimstone Earth markers. These players must drop these growing puddles on the corners where once spawned they will expand.
A DPS, Healer and Tank will be targeted with Deluge of Death Flare markers while a remaining player at random is targeted for the Absolute Holy party stack. The party stack should remain center while the Flare marked players should drop theirs in the middle of the following cardinal walls*:
- DPS - South
- Healer - East | West
- Tank - North
* This is one of the more commonly adopted positions in current PF. Adapt based on the party’s wants.
See the following clip as an example of this phase:
He finishes this segment with Limit Break into The Bitter End requiring a tank swap. Remember how many bars he had as this will dictate which mechanic to resolve.
Spectral Black Mage + White Mage
The Warrior of Light casts To the Limit followed by Specter of Light. Take note of how many bars are present in his Limit Break gauge.
Together the Black Mage and White Mage will summon 8 towers. Figure out the order of pairs for the 1st, 2nd, 3rd and 4th towers. Then for the have the pair who resolved the 1st tower resolve the 5th, 2nd and 6th, 3rd and 7th, 4th and 8th. This staggering of tower soaks is required due to the Fire Resistance Down II debuff.
Failing a tower results in raidwide damage and a stacking Damage Down.
Shortly afterwards the Warrior of Light casts Summon Wyrm spawning a large NotBahamut on the North edge of the arena. Check whether he is on the East or West side as he will divebomb this half.
He then prepares Coruscant Saber - the unaspected version. Go In or Out while dodging to the safe side against the Divebomb.
See the following clip as an example of this phase:
He finishes this segment with Limit Break into The Bitter End requiring a tank swap. Remember how many bars he had as this will dictate which mechanic to resolve.
Fortunately the DPS check is fairly forgiving so in an ideal world you will defeat the Warrior of Light before seeing too many Specter of Light segments, however, don’t get too complacent as enough deaths and damage downs will have you see the final Ultimate Crossover enrage!
If you have gotten to here - congratulations you have defeated the original Warrior of Light! Now go forth and enjoy farming your shiny golden loot.
Loot
Weapons
These i495 weapons are gold accented and cost 10 Totems of Light each with the usual exception of 7 + 3 for PLD.
- PLD: Sword of light [Det|Crit] + Shield of light [Det|Crit]
- WAR: Axe of light [Crit|Det]
- DRK: Faussar of light [Det|Crit]
- GNB: Gunblade of light [Crit|Det]
- DRG: Spear of light [Crit|Det]
- MNK: Jamadhars of light [DH|Crit]
- SAM: Blade of light [Det|DH]
- NIN: Knives of light [Crit|Det]
- BRD: Bow of light [DH|Det]
- MCH: Gun of light [Det|DH]
- DNC: Chakrams of light [Crit|Det]
- BLM: Rod of light [Det|SpS]
- SMN: Index of light [Det|DH]
- RDM: Hanger of light [DH|Crit]
- WHM: Cane of light [Pie|Det]
- SCH: Codex of light [Crit|Pie]
- AST: Globe of light [Pie|Det]
Mount
Orchestrion Roll
Cosmetics
Plate of Light is a crafted material used to create:
- Trophy of Light (Housing)
- True Barding of Light (Chocobo Barding)
Joon’s Pickup Video Guide
Day 1 Video Guide
Change Log
- 20/09/2020: Banner update, page optimisations, Joon’s Pickup Guide Video release
- 01/09/2020: Phase 3: Positioning tweaks to Spectral DRK + BRD.
- 18/08/2020: Phase 2: Adds variations added with clips from Joon and PB.
- 15/08/2020: Spectral Ninja Imbued Saber typo fixed to show Earth or Holy under Mechanics. (Thanks Miko!)
- 15/08/2020: Updated the DPS LB Boss Hallowed Ground interaction and Spectral Summoner tell. (Thanks Ory!)
- 14/08/2020: Sword of Light diagram added, amendments to some sections.
- 13/08/2020: Release