Authors
Introduction
Hello, I’m Oryza, also known as Ory, and I’ve been raiding in FFXIV since patch 3.4, hardcore since patch 4.1.
From talking to viewers on my stream, I’ve come to realize that FFXIV does a horrid job of teaching its core mechanics to new players. Despite this and the stigma surrounding raids as being for only the “elite”, I believe most players are capable of clearing even the hardest of fights.
And so I decided to write this guide to help out players who are interested in Savage or even Ultimate. Even if you’re a more experienced player, I would recommend giving this at least a glance-through because even with years of experience, there are still quirks in FFXIV’s engine that surprise me.
If you have any questions, comments, or suggestions for additions or changes, you can DM me on twitter or drop by my twitch stream. I try to stream 4-5 days a week and mainly focus on doing endgame content and talking about my thoughts on the game from a design perspective, but I spend a lot of time talking to chat and answering questions about raiding!
Quick disclaimer, I’m writing this primarily based on my knowledge from just playing and observing the game, without access to the game’s internal engine. Combined with the fact that FFXIV is a game of few concrete rules and many exceptions, I think that there is a chance that some of the contents of this guide are wrong - if you are knowledgeable and want to correct something, please let me know! It’s greatly appreciated.
What This Guide Will Cover
I wrote this guide with beginner to intermediate level raiders in mind. This means anyone anywhere from players who recently started Savage to players who are looking to make the jump to Ultimate.
This doesn’t mean that there isn’t anything to learn for veteran raiders though - each section will be marked to notify its significance in raiding:
- ★★★ - Fundamental knowledge for raiding.
- ★★☆ - Recommend to understand before raiding, but it is still possible to clear a whole Savage tier without knowing it.
- ★☆☆ - Nice-to-know information or tips for specific situations, but not generally applicable across all fights or otherwise not incredibly impactful.
What This Guide Won’t Cover
This is not a guide for…
- beginners to FFXIV as a whole - you can find an example of that on AkhMorning here.
- raid basics. I will assume you know the basics like what GCDs and oGCDs are.
- job specific information. Things like your rotation, your opener, and fight optimisations can be found can be found here on AkhMorning, in The Balance or elsewhere.
- role specific information. Tanking basics (tank swaps, holding aggro) or healing basics (keeping your party alive while still dealing damage) will not be covered - if there’s demand for it I can add those concepts to this guide in the future.
- fight-specific tech. There are a few mechanic-based exceptions, but this is meant to be a general guide to improve any raider tackling any fight.
Note: These square brackets [] indicate spots where I would like to include a visual, but have not been able to due to lack of footage or time. If you know of a clip that would fit in any of these spots, please let me know!
Without any further ado, let’s get into it.
Positioning
“Snapshot” ★★★
The term “snapshot” is quintessential when it comes to understanding how mechanics function in FFXIV. Buffs, debuffs, positioning, and more all rely on some form of snapshotting. Snapshotting refers to when the server checks on the current state of the player character, as it tries to resolve mechanics either friendly (e.g party buffs for damage calculation) or hostile (e.g. boss AoE resolving).
In conventional action games, like Monster Hunter World, the snapshot intuitively occurs when the boss’s animation connects with the character, and the damage the player takes is dependent on buffs/debuffs active at that time (e.g. is there defense buff?).
However in FFXIV, snapshot timings can vary tremendously.
Understanding the quirks of snapshots can be the difference between life or death.
Castbar-based & Animation-based Attacks ★★★
If you can dodge a wrench, you can dodge a ball. If you can dodge an AoE, you can clear the raid floor.
Dodging attacks is fundamental. Failing will result in a vuln stack or damage down if lucky, or death if not.
In savage/ultimate, these mistakes can cascade into an enrage or full raid wipe. Attacks come in roughly two flavors: castbar-based attacks and animation-based attacks.
Castbar-based attacks make up the bulk of mechanics, and they snapshot when the boss’s cast bar finishes, as the name implies.
At the snapshot, the server checks the player’s position and determines whether or not the player takes damage or properly resolves a mechanic.
Note: Castbars are not always directly linked to AoE markers disappearing.
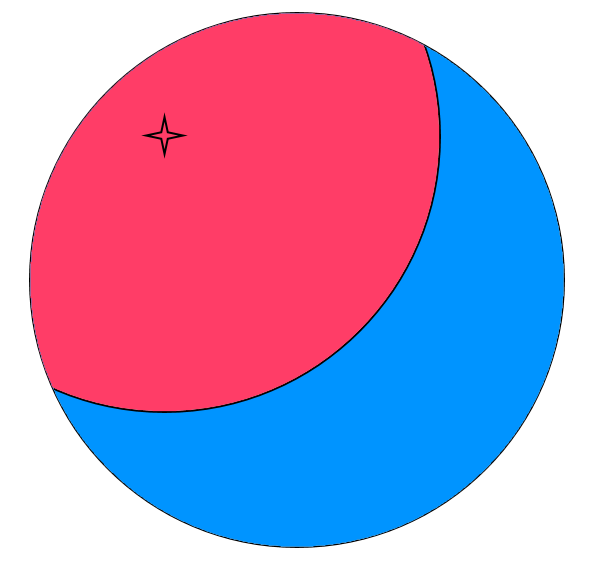
Ramuh’s Thunderstorm castbar is irrelevant to its duration.
Here, the orange ground AoEs softly track the player, and each individual AoE snapshots position as it disappears. In general, AoE indicators disappearing are the real tell for when castbar based attacks snapshot position, and generally take precedence over boss castbars.
Animation-based attacks behave more similarly to the aforementioned Monster Hunter World example – they check your position when the animation of the attack goes off. While these are a bit rarer, they still do happen occasionally and remembering which mechanics have this property is important.
While there are no direct indications whether a mechanic is castbar or animation based, some experience (dying) will generally help you figure out which it is. A good rule of thumb is that most mechanics are cast bar based and animation-based ones can be learned as they come.
But all rules have exceptions. E.g. E6S Ifrit’s Strike Spark spawns fireballs all around the arena.
Neither Ifrit nor the fireballs have a castbar, and the fireballs actually snapshot a half-second before the explosion animation goes off.
These special mechanics will need to be learned individually by experience.
Other Tips ★★☆
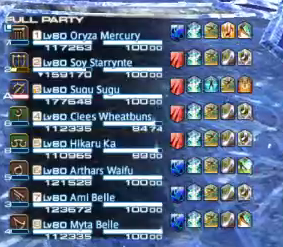
Sometimes, there will be adds that cast mechanics where the snapshot is castbar based, but the castbar is invisible because the add is untargetable. When this happens, I recommend checking your aggro list to see if the add appears there.
For example, Frozen Mirror adds in E8S Shiva are untargetable, but still show up in the aggro list:
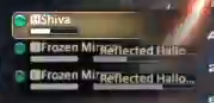
Note: These adds won’t appear on a player’s aggro list if they are dead and raise after the adds have spawned.
Snapshotting timing is not absolute - it is affected by ping.
Players with higher ping have to preemptively dodge attacks and cannot trust castbars or markers. The higher your latency the more you have to compensate.
Get used to playing on whatever ping you have so you don’t make any unnecessary mistakes as you raid.
Remember: It doesn’t matter if you say “I was out of that on my screen”. The game is the final judge of what happens.
A player’s position is determined by the direct center of their player model. This means that even if the player seems visually inside the AoE, they might not get hit by it. However, distance requirements for targeting bosses is determined by the distance to the edge of the boss’s targeting ring.
Moving Objects ★★★
One of the least intuitive FFXIV mechanic interactions is unit collision.
There is a desync between unit location shown on the player screen and the unit location according to the server. As a result, there’s some visual wackiness with players being directly inside moving objects but not interacting with them. Or sometimes the object seems far away from the player, and all of the sudden it jumps straight at them.
To be specific, any moving object on a client’s screen is basically about a second in the past compared to the server’s version of that object. The server believes that the moving object is about one second ahead of what the client believes.
To combat this desynchronization, always approach objects that you intend to intercept from head on in their path, i.e. run in front of it then turn back into it. It is of course possible to chase objects but one may need to run through the entirety of the object for it to register.
Similarly, to avoid an object, never been in front of it, behind is the safest. For objects that follow you, circling around them is the best option if you can’t run directly away from them.
Debuff Passing ★★☆
Passing debuffs or tethers between party members can also cause all sorts of confusion due to a desync between what party members see on their screens, and what the server believes is true.
Luckily, this isn’t as bad as it used to be, but the general rule of thumb for passing a tether or a debuff to an ally is to have one player stay still and to have the other player do all the moving.
If both players run at each other there’s a chance that they will pass through each other without anything passing.
Proximity Damage ★★☆
Proximity damage is damage where the amount taken increases as a function of the player’s proximity to the damage source (shocker!).
There are generally two types:
- Where damage taken decreases somewhat proportionally with distance. Most proximity damage is this type.
- where damage taken is split in two - high lethal damage and safe survivable damage.
Examples of the this variety are A12S Alexander Prime’s Inception Crystal, and Sophia Extreme’s Quasar
Damage Snapshotting
Basics ★★★
Damage snapshots occur at the same time as position snapshots, and include all buffs and debuffs on related entities.
For example, if reprisal (10% mitigation) is placed onto E8S Shiva during her Absolute Zero castbar, the damage will be reduced 10%. However, if its placed in between the castbar completion and the damage application, the full damage is taken.
This holds true for damage dealt by the player and from players healing each other.
Spells with cast times, e.g. White Mage’s Glare, snapshot at the end of the cast, whereas instant casts, e.g. Scholar’s Ruin II, or any melee GCD, the damage snapshots on button press.
For example, if a Warrior uses Fell Cleave with Storm’s Eye (10% damage increase) on, but the buff falls off between the button press and the damage application, the Fell Cleave still does 10% more damage.
A more apt use of this knowledge is in regards to DoTs and HoTs.
Both of these types of abilities snapshot on cast, e.g. a 10% damage buff that expires in 1 second will still provide the 10% damage buff to the entirety of the DoT, but gaining the buff after the DoT has been cast will not retroactively affect the DoT’s damage, even if it still ticking on the boss. DoTs under buffs and other various buff snapshotting is a basis for optimisation.
[Timeline Example]
Aggro Snapshotting ★★★
Unlike damage and position snapshotting, aggro is snapshotted when the castbar starts. Once a boss starts casting an attack, it has already decided its target, and there is no way to change that. If a DPS is being targeted with the tankbuster, tough luck. Even if the tank gains aggro before the castbar finishes, the original target will still be hit with the attack.
This means that it’s very important to have aggro of the boss before tank busters even start casting. However, this also means that you can provoke the boss during a castbar if you want aggro after that cast, and the target of that cast will not be changed (i.e. a Tank swap)
Instant Cast Attacks & Multi-hit Attacks ★★★
As a rule of thumb, instant cast attacks (no cast bar) will snapshot positioning, damage, and aggro all at once, and will do so right before the animation of the attack plays. Once the animation starts to play, it’s too late to make any changes. There are of course many exceptions to this rule but this is the general behavior.
Multi-hit attacks, namely Bahamut’s, Golden Bahamut’s, Midgarsormr’s, and Shiva’s (and other’s) Akh Morn tend to follow this rule as well.
The first hit of the attack has a castbar, and thus follows standard castbar-based snapshotting. Every hit after is treated as its own instant cast, and thus changes like buffing or debuffing the boss or swapping aggro will then affect the following hits of the attack.
Exceptions ★★☆
While it’s a good rule of thumb to now believe that everything is snapshotted, there are a few exceptions.
In the case of life or death, HP is never snapshotted - if Shiva’s Absolute Zero does 100k damage and its castbar ends when the player has 50k HP, they will not die as long as they get healed to 100,001 health before the damage is applied.
In a related way, Holmgang is not snapshotted either. As long as a Warrior has holmgang active when the damage is applied, they won’t drop below 0 health (with some exceptions).
Monk’s Riddle of Earth also works like this. As long as the buff is on the player’s buff bar when they take damage, they will gain Earth’s Reply. I believe that Samurai’s Third Eye also works like this, although I don’t play Samurai so I cannot confirm.
Untargetable Entities ★★★
In FFXIV, enemies can only commit to one action at a time.
But sometimes a boss will cast a spell, and the effects will happen later on (remember E2S Voidwalker’s spell-in-waiting?) or the effects continue while the boss goes on to do something else. If there are multiple things going on, the sources of these extra effects are likely some invisible, untargetable entity. And if one of these spooky ghosts are doing the action, usually it means standard mitigation debuffs like Reprisal do not work.
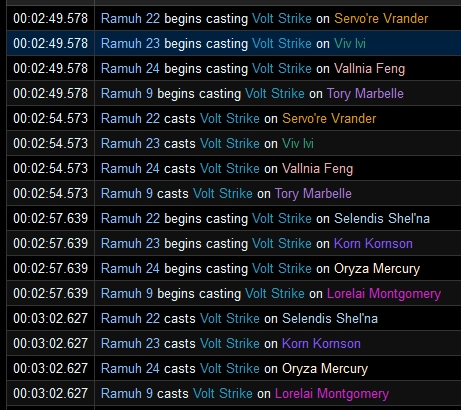
For example, in Ramuh’s Thunderstorm, players are targeted with AoE circles called “Volt Strike” that deal moderate damage, but these attacks are sourced offscreen (through invisible Ramuh clones casting). It’s recommended to prioritize using “player buffing” mitigation in times like these (e.g. Bard’s Troubadour, Scholar’s Sacred Soil, Warrior’s Shake it Off, etc. )
In the most recent raid tier, there have been exceptions to this rule.
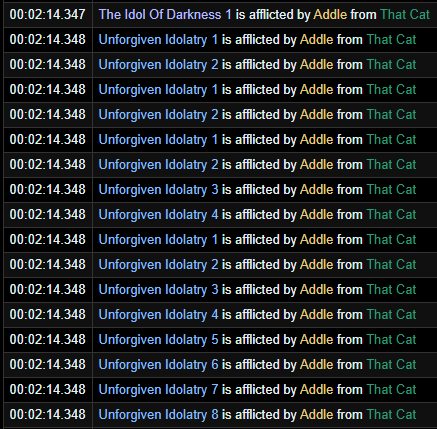
Casting Addle or Reprisal on E7S Idol of Darkness will actually copy this debuff to the unseen invisible entities and therefore actually reduce the amount of damage taken in mechanics like Betwixt Worlds or the colored portals.

Invincibility
Rez Immunity ★★★
As of patch 5.3, rez immunity is now a visible buff called “Transcendent”. However, the rest of this section should still remain accurate!
When any player is revived in a raid, they have an invisible buff that the community calls “rez immunity”, which makes them immune to almost all damage for about 5 seconds.
However, performing any action (GCD or oGCD) will instantly remove that buff. When you get resurrected, you shouldn’t perform any actions until you get healed, or you are sure that it’s safe and that you won’t take lethal damage soon.
If a player gets resurrected right before a stack mechanic, they can stand in the stack even if they don’t get healed, reduce the amount of damage their party members take, and take 0 damage themself.
For healers, don’t stress too much about immediately healing people who take your raise right before raidwide damage, since they should be invulnerable and take 0 damage. But note that rez immunity does not apply to players resurrected by Healer LB3.
It is a common misconception that moving or receiving healing will remove rez immunity. This is not true! Only actions will remove it.
Additional Effects ★★☆
In some cases, when a player takes 0 damage from a mechanic, they will not suffer the other effects of the mechanic. An example of this is O8S God Kefka’s tankbuster, Hyperdrive. When taken normally, it gives the tank a mild bleed, but if the tank takes 0 damage from the buster, they do not get the bleed either.
However, most mechanics will apply their additional effect no matter what, such as E8S Shiva’s tankbuster, Double Slap, and its physical resistance down debuff. This also applies to mechanics that don’t do damage, such as E8S Shiva’s gaze mechanic, Undress.
There have been times in the past where this was an intended mechanic. A5S Ratfinx Twinkledinx will charge a party member and deal a small amount of damage and apply Enervation, which increases damage taken and decreases damage dealt, but taking 0 damage will avoid the debuff entirely.
.gif)
.gif)
Knockbacks are a particularly common additional effect that almost always will apply even when taking 0 damage.
If a player resurrects right before the cast resolves, they will get knocked back. Resurrecting locks the player where the raise was casted in place for a small amount of time, so they will likely immediately get knocked off the arena.
Be cognizant of upcoming mechanics and only take resurrections when safe.
Invincibility Exceptions ★★☆
Some damage will go through rez immunity or other invincibility skills.
Although often attributed as a property of Darkness damage, that is not the case. Instead, some attacks arbitrarily go through rez immunity and some do not.
A recent example of this is that popping the dragon head in E8S will do damage to you through Gunbreaker’s Superbolide, which is extremely dangerous given that Superbollide puts the Gunbreaker at 1HP.
[Dying to dragon head with Superbolide on]
Server Ticks
Basics ★★★
In FFXIV, every unit (players, bosses, adds, etc.) has an internal timer that is called a “server tick” or “actor tick”.
These occur every 3 seconds. Damage from DoTs, healing from HoTs, and other effects are applied or removed on those ticks. If a DoT says “50 potency” and lasts 30 seconds, this means that it will deal 50 potency every 3 seconds, for a total of 500 potency.
The timer on these ticks vary from unit to unit. This means the time when enemy A takes damage from my DoT will be different from the time enemy B takes damage from my DoT, but both enemies will be taking damage in 3 second intervals.
Ground AoEs ★★☆
The term “server tick” is also generally used when talking about ground AoEs with additional effects. This can both be friendly, like Scholar’s Sacred Soil, or deadly, like UCOB’s version of Liquid Hell.
When a player walks into range of one of these AoEs, their respective buffs and debuffs are not always instantly applied, but instead can take up to three seconds. Friendly ground AoE buffs have a lingering effect, and players keep the buff for about 5 seconds after leaving the AoE.
For friendly AoEs, most of the time this isn’t a huge factor. This is because in Stormblood, Square Enix introduced a change where friendly AoEs instantly apply their buff to players who are standing in the AoE when it is created.
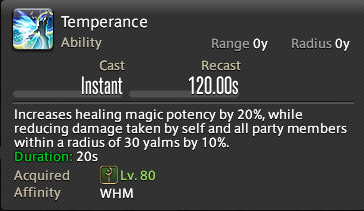
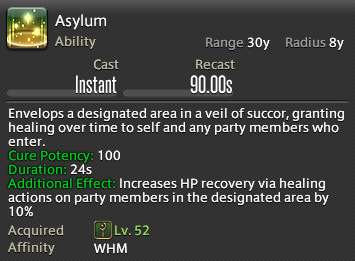
For example, players now will instantly receive Passage of Arms when standing behind a Paladin as they use it, whereas previously players needed to stand in it for up to 3 seconds. Friendly AoEs that behave like this include Sacred Soil, Collective Unconscious, Passage of Arms, Asylum, Temperance.
Enemy ground AoE effects generally have the opposite behaviour as friendly AoEs, where they actually cannot apply their debuff effect immediately and instead take a few seconds to become activated.
A general exception to this rule is that death zones, like E6S Garuda’s Vacuum Slice, will instantly kill you if you go inside them.
Damage Properties
Special thanks to Perchbird for help with this section!
I want to note that this section doesn’t exactly reflect what’s going on under the hood in FFXIV’s engine, but is generalised in a way that is simpler and still accurate for raiders.
Damages Types ★★★
In FFXIV, all damage falls into exactly one of three types:
- Physical
- Magical
- Darkness (also known as Breath)
In addition, physical damage is split into the following subtypes:
- Blunt
- Piercing
- Slashing
The purpose of damage types is that certain buffs and debuffs increase damage taken or given only of a specific type.
More specifically, certain buffs (e.g. Red Mage’s Embolden) and debuffs (Physical Resistance Down, Caster’s Addle) will only target either physical or magical damage.
Darkness damage is a unique enemy damage type. Only skills that mitigate all damage (Tank’s Reprisal, Scholar’s Sacred Soil) can mitigate Darkness damage, but luckily it makes up less than 10% of damage taken.
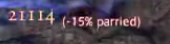
A special trait of physical damage is that only physical damage can be parried. If (-x% parried) ever appears on your screen, that means you took physical damage.
Unfortunately, there isn’t a straightforward way to figure out the damage type of an attack.
Generally, auto attacks and tank busters are physical and raid-wide damage is magical. Animations can be used to help guess damage types, but don’t always make sense either - Titan’s tumults, which consist of titan punching the ground, are magical damage, and Shiva’s auto-attacks, which look like a laser beam, are physical damage. Your best bet is that as mentioned above, if you see a parry it’s physical, and otherwise it’s magical, since Darkness is fairly rare.
[gif of titan tumults and shiva autos]
Outside of the game there are a few ways to determine damage type. FFLogs and ACT record damage types. In the “Damage Taken” section of FFLogs, it marks different damage types with different colors. In addition, Perchbird recently has been developing a tool for ACT that has similar behaviour for the damage taken text in game.
Note: If FFLogs cannot find the damage type it will default to showing Purple. This does not always mean the action deals Darkness damage. ACT will show the damage type as blank. If you are unsure about an action - ask around!
Other Stuff ★☆☆
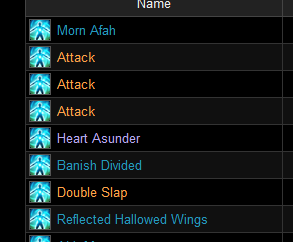
Sometimes, an attack will not follow standard damage calculation and instead will deal max health %-based damage.. Heart Asunder, which is the AoE attack in the adds phase of E8S, will always do 50% of each player’s max health as damage. Max health %-based damage is not mitigatable through normal means, and generally only reduced through shields.
[Gif of shiva adds phase or Eden’s Gravity]
Damage can also have an elemental aspect. This includes fire, water, earth, and so on, or simply be unaspected. This generally is a tell for a tank swap or a “spread out” mechanic. For example, Innocence applies a “lightning vulnerability up” debuff on his tank buster, and the tanks swap so that the tank with the debuff doesn’t take extra damage from his lightning aspected auto attacks.

Damage and healing calculations are not static, but instead have slight variance. Damage varies from 95% to 105% of the expected value, and healing varies from 97% to 103%. You can find the full damage formulas here. This is generally referred to as “damage variance” or “damage rolls”.
Attacks will rarely have peculiar special effects. An example of this is O8S God Kefka’s Heartless Archangel - this attack will set all players to 1HP and remove all HoTs.
Another example is O3S Halicarnassus’s Folio which has damage that ignores shields. These exceptions need to be learned on a case-by-case basis.
Terminology & Markers
Mechanic Terminology ★★☆
Knowing mechanic terminology from old fights is fairly important, since FFXIV very often recycles old mechanics and raiders who recognize this will use older callouts rather than new mechanic names. If you know how to handle these mechanics, progging future fights becomes a lot easier since you are already familiar with the movements.
| Name(s) | Description | Examples |
|---|---|---|
| Dynamo In |
A donut shaped attack, where the safe spots are directly under the boss or very far away from the boss | Lunar Dynamo (T9, Ruby Weapon) Radiant Sacrement (A12S, TEA) Phantom Rune [Blue] (Titania) Scythe Kick (E8S) |
| Chariot Out |
A circle shaped attack centered on the boss | Iron Chariot (T9, Ruby Weapon) Phantom Rune [Yellow] (Titania) Axe Kick (E8S) |
| Protean | An attack that targets party members with cones, originating from the boss. How this attack chooses which party members to hit depends on the mechanic itself. Differentiated from normal cone attacks (such as Bahamut’s Earthshaker) because Protean is almost always handled with party members spreading out into clock positions around the boss. |
Protean Wave (A3S, TEA) The Queen’s Waltz (O3S) Flamethrower (O11S) Shadow Spread (Hades) The Path of Light (E8S) The House of Light (E8S) |
| Earthshaker | Targeted cones on party members, often indicated through a very specific marker on a player’s head. Differentiated from protean mechanics because these generally target fewer players. |
Earthshaker (T13, O4S) Dark II (Hades) |
| Blighted Bouquet Acceleration Bomb Stillness |
A mechanic where if a player is moving or performing an action, they get punished. | Blighted Bouquet (T6) Extreme Caution (A10S) Acceleration Bomb (Ozma, O4S) Ordained Stillness (TEA) |
| White Hole | A mechanic where you have to be full health by the time it resolves | White Hole (O4S) Heartless Archangel (O8S) |
| NISI (Allagan) Rot |
A debuff that is passed between party members when they touch each other. Often has to be passed for a certain amount of time until it expires or is used to resolve a different mechanic. |
Allagan Rot (T2) Judgement Nisi (A4S, TEA) Aether Rot (O7S) Critical Underflow Bug (O12S) |
| Wild Charge | A line stack marker where the first person in the line takes more damage than the rest of the party, requiring tank cooldowns | Wild Charge (T10) Spear of Fury (Thordan) Terminal Antilight (O4S) Knockback Mirrors (E8S) |
| Twister | A mechanic that places some sort of AoE where players are standing, forcing everyone to move | Twister (T5, UCOB) Stepped Leader (E5S) |
| Colors | A mechanic that assigns one color to half the party and a second color to the other half. Requires members to do mechanics based on their color, often times getting hit by the other color |
Force Field (Sephirot) Antilight (O4S) Unjoined Aspect (E7S) |
| Enumeration | An aoe that targets players and requires a certain number of players to stand in that aoe to resolve it correctly. | Enumeration (A3S, TEA) Air Bump (E6S) |
| Haircut Left/Right Laser Sword |
An aoe that originates from the boss and targets one half of the arena. | Haircut (Calofisteri) Left/Right Laser Sword (A11S) Starboard/Larboard (O11S) |
| Exaflare | Circle AoEs that have a little arrow on them that indicate the direction the AoE moves. | Emptiness (O4S) Exaflare (UCOB, O10S) Dark Current (Hades) |
| Defamation | A humongous circle AoE centered on a player, indicated by a debuff on that player. | Defamation (A12S, TEA) Critical Overflow (O12S) |
| Shared Sentence | A stack marker centered on a player, indicated by a debuff on that player. | Shared Sentence (A12S, TEA) Critical Synchronization (O12S) |
Markers ★★☆
I was going to make a whole section on common markers, but I found a really good marker guide online here.
It covers nearly every marker in the game, and anyone who has raided for a while should recognize all these markers.
Unfortunately, marker language was not consistent until approximately halfway through Heavensward, so anything before then (level 60 and lower content) might have confusing markers.
Adjusting / Recovery
This section might honestly deserve its own guide - recovery is a subjective set of choices, unlike the objective properties of the game engine that compose the rest of this guide. But it is an extremely important topic so I’m going to try to at least cover it briefly in this section. The following is derived from my experience watching both PF groups and statics wipe on recoverable pulls.
Mechanic Targeting ★★☆
In FFXIV, most mechanics either:
- target all players
- target players based on role
- target players completely randomly
- target players based on distance.
Where this gets messy is understanding how mechanic targeting works when players are dead.
One option is that the mechanic will simply target the dead body. This is common when the mechanic targets all players.
[Stepped Leader on a dead body, or Iconoclasm color assignment]
Another option is that the mechanic will just completely ignore dead players. This is common when mechanic targeting is completely random or distance based, but occasionally happens when the mechanic is supposed to target all players
[Shiva House of Light or Akh Rhai]
A third is that the mechanic will choose its new target randomly. This often happens when a mechanic has role based targeting, but somebody from that role is dead. In some cases, players will have to fulfill two roles for a mechanic which can be a guaranteed wipe depending on the mechanic.
[Ramuh Chain Lightning with healer dead]
[Wyrm’s Lament with somebody dead]
[Light Rampant with someone dead]
Generally, there is no hard set rule for how mechanics work when people are dead. Understanding how each mechanic works for all players in the party is integral to preventing a wipe to a single death, as targeting makes it such that players might have to perform the mechanic slightly differently to succeed.
Saccing ★★☆
Sometimes, the only way to prevent a wipe is to sacrifice yourself (to sac). The simplest example of this is when a player receives a stack marker and not enough players are alive to safely resolve the stack. That player can then instead run away with the stack marker, solo it, and die, but keep the rest of the party alive.
Before you sac, you should consider the consequences of doing so. Healers should rarely sac, as having a dead healer makes recovering a pull much harder.
On the flip side, melee and physical ranged DPS don’t have as much responsibility and are usually free to sac if necessary.
This requires a deeper understanding of what mechanics are coming next and how they might be affected if a person of any given role is dead.
Limit Break ★★☆
Limit break (LB) is one of the strongest tools for recovering pulls. Unless the party is aiming to kill the boss and DPS LB3 is required for the kill, LB should be used liberally.
Healer LB3 is the most used and well-understood LB, often used in PUGs to recover near-wipes. Healers should have the awareness to recognize when it’s necessary to save only themself, let everyone else die, and then healer LB3 everyone back. Healer LB is the only LB where LB1 and LB2 are absolutely useless
[Healer LB3 after shiva mirrors]
Tank LB is the most underutilized LB and can absolutely save runs. Tank LB1 gives the party 20% mitigation for 10 seconds, Tank LB2 gives the party 40% mitigation for 15 seconds, and Tank LB3 gives the party 80% mitigation for 8 seconds. All three are incredibly powerful and should be used when healers are dead or otherwise occupied and cannot heal or mitigate the party for an upcoming attack.
Tank LB can also be used when messing up a mechanic in progression - the extra mitigation can let players live through failing a mechanic, and allow them to practice the upcoming mechanics.
[Tank LB Shiva Akh Morn?]
DPS LB is normally used to kill the boss, but more generally all DPS LBs are useful for meeting any specific DPS check to prevent a wipe. An example of this is adds phase in E7S Idol of Darkness. Early on in the fight, two adds who have to be killed at the same time spawn. In progression, my group would use ranged LB2 to ensure we had enough damage to kill them before they enraged. Generally, melee LB is for single target, caster LB is for AoE, and ranged LB is for a rectangle AoE if caster LB’s circle AoE cannot hit all the targets at once.
[Ranged lb on E7S adds]
Be aware of the animation lock when using any LB. Healers can rescue players out of animation lock.
[Any LB and then rescue]
Miscellaneous Information
This section is just stuff that I find interesting and might be cool to know.
Damage Propagation ★☆☆
You may have noticed that heals and damage are applied to party members one by one with a slight timing offset. In some cases, this can cause party members to die if being healed at the last second, because that player could receive damage first and receive healing last.
All damage, healing, and effects are resolved in order of closest to source to furthest from source. So if I cast an AoE heal, the person closest to me receives the heal first, and the person furthest from me receives it last. The actual exact distance from the source doesn’t matter, just the order of the players who are affected in relation to each other.
This shouldn’t be an issue 99% of the time, and if it is, that means you probably are in a recovery situation, or at the very least your healers should have healed you earlier. There is one workaround for this, where GCD heals can be instantly applied to all party members if you use any oGCD immediately after.
Acceleration Bomb ★☆☆
Recently there has been more investigation into how mechanics like Acceleration Bomb work. I saw it here and I will update this section with a link to the Allagan Studies post once it is completed.
I still recommend not attacking at least a full second before the mechanic resolves, and to spam escape so that you deselect the boss and don’t accidentally auto attack it.
Gaze Mechanics ★☆☆
Gaze mechanics are those where you get punished (stunned, petrified, etc.) if you are looking at the boss when it resolves. Because you have to be facing a unit to attack it, so depending on timing it can be difficult to keep good GCD uptime on a boss casting a gaze mechanic.
Specifically, casters can have problems, since everyone else can instantly turn around after using an attack whereas casters have to keep looking at the boss while casting.
However, there is a workaround for this where you can turn your character partially away from the boss and jiggle your camera while casting, giving you full casting uptime while dodging the gaze mechanic.
The video is here but I want to emphasize that this isn’t completely foolproof, especially at higher ping, and it’s possible for unfortunate timing to cause you to still get punished, so I would avoid using this kind of trick in riskier scenarios like the holy gaze mirrors in E8S.
Healing Buffs ★★☆
Buffs and debuffs that increase or decrease outgoing healing do not affect any oGCDs.
For example, White Mage’s Temperance increases GCD healing by 20%, but will not affect Tetragrammaton at all.
However, buffs or debuffs that increase or decrease incoming healing affect all healing, so something like Asylum which increases healing received by 10% will make Tetragrammaton 10% stronger (if the target is standing inside the asylum).
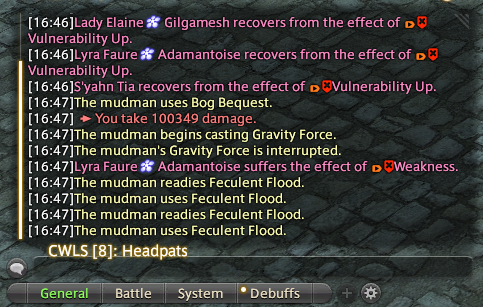
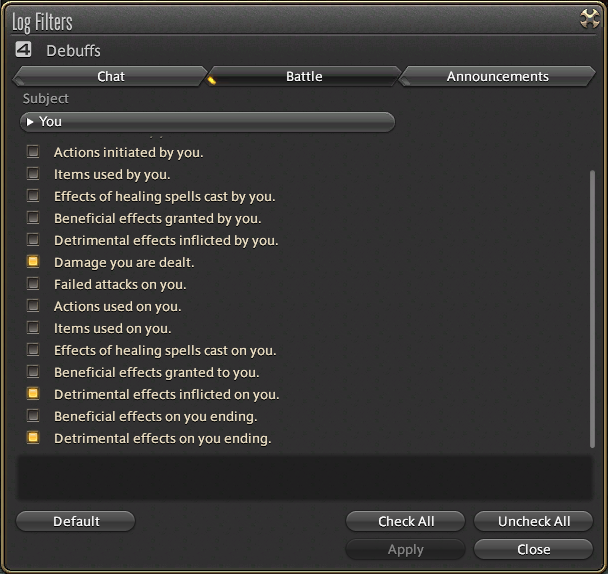
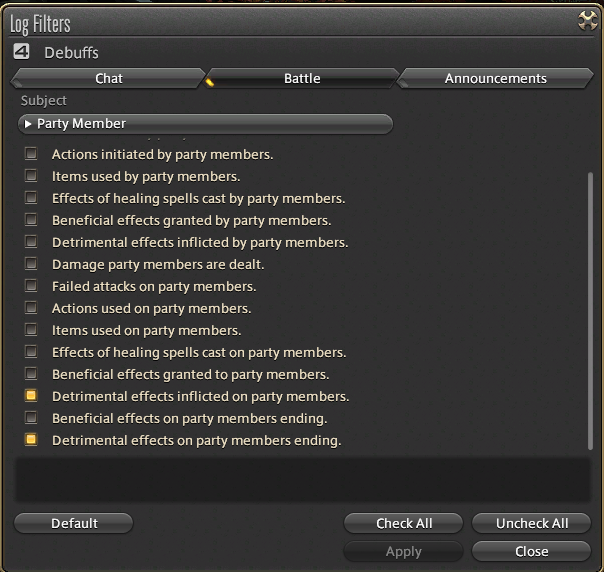
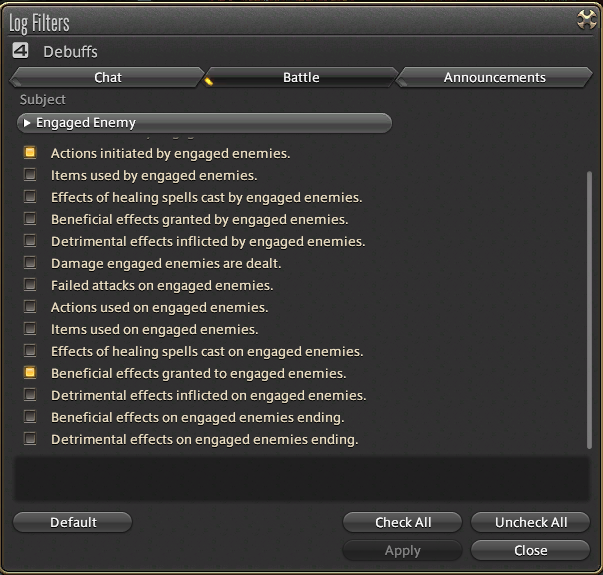
Battle Log ★☆☆
You can set up a chat filter to become a battle log that only displays damage you receive.
This makes it easier to understand how you die and therefore understand how you wiped.
The following images show the settings I use for my personal battle log, but you can change the settings to whatever you find is the most useful.
Lag ★☆☆
Sometimes this game’s netcode just straight up breaks. FFXIV is basically as sturdy as a house of cards and occasionally there’s just weird shit. A thread of example clips can be found here.
Still, I highly recommend you to never blame any wipes on lag, except in the most obvious examples such as when dead bodies slide across the floor or when everybody on your screen freezes for at least a few seconds.
[If anyone has a clip of a dead body sliding around let me know!]
Useful Links
Comfy Guide for Sprouts by Stal
Melee Uptime Optimization Guide by FFXIVMomo
Healer Optimization Guide by FFXIVMomo
Guide to Universal Markers in Final Fantasy XIV by ???
Gaze Attack Wiggle Trick by Ilya
Closing Notes
Thanks for reading this far! As you can tell from this document, FFXIV has a crazy engine full of random exceptions, exceptions to those exceptions, and so on.
At the end of the day the best way to get better is to play a lot and get accustomed to its quirks.
As always, I’m open to any and all feedback for this doc, and you can reach me on Twitter and Twitch.
Special thanks to:
- Perchbird for answering my questions on damage types
- Vaf for formatting and editing
- Mikage, Myta, Anchii, Nawa and Momohime for help getting footage
- Clees, Matai, and Crem for overall feedback
- Nemekh for having the guide hosted on AkhMorning!
If you’ve got any clips that better illustrate the points I’m trying to make, please feel free to send them to me. The clips currently in the guide are mostly from me and my rudimentary video editing skills.
TL;DR: FFXIV netcode sucks, everything on your screen is a lie.
Change Log
06/05/2021: Removed Monk’s mention in the line discussing damage type specific buffs. Monk Brotherhood is +5% to all damage as of 5.4 09/08/2020: Release