Authors
Hello! I’m stal~
I stream FFXIV on Twitch, from chill content to end-game raiding. I tend to get many questions from new players who have been curious about FFXIV for the longest time… and this happened! Sometimes the game gets really overwhelming for a new player so hopefully this helps. Please feel free to share this around as well!
This guide is mainly for new players (and for those in chat, hi friends) who want to know more about the basics of the game.
Do note that this is not a guide for higher level players! I can’t go through every single detail, but it does cover questions that have been asked all the time and basic tips that I personally feel will be very helpful for a newcomer.
A huge thanks to Q for writing this guide with me, Bokchoy (Twitter, Twitch) for being such a huge inspiration and Twitch chat for always being so supportive of my decisions!
If there are any questions or suggestions, you can DM any of us on Twitter or Twitch.
Q: What Is A ‘Sprout’?
A: It’s short for newcomers because you have a sprout icon next to your name.
A Comfy Guide for Sprouts (2021) Video
Introduction
This guide will be divided into three parts that will help you immensely while getting through the game:
Whether you have played a MMORPG in the past or not, this guide will definitely save you some time in figuring out many aspects that the game will subtly hint or never tell you, especially if you tend to skip tutorials and dialogues.
Before I begin: FFXIV has a trial version that is completely free to play until level 60, Patch 3.56. Unfortunately, there are certain limitations but it’s free so why not?
However, please take note if you’re downloading the trial from Steam or PC version as you can’t swap between the both. More information about that can be found below.
Frequently Asked Questions
From most frequently to not so frequently but still popular questions.
What class/job should I play?
Many players tend to get worried about what job they should start out since in some MMORPGs, certain jobs are deemed unviable in the game. My answer to that will be: Play whatever that interests you.
Fortunately for us, you can change jobs at any time after completing a certain amount of class quests. If you’re worried about completing quests solo or raiding at end game, you will be happy to know that every job is viable. There is a meta (like in every game) but generally, it is only important in high level gameplay where you want to maximise your damage. When it comes to simply clearing content and playing the game, it really doesn’t matter.
FFXIV is built on the Holy Trinity, which means there are three main roles: Tank, Healer and DPS. After choosing a class and going through the game, you will be able to obtain a Soul Crystal which unlocks an upgraded version of your class, also known as jobs. This requires the completion of your level 30 class quest and a main scenario quest, ‘Sylph Management’.
If you are unsure of what to play, decide which role you are interested in and branch out from there. Here is an introduction of the roles, jobs and their individual playstyle.
Note that certain classes will be unavailable unless you have access to the expansions and areas in ‘Heavensward’, ‘Stormblood’ or ‘Shadowbringers’.
The Starter Edition now includes both the base game and Heavensward.
Purchasing Shadowbringers will grant you access Stormblood.
 Tanks
Tanks
You lead the party and make sure the boss is always on you, while mitigating damage and supporting your party with certain abilities and cooldowns to ensure survival. Tanks are able to dish out decent damage as well.
In a dungeon setting, tanks are expected to lead the group and set the pace at which the dungeon is done. In a raid setting, tanks play one of two roles in a party: the Main Tank (MT) and Off Tank (OT/ST). Main tanks pull the boss and hold it until a tank swap. Off tanks support the main tank and the party using their abilities. Main tanks are generally expected to hold the boss until a forced tank swap. Currently, any tank can be either MT or OT.
Tank swaps are when the OT takes over aggro of the boss from the MT. They are important because many bosses apply vulnerability effects through attacks, necessitating swapping until the original main tank recovers from the debuff. Swaps can also be used to allow both tanks to use their mitigation in turns, leading to reduced incoming damage.
It is also highly recommended that you take a look at the Combat Tips if you are interested in playing a tank. There is a small section about pulling mobs effectively in dungeons while establishing and holding aggro, something the game does not exactly teach you how to do.
 Paladin
Starts off as a Gladiator in Ul’dah and wields a sword and shield. Upon completing the class quest at level 30, Paladin will be unlocked.
Paladins have excellent offensive capabilities combined with strong defensive and support capabilities. Paladins are capable of healing (in emergencies), shielding, buffing the defenses of the entire team and even taking attacks for an ally. They have the unique ability to block with their shields. Their ultimate defensive skill is Hallowed Ground, which nullifies all damage taken for 10 seconds. Offensively, Paladin cycles between physical attacks and holy magic. The physical attacks from Paladins recover MP which can be spent to use powerful magical attacks.
 Warrior
Starts off as a Marauder in Limsa Lominsa and wields an axe. Upon completing the class quest at level 30, Warrior will be unlocked.
Warriors are simple but powerful tanks with high burst potential and strong sustaining capabilities through self-healing. Warriors have a buff which turns damage they deal into a heal for themselves and also a targeted ally. Warriors also have the unique ability among tanks to increase the strength of incoming heals. Their ultimate defensive skill is Holmgang, which prevents the warrior from dropping below 1 HP for 6 seconds. Offensively, warriors focus on building resources for huge burst phases and powerful attacks.
 Dark Knight
Players must have completed all quests up to ‘Before the Dawn’ and have access to the Heavensward expansion. You can play this in the Free Trial.
Dark Knight starts at level 30 and wields a great sword.
Dark Knights are tanks with both strong personal defensive capabilities and good offensive capabilities. Dark Knights have a powerful self shield and a magic mitigation ability, both of which have low cooldowns. If you’re looking for a tank that can take huge hits (especially magical ones) and shrug them off, look no further. Their ultimate defensive ability is Living Dead, which makes them unkillable for 10 seconds but requires them to be healed to full in that time. Offensively, Dark Knights are based around managing both their MP and gauge, both of which can be used for strong bursts of damage. Dark Knights have more flexibility in their rotations and can take advantage of buffs granted by their allies well.
 Gunbreaker
Players must have access to the Shadowbringers expansion and have a combat class at level 60.
Gunbreaker starts at level 60 and wields a gunblade.
Gunbreakers are fast-paced tanks with strong offensive capabilities while also having good defensive options. Gunbreakers build cartridges through attacking which can be spent on powerful combos and skills. They have lots of abilities to be used in between skills, so if you’re looking for a tank with an active playstyle Gunbreaker should suit you well. Their ultimate defensive ability is Superbolide, which reduces your HP to 1 but makes you invulnerable for 8 seconds. Gunbreakers are fun, fast-paced tanks that put out high damage and flow nicely.
 Healers
You keep everyone alive by healing and mitigating damage with shields. Unlike certain MMOs, healers can dish out decent damage and have no issues playing solo. There are two types of healers: Regen and Shield.
Regen healers are able to use multiple skills that have healing over time (HoT) effects. These skills heal for more HP and are more MP efficient overall compared to regular healing skills, but require time for the heals to work.
Shield healers, on the other hand, are preventative healers that shield and protect the party from incoming damage. These shields are not related to the HP pool, meaning with shields, the player’s maximum HP is temporarily increased. Shields generally heal for lesser and cost more MP as compared to their HoT counterpart. However, they are very useful in situations where only by having shields would a player survive a high damaging hit.
 White Mage
Starts off as a Conjurer in Gridania and wields a wand or cane (no stats difference). Upon completing the class quest at level 30, White Mage will be unlocked.
White Mages are considered as Regen healers and have the highest raw healing output of all three healers. Overall, they are good at reactive healing and recovering from blunders.
They are the easiest healer to pick up with their straightfoward offensive and healing skills which can be supported even further by consuming Lilies from the Healing Gauge. However, they do not provide as much party utility as compared to the other two healers.
 Scholar
Starts off as an Arcanist in Limsa Lominsa, wields a book and is able to summon pets. Upon completing class quest Forgotten but Not Gone at level 30, Scholar will be unlocked. Additionally, Summoner (DPS) will be included after completing the class quest, Austerities of Flame.
Scholars, though mainly known as Shield healers, can also summon pets to aid them. These pets can can be controlled and have access to skills that provide the Scholar with additional healing and buffing options. Having to manage both character and pet, the scholar has a high skill ceiling and will take time and practice to master.
The Scholar works well together with a Regen healer; as the scholar provides damage boosting buffs and strong instant heals while supporting the Regen healer with pet healing and shields.
 Astrologian
Players must have completed all quests up to ‘Before the Dawn’ and have access to the Heavensward expansion. You can play this in the Free Trial.
Astrologian starts at level 30 in Ishgard and wields a star globe.
Astrologians have the choice of playing as the Regen or Shield healer, as they have sects (stances) that allow them to switch between the roles. These sects can only be changed when the player is not in combat, thus it is important to pick a sect that will synergise well with the co-healer.
The gameplay of an Astrologian revolves a lot around using cards to buff the party. The process of drawing cards is based on luck which gives the player multiple options to choose from. When used correctly, these buffs can be very potent.
Astrologian might be difficult to optimise due to the number of possible scenarios, but it rewards the player immensely when played efficiently.
DPS
You deal damage and occasionally have buffs to increase the party’s damage output. It is also possible to mitigate some damage as a DPS. This will be split into three categories:
 Melee DPS
You get up close and personal with the boss. All melees will have to deal with positionals which relies heavily on where and how the boss is being tanked.
More information on positionals will be listed in the Combat Tips, and it is highly recommended that you check it out.
 Monk
Monk
Starts off as a Pugilist in Ul’dah and wields fist-assisting weapons such as claws, knuckles etc. Upon completing the class quest at level 30, Monk will be unlocked.
Despite having average utility, Monk is an extremely high personal damage output job at the price of its strict placement and positionals.
At max level, the playstyle is focused on various stances, forms and managing stacks that increases their damage and speed. This speed increase makes Monk one of the fastest paced jobs in the game.
Different forms will allow you to perform different skills. After executing certain skills, the player will gain Greased Lightning stacks which can be either held on to or used on various skills.
 Dragoon
Starts off as a Lancer in Gridania and wields a spear. Upon completing the class quest at level 30, Dragoon will be unlocked.
Dragoon has a very strict rotation to follow while focusing on their main skill: Jumps. They pull a high personal damage but bring an average damage utility for the party. There are not too many positionals for Dragoons as well. It is generally easy to pick up and considered as a pretty straight forward job.
 Ninja
Ninja
Starts off as a Rogue in Limsa Lominsa and wields daggers. Upon completing the class quest at level 30, Ninja will be unlocked.
Note that Rogue is not available through the initial character creation, and is only unlocked after completing a level 10 class quest. If the class you have initially picked is not in Limsa Lominsa, you will have to complete the level 15 Main Scenario Quest that will bring you around Eorzea. After doing so, there will be a blue quest marker in Limsa Lominsa opposite the Fishing Guild (X8:Y16 on the map).
Ninja brings the highest utility to the party as they are able to boost raid damage significantly. Similar to Dragoon, they do not have many positionals but they deal damage in short bursts. At max level, the playstyle is focused on ‘Mudras’ which are similar to seals that casts different skills depending on the combination, and managing various timers. You can summon a frog at higher levels so it’s basically Naruto.
 Samurai
Players must have access to the Stormblood expansion and have a combat class at level 50. Samurai starts at level 50 in Ul’dah and wields a katana.
Samurai excels at personal damage output but lacks utility. They have a strict rotation and few positionals to deal with. At max level, their focus is to build ‘Kenki’ to perform certain skills, and accumulate ‘Sen’ to cast abilities. It is important to note that those abilities have a cast bar which is similar to casters, although there are only three of such abilities.
 Physical Ranged DPS
You attack from a distance and it is essentially similar to a support DPS by providing buffs and mitigations.
 Bard
Bard
Starts off as an Archer in Gridania and wields a bow. Upon completing the class quest at level 30, Bard will be unlocked. Additionally, the ‘Perform’ feature will also be available. This can be unlocked by talking to Simpkin in Old Gridania (X10.4:Y8.4).
Bard is a damage over time (DoT) class that requires the player to keep up certain songs, buffs and DoTs that provide sustainable damage, while being aware of other buffs that are used across the raid. Using various songs and skills, Bards are able to increase the party’s damage and provide mitigation.
 Machinist
Players must have completed all quests up to ‘Before the Dawn’ and have purchased the Heavensward expansion. You can play this in the Free Trial. Machinist starts at level 30 and wields a gun.
Machinists deal high damage in short bursts and the player has to manage a ‘heat gauge’ while being able to manipulate it according to the fight and its damage output. Similar to Bards, they are able to provide mitigation. However, they lack the ability to increase the party’s damage.
 Dancer
Players must have access to the Shadowbringers expansion and have a combat class at level 60. Dancer starts at level 60 and wields chakrams.
Dancer provides high damage utility for the party but has a low personal damage output. They focus primarily on their dances, managing an Esprit gauge and obtaining procs known as Fourfold Feathers.
Through their dances (which plays like mini DDR), they are able to provide buffs for the party and an individual which will be chosen as the Dance Partner. Although Dancer is a ranged job, there are instances where it is required to be in melee range to inflict damage.
 Magic Caster DPS
You cast spells from a distance to deal damage. Unlike other MMORPGs, elemental damage is not a thing in FFXIV.
 Black Mage
Starts off as a Thaumaturge in Ul’dah and wields a staff. Upon completing the class quest at level 30, Black Mage will be unlocked.
Similar to Samurai, Black Mages deal a significant amount of damage but lacks utility. This comes with a huge restriction in movement due to its long cast bars, although it is made easier by certain skills and the long cast bars can be sped up by various buffs. It requires optimisation and knowledge of the fight to perform at its peak.
 Summoner
Starts off as an Arcanist in Limsa Lominsa, wields a book and is able to summon pets. Upon completing the class quest, ‘Austerities of Flame’ at level 30, Summoner will be unlocked. Additionally, Scholar (Healer) will be included after completing the class quest ‘Forgotten but Not Gone’.
Summoners deal damage by casting DoTs and spells alongside their pets. It mainly revolves around utilizing Aetherflow stacks by using skills, entering various Trances and managing pets. As such, they do damage in cycles. Summoners are also able to resurrect players in combat.
 Red Mage
Players must have access to the Stormblood expansion and have a combat class at level 50.
Red Mage starts at level 50 in Ul’dah and wields a rapier.
Red Mage is a unique caster as its playstyle involves both casting and melee attacks. Most of the time, they cast spells to balance their Black and White mana. After reaching a certain amount, they are able to deal melee combos before going back to the casting side of things.
The playstyle is heavily reliant on the concept of Dualcast, which means upon casting any spell with a cast bar, the next spell is instant. Red Mages are able to heal and resurrect players in combat, although healing is only done in emergencies or during downtime in order to gain the Dualcast buff.
 Blue Mage [Limited Job]
Players must have completed all quests up to “The Ultimate Weapon” and have a combat class at level 50.
Blue Mage starts at level 1 in Limsa Lominsa by completing the quest Out of the Blue, and wields a cane.
This is a ‘Limited Job’, which means it is unable to do certain content. More information can be found here.
Do Race, Patron Deity and Eorzean Calendar matter?
No, they do not. Although each Race has different stats, you’re better off picking whichever you want to play since the difference is so minimal. Same goes for the Deity, elemental resistance has almost no impact on gameplay so feel free to pick whichever looks good. Eorzean Calendar is similar to birthdays, so that doesn’t mean anything either.
Should I play it on Steam or PC?
Honestly, it’s up to you. However, if your trial account is on Steam, you can only register the full game via Steam. This is because your account is locked to Steam. If you buy a PC key, you have to make a new account. This also applies to current and future expansions. The good news is you can use your Steam wallet to pay for Mog Station items and subscription. Many players tend to advice against the Steam version due to discounts on the PC version and such, but like I said it is entirely up to you. If the game launches, all is good!
Which region, data center or server should I join?
A quick crash course if you are confused about data centers and servers. Every region has a certain amount of data centers to choose from, and in each data center, there will be a good amount of servers. With the addition of World Visit, you can visit other players who are in the same data center as you regardless of your server but there are certain restrictions. However, you cannot visit other players from a different data center. More information about World Visit can be found here.
It depends on where you live. If you live in NA, EU or JP regions, then it’s pretty straight forward. However, if you’re living anywhere else like SEA or Oceania, then pick the one closest to you. Ping does matter in this game, especially if you plan to get into raiding. Usually, our Australian friends will pick either NA or JP region and our Middle Eastern friends will pick EU, but that depends if you can fit into the time zones as well.
To Check Your Ping
- Do Windows + R and type cmd
- Type in ping [IP Address] without the brackets
IP Addresses of each data center can be found here.
If you have any friends playing the game, I would say just pick the same data center and server so you can play together. If all of you are new or you’re playing solo, it depends on what you’re interested in. There are also recommended servers if you would like to hang out with your fellow country friends, which I will list below.
NA Data Centers
- Aether
- Crystal
- Primal
If you’re into raiding, Aether might be what you’re looking for. I think Primal is pretty similar as well, but a thing to note is the server ‘Behemoth’ has many Australian and Brazilian players. Crystal is more on the RP side of things. With that being said, it doesn’t mean that you can’t raid if you’re on Crystal. It’s just that Aether is more raid focused. For our Australian friends, do take note of the timezone difference before deciding between NA and JP especially for those planning to raid!
EU Data Centers
- Chaos
- Light
If you’re interested in raiding, maybe try Chaos. I’m not exactly sure if I can say Light is more RP focused but my point still stands: you can raid on any data center. EU has multiple languages going on so there are certain servers that will be more suited for you depending on your first language.
This is what I have gathered from players in EU. For our German friends, the server ‘Shiva’ has the most German players. For our French friends, the server ‘Moogle’ will be more suited for you. For our Russian friends, the server ‘Cerberus’ has a good population size. Lastly, for our Spanish and Middle Eastern friends, the server ‘Ragnarok’ will be a good fit. Unfortunately, I do not play on EU much so I’m not sure if anything has changed.
JP Data Centers
- Elemental
- Gaia
- Mana
If you’re reading this guide, you’re probably an English player so pick Elemental. The biggest English server on Elemental is Tonberry, followed by Kujata and maybe Ramuh/Typhon. If you’re unable to join Elemental, try Mana. Masamune has some English players as well. Language barriers do exist in JP servers, but eventually you will be able to understand the basics. You will be glad to know that JP players are mostly very courteous and kind as long as you don’t do stupid things to make them upset.
What’s The TL;DR?
First, choose whichever region is closest to you. Next, pick the data center based on your priorities in this game. Lastly, for the server.. if you’re not looking for one that mostly speaks your first language, I guess you could just wing it. If you have friends, consider following them.
Controller or Keyboard/Mouse?
It’s just a matter of preference. Controller users can be as good as keyboard users and vice versa. A mouse makes it easier to navigate things but that doesn’t mean you will do worse on a controller. Just use whichever you’re comfortable with.
Can I just use a level boost/jump pot or skip the MSQ?
Yes, you can. You need to purchase it from the Mog Station and it is quite expensive. Generally, I do not recommend buying it if you are new so you can familiarize yourself with the game.
If you are still interested, there are a few variations listed:
- Job level boost to 70 at $25 per job. (Level cap is 80 as of Shadowbringers)
- A Realm Reborn (the base game) MSQ skip at $11.
- A Realm Reborn + Heavensward MSQ skip at $18.
- A Realm Reborn + Heavensward + Stormblood MSQ skip at $25.
It is highly recommended to use both level and MSQ pots if you really intend to do so. Although, you have to do the Shadowbringers MSQ yourself.
The MSQ skip does include unlocking necessary Aetherytes and such. However, anything not included in the MSQ will not be unlocked including dungeons, trials and raids.
More information can be found here.
Beginner Tips
If possible, please try to read through all of it. I promise it will be helpful!
You Must Do All MSQs
Newcomers tend to get side tracked or lost (like myself). Just make sure you’re completing every MSQ to progress through the story.

Pick up some side quests and do dungeons
Your first dungeon will be unlocked at level 15.. You might get locked out of a MSQ if your level is too low, and that does happen every now and then. It is recommended that you do some side quests on the way. It’s mostly going to be near your next MSQ, so you might as well do it to save yourself some time.
If you are sick of side quests, dungeons give relatively good EXP. The downside is if you are a DPS, your queues will be so long that you will opt for another option which I will talk about it soon.

Consider completing Feature Quests
Feature Quests tend to unlock other content ranging from dungeons, raids, new jobs and skills. It is highly recommended to pick up these quests, maybe with the exception of new jobs until you are at a higher level since it will take up space in your inventory and you might be overwhelmed. At least I was…

Complete your Class Quests every 5 levels + Hunting Log
Completing your class quests will give you gear and sometimes new skills. Most importantly, it unlocks the Hunting Log which gives you more experience if you kill whatever is stated in it.
This is a good way to get experience in your early levels, so be sure not to miss out on it. However, jobs unlocked from expansions do not have Hunting Logs available.
Do Not Attempt To Grind Mobs For EXP
Nope, it doesn’t work that way in this game. Don’t even try.
Unlocking Guildhests
Unfortunately, the game does not unlock guildhests through MSQ. Guildhests are small dungeons that gives decent EXP at low levels, especially in roulettes which I will touch on later.
Talk to the Levequests provider in your town’s Adventurer’s Guild to do one of the following side quests: Leves of Brentbranch (Gridania), Leves of Swiftperch (Limsa Lominsa) or Leves of Horizon (Ul’dah). After completing that, pick up the quest ‘Simply the Hest’ and finish that to unlock Guildhests. New guildhests will be unlocked by completing a lower level guildhest.

Hall Of The Novice
When you reach Level 15, you will gain access to the Hall of The Novice. Before unlocking your first dungeon, you will be led to the Hall of Novice. Talk to The Smith (NPC) to start the training.
There are several training exercises so just complete all of them. It does teach you the basics of the game but more importantly, you get gear and a Brand-new Ring that gives you +30% EXP gain while you’re under level 30. This will be useful for leveling your current and future jobs.

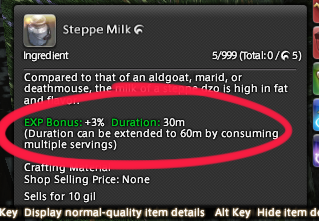
Eating Food in dungeons (and outside, if you want)
This is not a really huge thing but eating food does net you an additional 3% EXP. It doesn’t matter what it is and the NPCs along the way probably gave you a lot of food.
Don’t bother saving those for a later date since they are generally useless throughout the game.
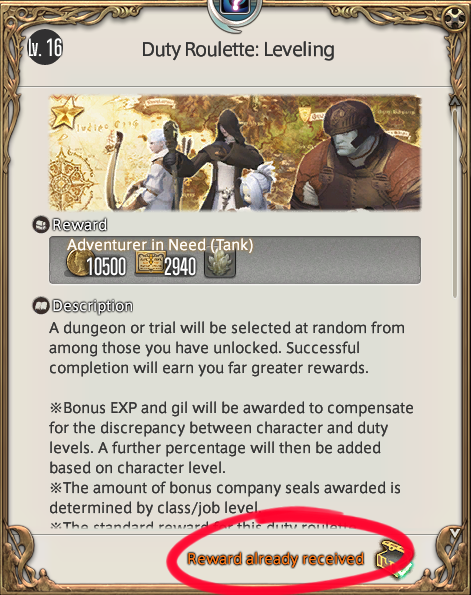
Complete Your Daily Duty Roulettes For EXP
Duty Roulette (DR) picks a random duty that you have unlocked and gives additional EXP and rewards. It is split into multiple categories such as Leveling, Trials, Guildhest etc…
This is one of the fastest way to gain EXP and it is highly encouraged to do it daily. However, you can only get the additional EXP and rewards once a day.
Daily reset is 12 AM JST/GMT+9 or you can just note the ‘Reward already received’ at the bottom right.
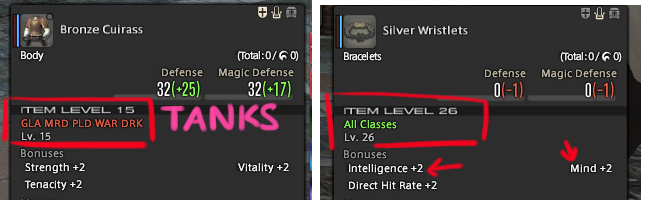
Only Item Level (and EXP Bonus Gear) Matters At Lower Levels
Many new players tend to get concern over what gear they are wearing because of the substats. Fortunately, you do not need to care about all of that for now. Just pick whichever has the highest Item Level (IL) with the correct main stats, or the one that gives you an EXP bonus. For example, the Brand-new Ring is IL 30 and gives 30% additional bonus while level 30 or under, so keep using it until the EXP bonus doesn’t apply to you.
Low level equipment (especially accessories) can be shared around, thus it is important to pick the correct main stat. Equipment will always show if it is specifically for Tanks, Disciple of War or Magic. Disciple of War consists of any jobs that do not use magic, including Tanks.
Naturally, Tanks will pick the gear meant for them. For accessories, pick those with the highest value on Vitality if any, otherwise Strength. As for Disciple of War or Magic, just make sure the correct main stat is on the equipment:
- Melee DPS except Ninja: Strength
- Ranged DPS and Ninja: Dexterity
- Casters: Intelligence
- Healers: Mind
Don’t Bother Hoarding Miscellaneous Items
They are generally useless until you start crafting and you might not even use it, so… just throw those items away or sell it to NPCs if you are really diligent. I hoard a lot of things when I was a new player and I can confirm that it is extremely useless!
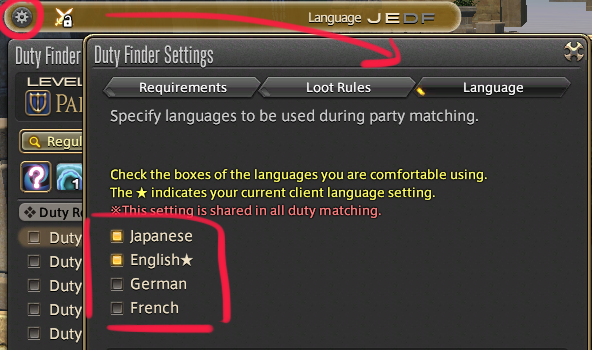
Set your languages in Duty Finder, especially in JP servers
The game will check the language your client is using. This means that if you’re using an English client, only the English option will be checked. If you intend to play in a JP server, there is no way you will be getting any queues for a dungeon for at least a couple of hours if you do not check that JP language. I must emphasise: Please do not be rude to our JP players.
Unlock Palace of the Dead (and Heaven on High) For Future Leveling
Before I start, I want to say this: Please do not use this to level your first job unless you desperately need EXP. This is especially important if you are unsure of how the jobs and/or the combat in FFXIV work.
Palace of the Dead (PotD) and Heaven on High (HoH) are quick “dungeons” that give a decent amount of experience. This is extremely useful for DPS since dungeon queues are pretty long. Since leveling is separated from other content, it is also a good way to experience a job at a higher level so you can see if you like the playstyle of it.
The downside is you are not able to fully learn how your class works because everything dies so quick. This is why I do not recommend newcomers to attempt PotD and HoH unless you really need some quick EXP.
The PotD quest, The House That Death Built, starts in New Gridania (X12, Y13.1), while the HoH quest, Knocking on Heaven’s Door, starts in The Ruby Sea (X6.2, Y11.7).
There are small story spoilers so I will not go into too much detail. More information about both PotD and HoH can be found here.
Hire A Retainer Or Two When You Can
Retainers are similar to banks where you can keep your items and gil. In FFXIV, we are able to hire two Retainers for free.
If you want more, you have to get them through MogStation. You can hire them in the main towns’ market area (Gridania, Limsa Lominsa and Ul’dah). Be prepared to spend some time because you can actually customize how your Retainer looks and you have to think of a name for him/her.
Try Not To Get Too Tempted By Crafting!
I know, it’s very enticing to try the new things. However as a new player, crafting will most likely eat up all your gil before you know it. If you really do want to try something other than combat, consider picking up gathering first! It’s useful since you can gather your own materials when you start crafting in the future, and you can sell it on the Market Board if you don’t need it. I don’t know about you but it sounds like a win-win to me.
“Glamour Is The True End-Game!”
Glamour allows the player to change the appearance of your gear. Basically, you don’t need to look stupid while doing fetch quests and fighting trees or something… You can unlock Glamour by being Level 15 and going to Vesper Bay in Western Thanalan. There will be two feature quests, If I had a Glamour followed by Absolutely Glamourous. The story will bring you there a lot so no need to worry about getting there on your own!
Manage your settings: Movement, HUD layout and key bindings
This is really up to preference and there is no right or wrong in whatever you want to do. It is also highly recommended that you get this over and done with so you can enjoy playing the game without feeling frustrated. Do note that this might take a while but it is totally worth it!
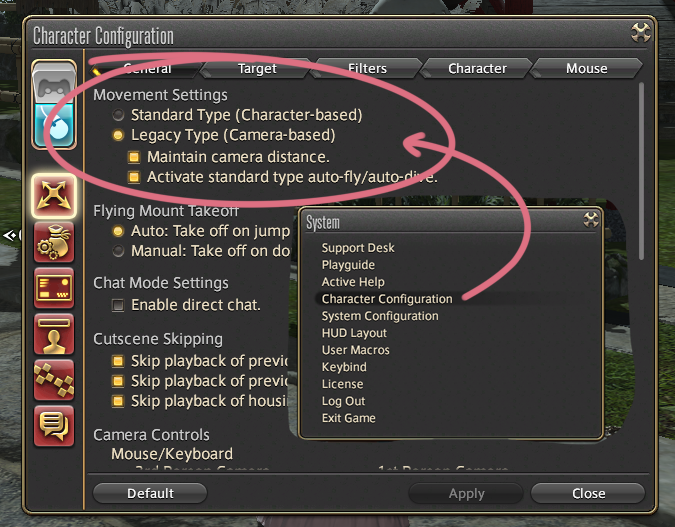
For movement settings, this game has Standard and Legacy type. It’s kind of weird to explain it in words so it’s best for you to just try it out yourself.
You can adjust it by clicking ESC > Character Configuration. Click the first red button on the left (Control Settings) and you should see Movement Settings. You can also make a bunch of changes to fit your playstyle!
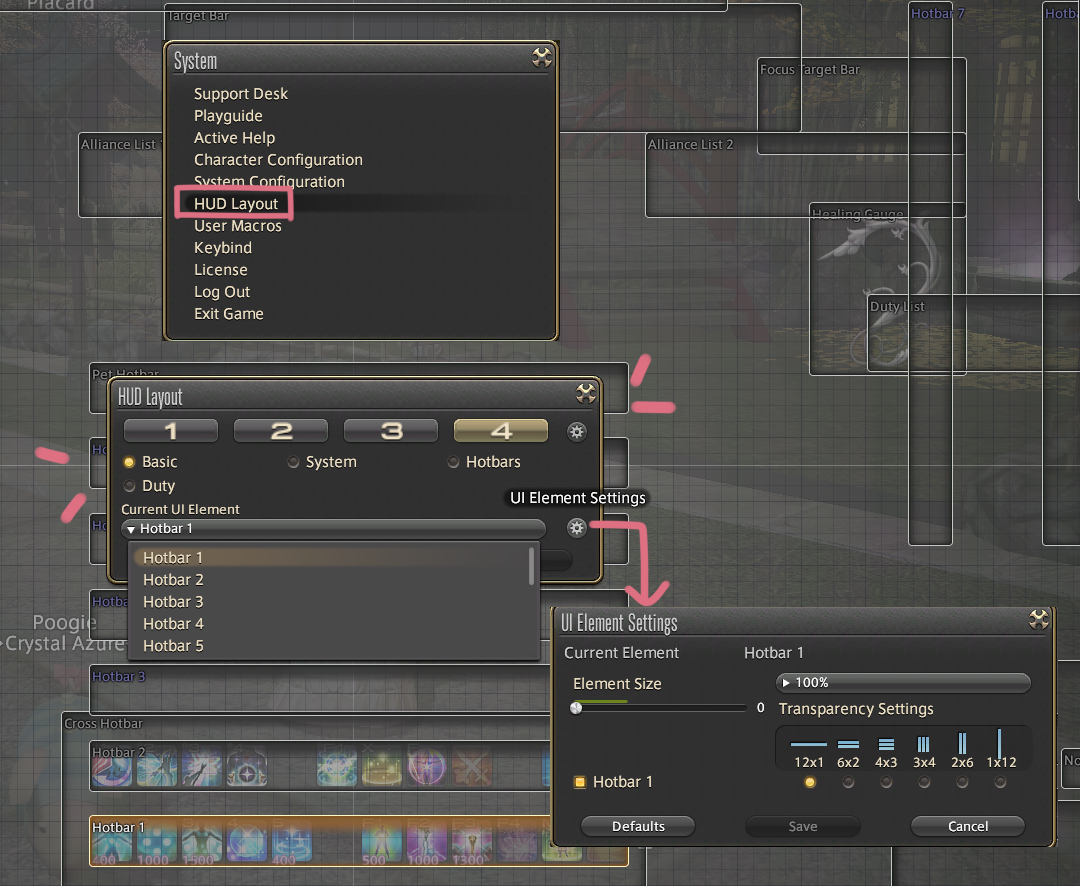
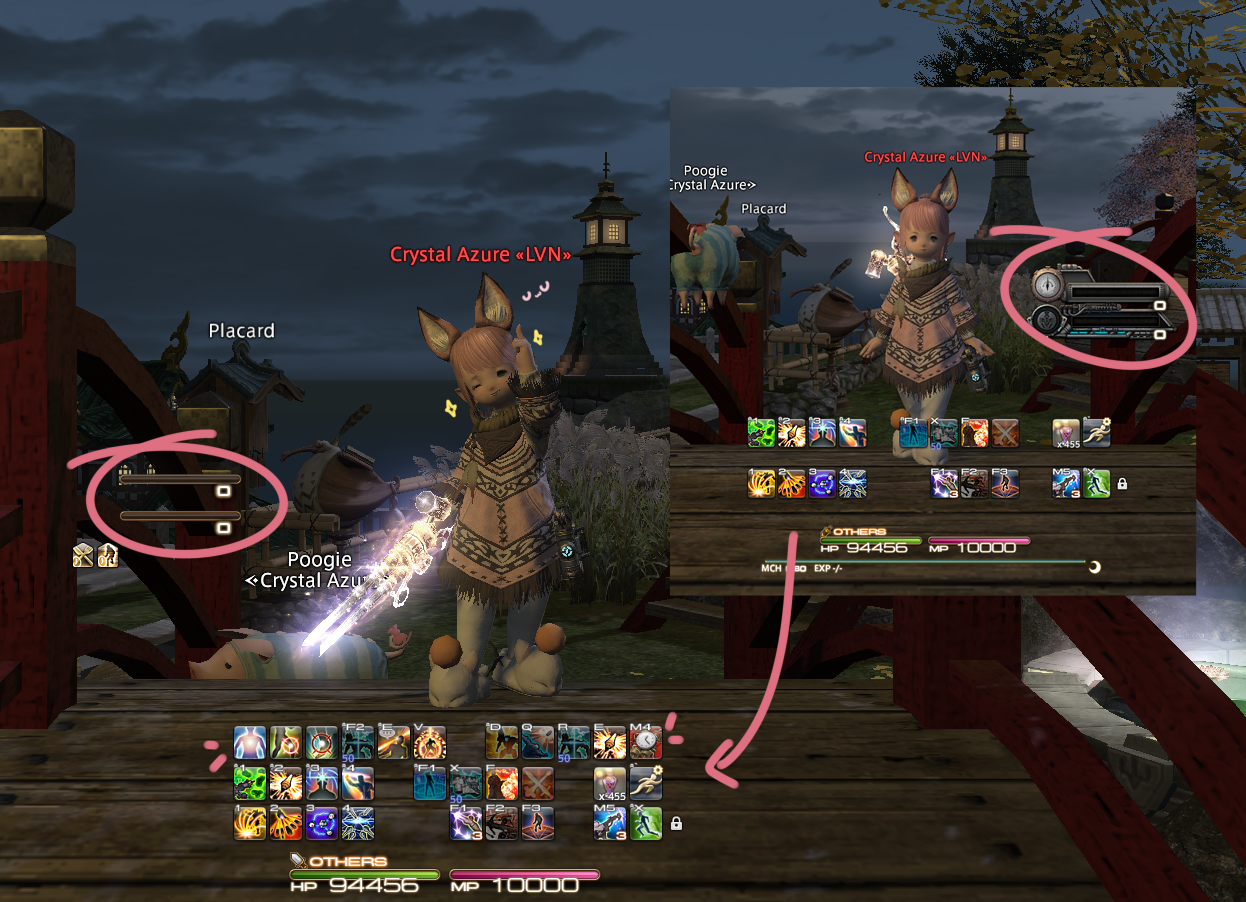
Next, we’re going to talk about HUD layout. You can customize everything in your layout from position of your hotbar to the opacity of your minimap. Each element you choose can be individually customized to your preference by clicking the cogwheel icon.
For job gauges, you can choose switch it to Simple Mode as well. Again, it is difficult to explain these things in words since we all like different things and best if you just play around with it for a while.
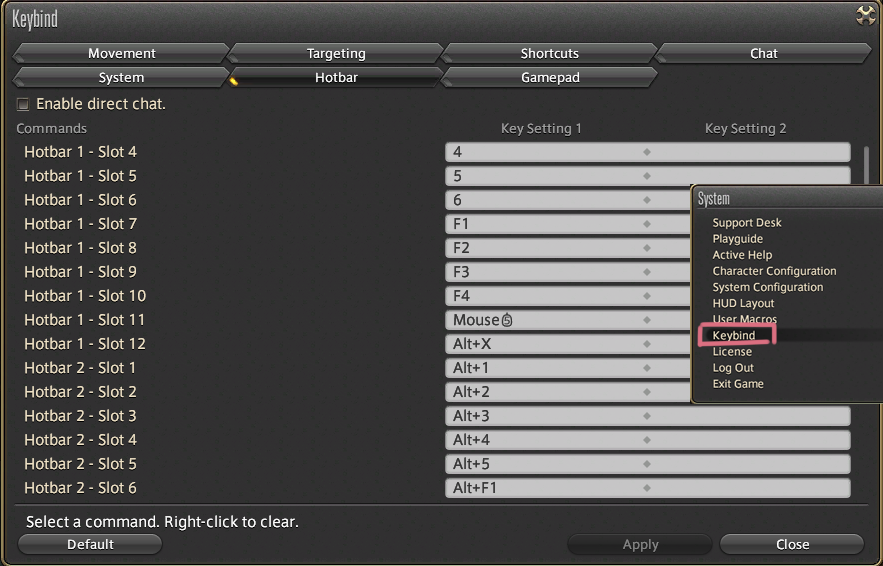
Lastly, you can change your keybinds! As you progress through the game and level up, you will start getting more skills. This is when you will realize that some jobs actually require more keybinds and hotbars.
Thankfully, you already know how to set up your HUD layout so all that’s left would be creating additional keybinds! By going to ESC > Keybinds, you will be able to change every keybind in the game.
Combat Tips
Tank Tips
1. Pulling mobs efficiently
As tanks, it is your job to lead the party in content. This may cause new players to have something known as ‘tank anxiety’ as they are unsure of how to efficiently pull mobs and establish aggro over the party. You do not want to pull by running into a bunch of mobs.
Our resident tank, Q, has recorded a short clip for each job. It teaches you the basics of pulling mobs in a dungeon, what to press and how to position yourself. It is simple but it will definitely require some practice.
Paladin
- Use Shield Lob on the nearest enemy.
- Position yourself in the middle of the group of enemies. Let them come to you then use Total Eclipse.
- Move through the group of enemies to face them away from your party then use Total Eclipse again.
Warrior
- Use Tomahawk on the nearest enemy.
- Position yourself so that the enemies will gather in a cone in front of you then use Overpower.
- Run through the group of enemies to face them away from your party then use Overpower again.
Dark Knight
- Use Unmend on the nearest enemy.
- Position yourself in the middle of the group of enemies. Let them come to you then use Unleash.
- Move through the group of enemies to face them away from your party then use Unleash again.
2. Provoke (Role Action) - How does it work?
Provoke (obtained at level 15) is an important skill that will be extremely useful in any setting. When you use it, it sets the enmity of the target to the current highest. With the changes made in Shadowbringers, Provoke will now put you on top of the enemies’ aggro list while generating extra enmity. More information regarding enmity can be found below.
3. Cycle through your cooldowns!
Cooldowns are abilities that increase your survivability such as Rampart, Vengeance, Shadow Wall, Sentinel, Anticipation, Awareness and so on. Do not be afraid to use them!
As a fresh tank, you will not have many of these cooldowns to use but as you level, there will be more options. Eventually, you will be confident enough to mass pull mobs and cooldowns will be essential. Take some time to read through what each cooldown does and try out different things or ask around.
Healer Tips
1. Should Healers DPS?
As a healer, your first job is to keep the party alive. However, damage in this game tend to come in bursts, leaving many moments where you don’t actually need to do much healing. There isn’t a need to constantly keep every member of your party at full HP or keep shields up on all players. During healing downtime, it is advised that you use your damage dealing skills to help contribute to killing the enemies faster. After all, the best way to reduce damage is to kill the enemy.
With that being said, don’t feel pressured to immediately start DPSing. Although it is recommended to learn while you’re still a fresh healer, go at your own pace and be comfortable with your toolkit first.
2. Lucid Dreaming (Role Action) - Is This Important?
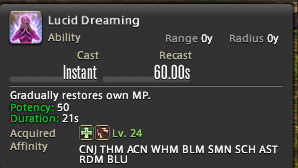
YES. The role action, ‘Lucid Dreaming’ (obtained at level 24), gradually restores your MP overtime.
With the changes made in Shadowbringers, MP is now capped at 10,000 for healers which makes it an extremely limited resource. Without Lucid Dreaming, you will find yourself running low and soon, dry.
It is highly recommended to get into the habit of using Lucid Dreaming on cooldown.
3. Esuna (Role Action) - What Can Be Esuna’d?
The role action, ‘Esuna’ (obtained at level 20) removes a single detrimental effect from a target. It is important to note that not ALL debuffs can be removed. Back then, you had to play a guessing game to find out but in the recent patches, things are much easier.
To find out if a debuff can be removed, simply check if there is a line above the debuff. If there is, this debuff CAN be removed by Esuna. Otherwise, tough luck. You have to wait it out.
DPS Tips
Area of Effect (AOE) skills
At a certain level, all DPS jobs will get skills that do an AOE damage to multiple enemies. If you find yourself facing a large group of enemies (usually 3 or 4+), it is normally a damage increase to use these AOE skills instead of your single target attacks.
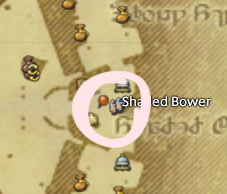
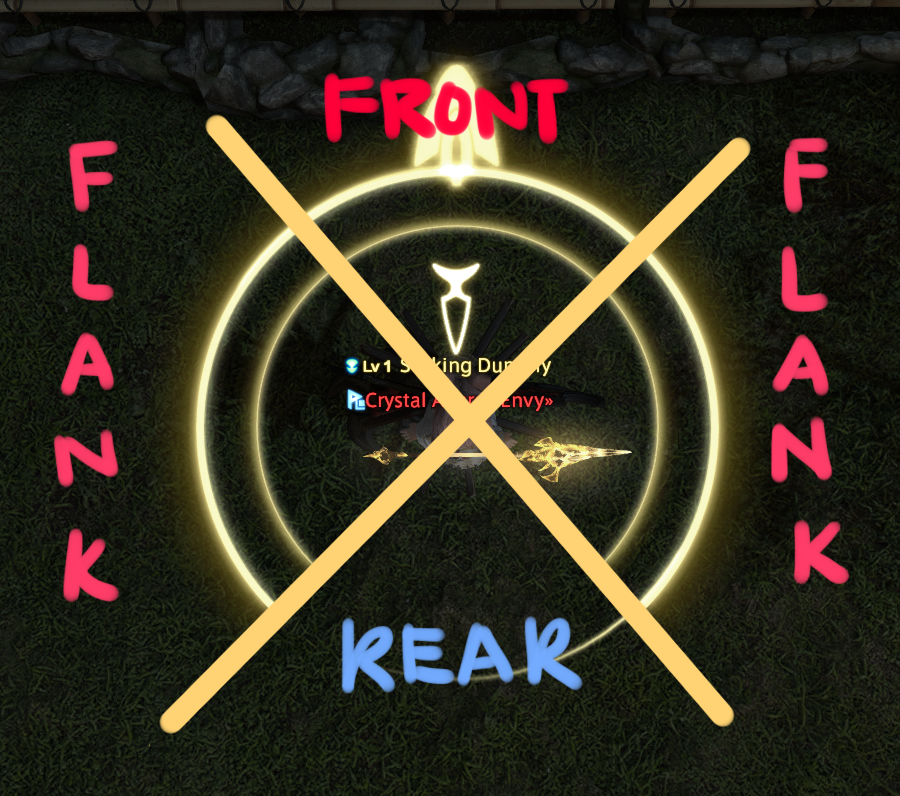
Positionals For Melee (Rear and Flank)
If you have been reading your tooltips, you would have noticed something called ‘Flank’ or ‘Rear’. These are positional bonuses which deals more damage when used at a certain position. Flank is the sides of the target and Rear is the back of the target.
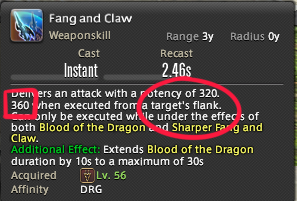
For example, Fang and Claw does 320 potency normally. If you execute it on the target’s Flank, it deals 360 potency instead. 40 potency doesn’t sound like much but when everything adds up, it costs you a lot.
It is heavily encouraged that you learn how to handle positionals while you’re still new. If you’re still confused, this picture should make it easier. A quick note is if the circle is a full circle, it means there are no positionals and you do not need to perform them.
Lucid Dreaming (Role Action) For Casters - Is This important?
It depends on the job and situation. Unlike for Healers who look to use it on cooldown, Summoner and Red Mage will want to use it after casting raises, taking a raise, or when their MP reserves are starting to get lower from their rotation. Black Mage looks to never use Lucid Dreaming thanks to Umbral Ice’s MP recovery.
Everyone
Always be casting (ABC) your skills.
This is an extremely good habit to pick up and it will definitely show in high end content. Make sure you are always pressing or clicking on your skills instead of doing it once every 5 to 10 seconds. I don’t really want to say this, but there are certain cases where players get kicked from a dungeon because they are not actively using their skills. Don’t be that person because it can be really frustrating for the rest of the party.
Read Your Tooltips
Tooltips are descriptions of your skills. Always read your tooltips. Yes, some of them are extremely long but you should have a rough understanding of what it does. If you are still unsure, ask a friend or look it up in a guide.
A few examples would be Swiftcast (level 18) and True North (level 50). Both skills are under their respective Role Actions (mentioned below) which will be extremely important in end-game content. I cannot emphasise this enough: Please read your tooltips.
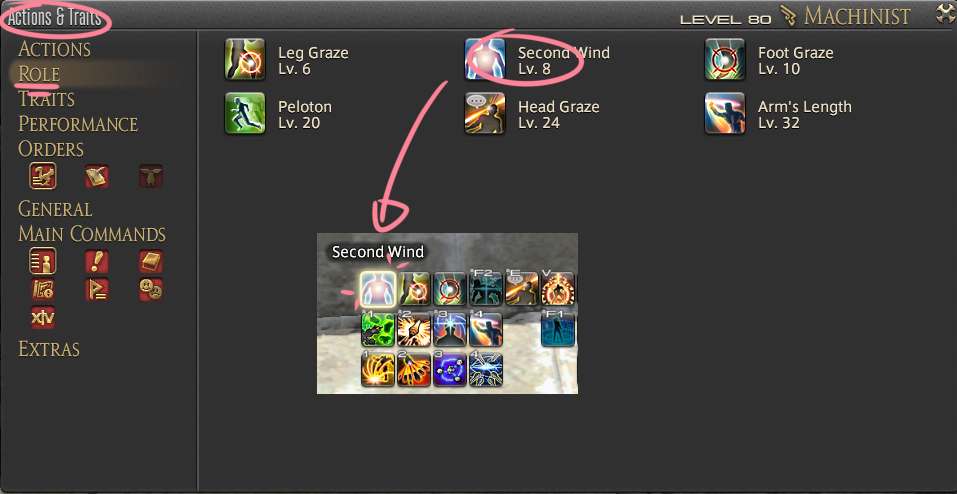
Assign ALL Role Actions
Role Actions have to be manually equipped. They are no different from the normal skills that you have, except they do not appear on your hotbar automatically after completing a class quest or leveling up. Instead, you have to go to the Actions menu to select them. Just remember to put it on your hotbar.
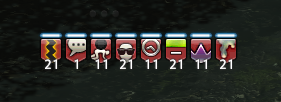
How To Check Your Enmity/Aggro
There are two ways you can check your enmity:
- on the enemy list
- on the party list
For the enemy list, you can see indicators beside the enemies’ names which come in four colours. They represent the amount of enmity you have from the lowest to the highest in this order:
- Green
- Yellow
- Orange
- Red
The good part is you can see the enmity on every enemy which is very useful in dungeons. However, this indicator is just a rough estimate which can be a little misleading. For example, it may seem like a tank has a solid aggro lead on all the mobs since the indicator is red but there might be another player who is really close to overtaking that lead. The red square only indicates that you have an aggro lead, but not by how much.
For the party list, you will see ‘A’ or numbers beside your job icon with the highest being A, followed by 2, 3, 4 etc.. There is a bar beside it that shows how much enmity you have generated. This is extremely informative as you can clearly tell how much you’re ahead of in aggro. The downside is that this only shows for the targeted mob.
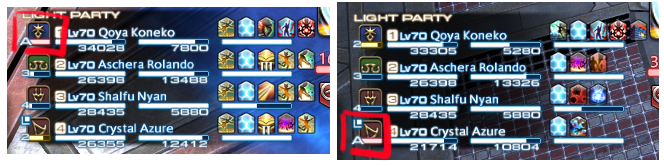
When both of these tools are used side by side, it gives a clear picture of how much enmity has been generated.
Do note that this is not a way to gauge exactly how much DPS a player is doing.
It is just for enmity/aggro purposes.
Final… Stuff?
If you made it to the end, you must really like reading and should probably go download and play the game.
I hope this guide has helped you in some way, especially for those who didn’t know ‘Blue Marker’ quests are called Feature Quests. You’re welcome!
If you’re from Tonberry, feel free to say hi in-game! I play on NA and EU too but not so often.
Some people have asked me for my characters, so I’m just going to list it down here real quick. If you want to add me or ask me anything, please do so!
JP Region Characters
- Crystal Azure (Tonberry / Elemental)
- Luna Xaerella (Tonberry / Elemental)
- Aeryn Rei (Kujata / Elemental)
NA Region Characters
- Wind-up Stal (Cactuar / Aether)
- Popoto Chip (Sargatanas / Aether)
- Fiora No (Excalibur / Primal)
- Water Good (Coeurl / Crystal)
EU Region Characters
- Caramel Frappe (Ragnarok / Chaos)
- Comfy Tosic (Twintania / Light)
Lastly, welcome to Final Fantasy XIV and enjoy your stay!
Change Log
Shadowbringers
August 6, 2021
- A Comfy Guide For Sprouts (2021) video guide added.
November 21, 2020
- Images resized to better fit the page.
- arrstatus link replaced with is.xivup.
October 13, 2020
- Release on AkhMorning
July 22, 2020
- PLL free trial expansion yay~
- Free trial level cap increased from 35 to 60
- Heavensward content accessible until Patch 3.56.
- Dark Knight, Astrologian and Machinist are playable in the free trial.
Jan 20, 2020
- Updated the jobs and made slight description changes in regards to 5.1 update.
- Added additional beginner tips from questions that were asked on stream.
- Basically, I did a mini revamp of almost everything. Finally. It only took 6 months…
- Guide is now relevant as of Shadowbringers 5.1-ish.
- Happy new year, everyone. :)
July 29, 2019
- Updated Tanks for Shadowbringers with the addition of Gunbreaker.
- Updated DPS for Shadowbringers with the addition of Dancer.
- Updated level boost/jump pot to reflect the addition of level 70 and SB jump pot.
- Updated Combat Tips, now relevant to Shadowbringers - Provoke, Lucid (Healers and Casters), Role Actions and certain descriptions and images due to the removal of skills.
Stormblood
May 22, 2019
- Added ‘Esuna’ under Healers tips! Smol but important.
May 4, 2019
- Revised IL + EXP bonus section, emphasised more on main stats.
- Added Diversion/Refresh example to add on to the importance of reading tooltips
- Revised enmity/aggro check, a one liner to sum up enemy list’s enmity in case it gets too overwhelming
- Edited job change requirements (msq > class quest)
- Added full circle = no positionals under positionals for melee dps
- Added my characters because a lot of people asked me.. I feel shameless
May 2, 2019
- 1.0 completed! should I publish it??? I’m scared
- yeaaaaaaaaaaaah I published it now I’m just terrified