Quick Targeting Reference:
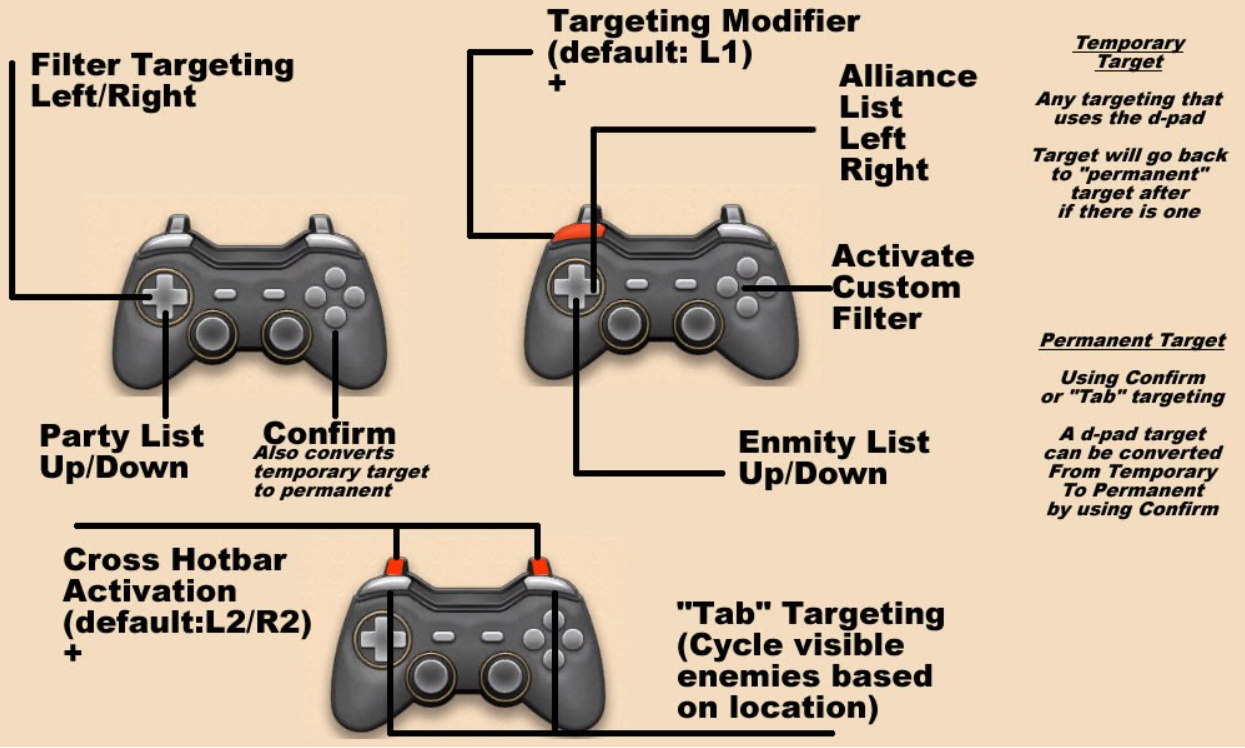
If you just need a quick reference of your controller targeting options, you can use the picture below.
However, do read on if you want to find out about other targeting nuances not covered in this image.
“Confirm” Targeting
“Confirm” targeting is the most basic type of nearby targeting in FFXIV. You press your confirm button (X) while you have no target at all, and it’ll pick a nearby target.
The calculation for “nearby” is a bit convoluted, but essentially it picks:
- A target in front of your within 5 yalms, focusing on the center of the screen and moving out
- A target behind you within 5 yalms, focusing on the center of the screen and moving out
- And then repeats the process but increasing the yalms it can check drastically.
It’s a little bit unpredictable, but it works out alright if you just need to grab a target quickly.
In cities, Confirm targeting applies to NPCs only. This is a great way to quickly targeting a quest NPC or retainer just by getting close.
In battle-enabled areas, Confirm targeting applies to monsters and NPCs (including treasure coffers).
This targeting is affected by the direction you are facing. Only targets visible on the screen can be selected.
“Tab” Targeting
Final Fantasy XIV is known as a “Tab target” MMORPG. This is because you have to actually pick enemies to target your skills, unlike some other MMOs that require no specific targeting and are only using player direction. The term “tab target” comes from past MMOs where using the TAB key on the keyboard would be used to go through enemies to target - and FFXIV also has that. On a keyboard, you can use Tab to go through enemies (and shift+tab to go back).
“Tab targeting” traditionally is often thought as distance-based, where things near you are picked before things that are further away from you. This is not the default in FFXIV, and additionally there are many controller players who do not know how to actually “tab target”. This can lead to people believe that tab targeting, in the traditional sense of using distance, does not exist in FFXIV.
However, that is incorrect.
How to tab target on controller
Many players use the d-pad left/right to target enemies. That is known as “filter targeting” and works differently. The d-pad targeting is not the equivalent of “tab targeting”. Filter targeting is covered later in this guide.
To tab target, you would activate a cross hotbar (R2 or L2 or R2+L2) and while the cross hotbar is activated, you would use your Hotbar Switch button (R1). To go the opposite order, you would use the Auto-Run button (L1).
There is another way to tab target, if you don’t mind losing a button slot (or two). In Actions & Traits, General, you can allocate Target Back and Target Forward to your cross hotbar. It’s an option, though very few players use it since it costs 1 - 2 action slots.
How to use distance in tab targeting
There are two types of distance calculations. Do note that regardless of type, the calculation does require for the enemy to be visible on your screen.
Type 1: Ignore Depth
This is the default option.
When you have nothing targeted, it does usually go to the nearest monster near you - imagine a circle around you.
It’s once you have a target and want to “tab” to another target that this method gets a bit trickier. The moment you have a target, any target (even yourself), it does a pure scan in that direction starting from that target, without depth used at all.
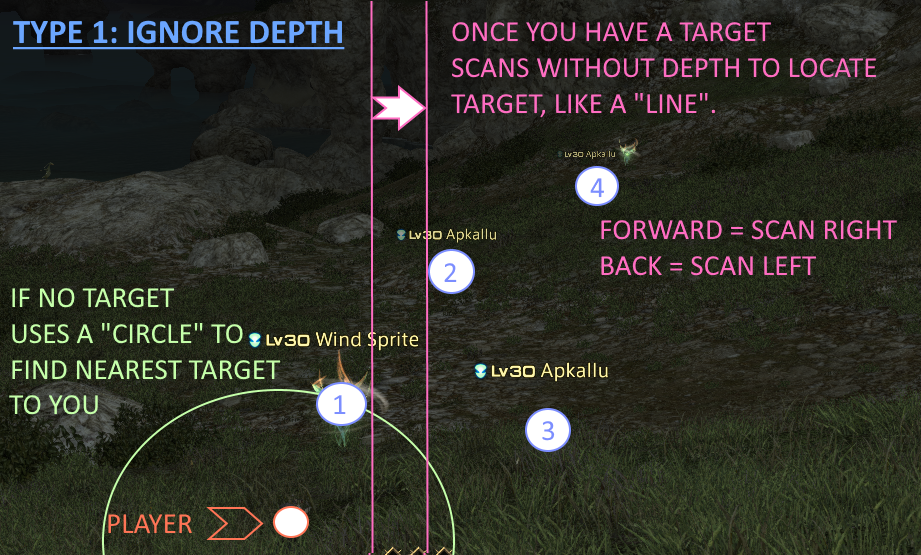
This behavior of scanning is why some people claim that FFXIV does not have “tab targeting” or that the tab targeting algorithm is not good. However, there is a second one.
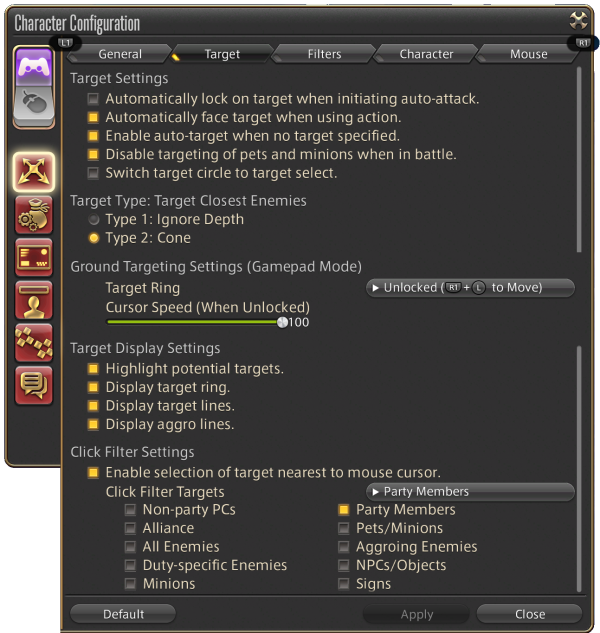
Type 2: Cone
Essentially this is a cone in front of your ‘camera’. How your character faces doesn’t matter, but your camera does. However, it’s not a pure cone. It’s more like a series of calculations and is really hard to describe.
First it checks near you with two initial zones. If there are no monsters, or if it runs out of monsters, it moves to the next zone
- A small cone in front of you (“front” is always up, regardless how you face)
- A smaller circle, this is to check for any nearby monsters behind you
After that it starts checking monsters that are “far” through a series of cones that get longer, but the angle becomes shorter. In each of those cones, the center or “front” is prioritized, then the sides. The cones do not re-check sections that were already checked.
Once it runs out of cones to check, it repeats with the initial two zones.
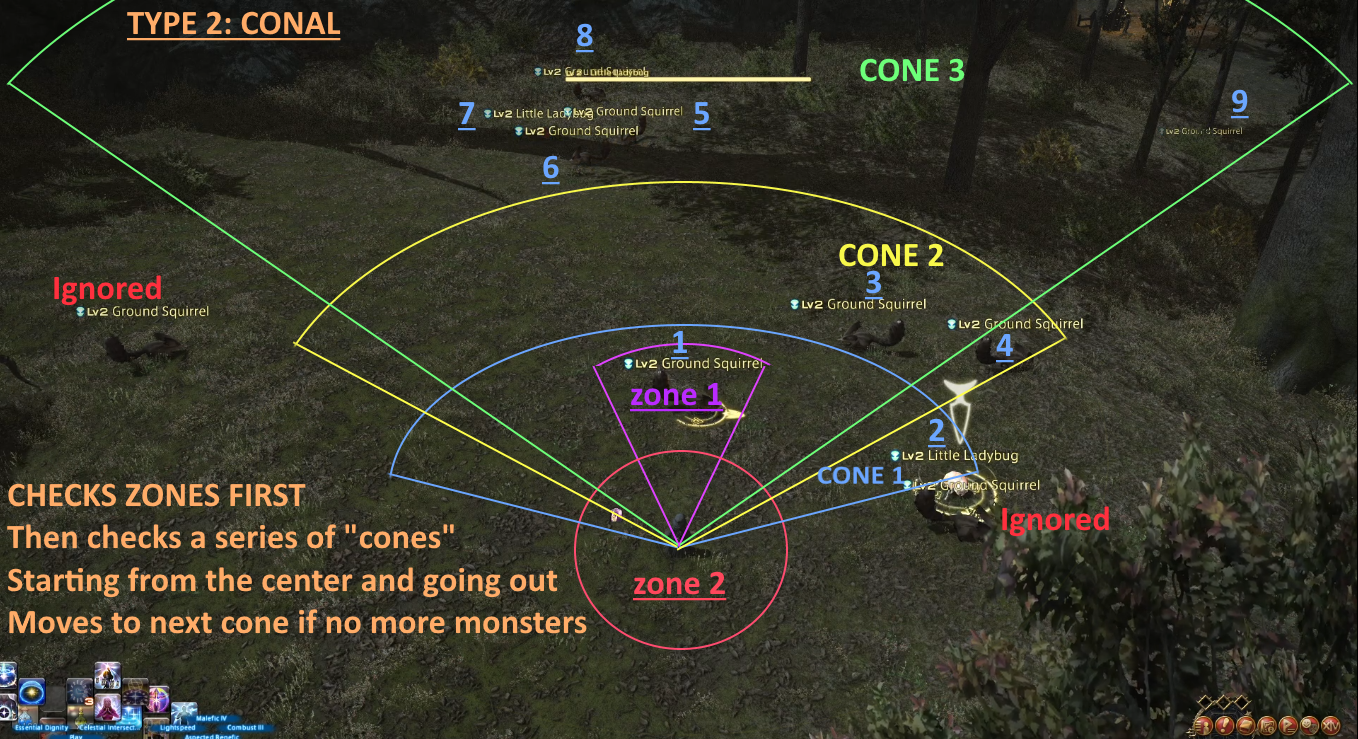
Take this picture as a rough estimate, as it’s really hard to get the picture just right since there are multiple “cones”, and not all of them were drawn for the picture. It’s also very difficult to test since monsters often move and throw off observations.
This type is less predictable, and can lead to some monsters being outright ignored unless you move your camera, but it does favor monsters that are near you far more. Generally, it works out well because it’s fairly natural to want to aim for monsters that are near, or in “front” of you, so you can get started on those targeted AOE attacks right away.
This type of targeting is more like a traditional “tab target” for those who’ve played other MMORPGs.
If you wish to have the distance-based aspect of Conal, but still the option to use scanning left or right, this is still possible by using Filter Targeting.
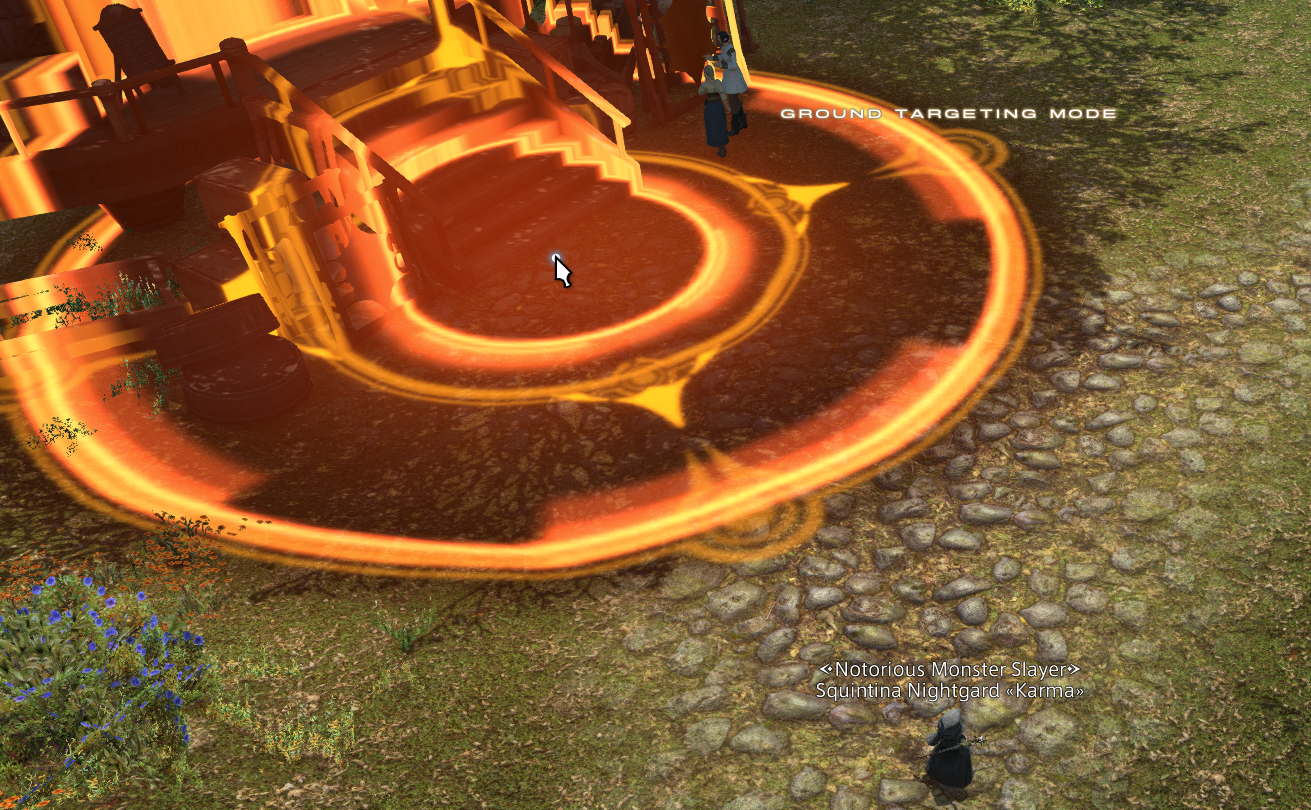
Ground targeting
Some actions do have a ground targeting circle, and there are a few ways to handle those.
How you control those is based on the Ground Targeting Settings found in Character Configuration, Control Settings, Target.
Target Ring Type
Locked to Cursor: The default on mouse mode.
In this mode, your ground target is based on your cursor (your mouse, whether physical or virtual). This can be useful for console players using the touchpad. You can use Confirm (X) or the touchpad left click (lightly double tapping the left side) to apply.
This mode is not recommended unless you’re using the touchpad, or you’re comfortable reaching for a physical mouse.
Unlocked: The default on gamepad mode.
In this mode, you get a special ground targeting focus point, visible via a dot. It’s not possible to enter ground targeting mode without using an action that has a ground target, so having a white mage (Asylum at level 52) or astrologian (Earthly Start at level 62) can make it easy to check your ground targeting focus location without having to get into battle.
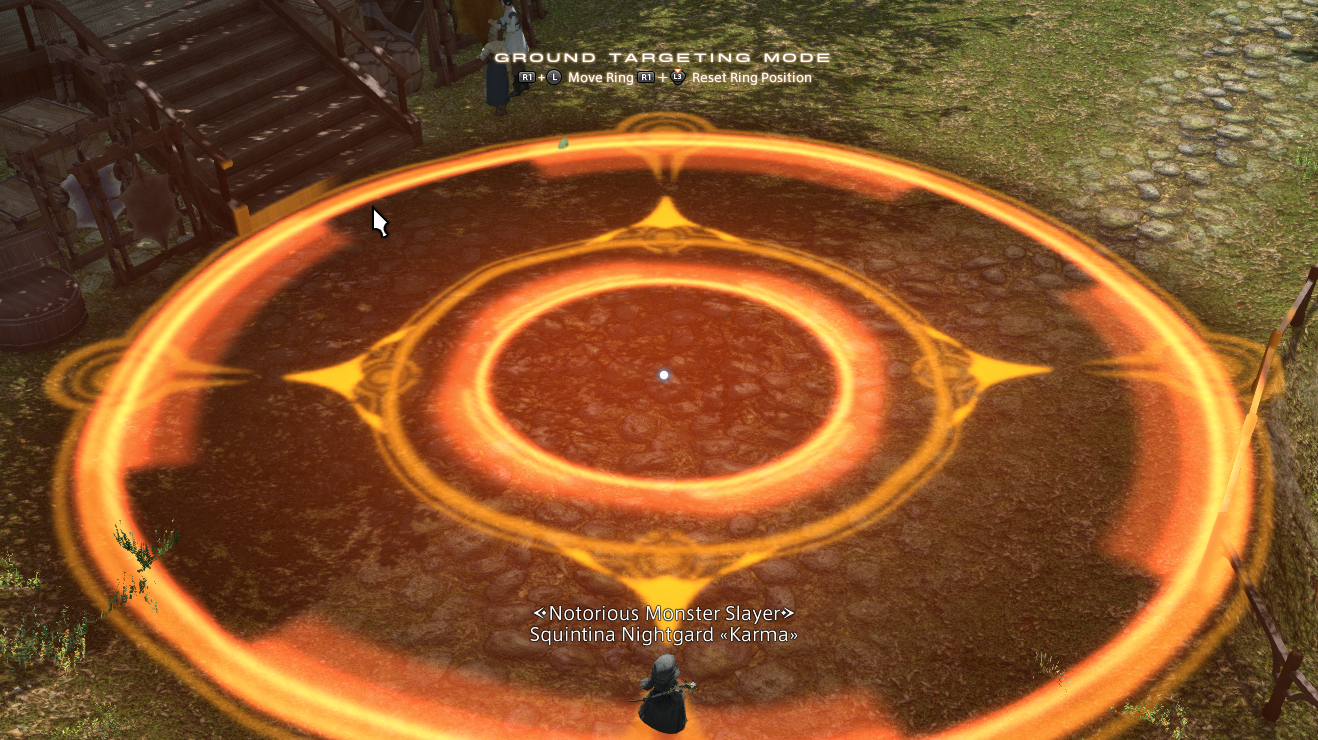
The dot in the center is the special ground targeting cursor you can manipulate.
This targeting focus is separate from any cursors (physical or virtual mouse). You can move its location using the Hotbar modifier button (R1) and the movement stick (Left stick); this should be visible as a guide if you’re in Gamepad mode. You can also click in the movement stick to reset its location.
The focus point will remember your location for the next time. Whether that is a good or bad thing will depend on personal taste. There are essentially two ways to control your ground targeting:
- Move the ring’s focus point, keeping in mind that it’ll change it for the next time.
- Keep the focus point always in the same spot, or moving it only slightly for minor adjustments, and then using your camera to change your screen’s viewpoint, which would then manipulate where the focus point ends up.
Ground Targeting Macros
Ground targeted actions are often targeted using macros instead. Normally, macroing actions is considered bad practice, as that results in them not being able to be “queued” after your current action is done. However, the ground targeting ring cannot be queued anyway, so there is no real loss. Not having to target at all can actually be a gain in overall speed.
Some people might have two versions of a ground-targeted AOE: one using a macro, one without, in order to have the flexibility to use the manual option if the need arises.
Earthly Star on a target
/ac "Earthly Star" <t>
Asylum on yourself
/ac "Asylum" <me>
Note: For Astrologian’s Earthly Star, the detonation can be queued, so it is worth considering having both a macro and non-macro version of Earthly Star, so you can target using the macro version, and detonate using the non-macro version.
Waymarks
Waymarks do use the Ground Targeting’s focus point. Because of this, if you are using the unlocked shortcut (R1 + Left Stick) instead of using Camera manipulation, you may need to fix up your ground targeting’s focus point before the fight starts if you are not using macros.
Unfortunately if you try to use an existing waymark it would end up removing the waymark, so then the only other option is to fix it via an action. If your ground targeted abilities require some kind of gauge, like Sacred Soil needing Aetherflow, you may not be able to fix it until the battle starts.
Assist Targeting
There are two ways to do assist targeting (targeting your current target’s target):
- Using the built-in “Assist Target” option for L3 or R3
- Using a macro
Even for the macro, there are two choices:
You can either use an action macro and put <tt> as the placeholder, such as
/ac "Malefic" <tt>
However, it is not recommended to use action macros for actions that can be queued, as it can cause delays that add up over time. Thankfully, there is another way.
/target <tt>
This will change your target to your current target’s target. Since there is no action, there is no loss to action queuing. You would then use the action you want.
Focus Targeting
It is possible to make use of your Focus target as a targeting option, but there isn’t an existing shortcut for it so a macro will be necessary.
Setting a Focus Target
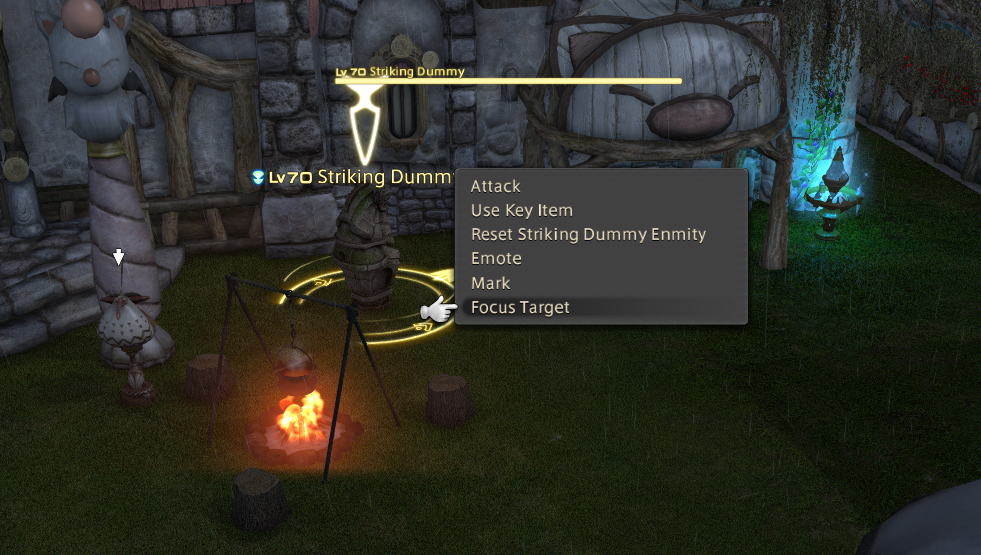
To set a Focus Target, first you need to target what you wish to become a focus. Then use the subcommand button (square) and select “Focus Target”.
Alternatively, you can also use a macro
/focustarget
This will set your current target as the focus target, if you don’t already have one
Targeting your Focus Target
This is only doable via macros or a mouse (virtual, touch, physical). Once again for the macros there are two options:
Using an inefficient action macro:
/ac "Adloquium" <f>
Using a targeting macro:
/target <f>
And if you don’t wish to use a macro, perhaps you’d prefer to use the touch pad, you can click on the Focus Target HUD element. Left click will target without auto-attack, Right click will target with auto-attack.
Combining it together
You can make targeting macros that use multiple targeting methods.
Here is an example of a macro that is meant to be used on a boss:
/target <f>
/focustarget
/target <tt>
That above macro will:
Target a focus target if there is one
Set the current target as the focus target if there isn’t one
Target the target’s target
By using it on a boss, it can be used to both set the boss as a Focus Target, so it can be tracked more easily via the Focus Target UI, and target the current tank. This can be useful for shielding and healing the current tank faster and still having an easy way to check the boss’s cast bar using the Focus Target element.
Since there is no action in the macro, it has no queue loss. The only cost is moving fingers to press the button that hold the macro. However, it can be used while casting the previous action so no loss needs to occur if used early enough.
A list of targeting placeholders beyond just <f>, <me>, and <tt> can be found on the Lodestone.
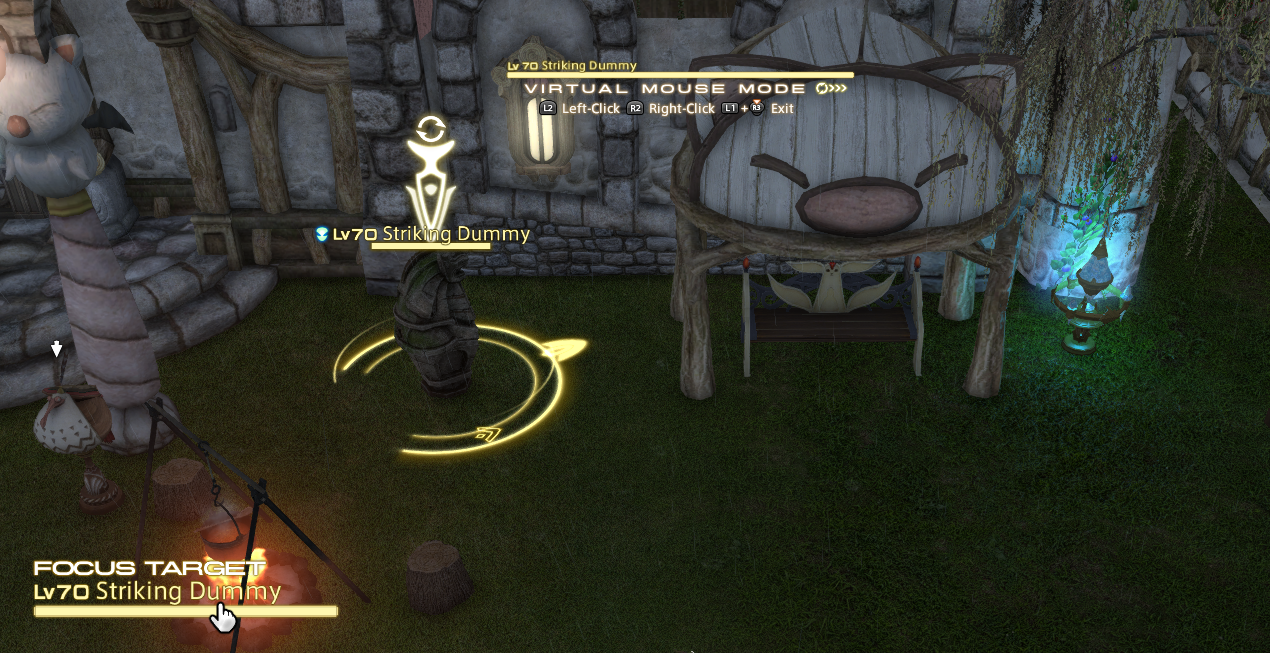
Virtual Mouse and Cursor Targeting
The touchpad and virtual mouse can also be used to target by using the “Left Click” to select a target, or “Right Click” to both select and set Auto-Attack on a target. This also includes “clicking” on the Party, Enemy, Alliance List, NPC nameplates, and target/focus target HUD elements.
But would you use it in battle? Well, possibly! Some people use the virtual mouse or touchpad as an alternative to having to use the d-pad for the alliance list. You can also love to leave your virtual mouse cursor in the same spot and use that as an easy way to target anything that is on that spot, by manipulating your character to move your camera.
- Enter virtual mouse mode
- Hover over target
- Use the “Right Click” button (R2) to set new target
- Leave virtual mouse mode
- Use action
This does involve a lot of finger movement, so more than likely you would end up late on your GCD. However, if selecting that target via other means would take you just as long, if not longer (such as trying to pick a target to attack in Frontline PVP), this could potentially be overall faster.
Even if you don’t play on moving the cursor at all during battle, you can always just leave it in the middle of the screen and use Mouseover macros.
Changing your target to your current mouseover
/target <mo>
Using an action on your mouseover target. Will suffer from action queuing loss if it’s an action that supports action queuing.
/ac "Adloquium" <mo>
Which actions have and don’t have action queuing?
Have action queuing:
- Class/Job actions (without a ground-targeting ring)
- Role actions
- Duty actions (at the very least, Lost Actions do. May or may not be true to all duty actions)
Everything else does not have action queuing, which includes:
- Actions with a ground-targeting ring
- Sprint
- Limit Break
Orders, such as command mission orders, are not on the player’s action lock system at all and can be used any time. The same is true for macros that don’t use the /action , /blueaction, or /pvpaction commands.
Targeting Using the D-Pad
Targeting via the Party List
To target a party member, use the d-pad up and down buttons. If you have no party member already targeted, this will start on you first.
Do note this does cycle through the list. For example, if you want to reach the 8th person, instead of pressing down 8 times, you can press up twice.
This actually makes certain slots more easily accessible for others, which means customizing your party list is something you might want to consider.
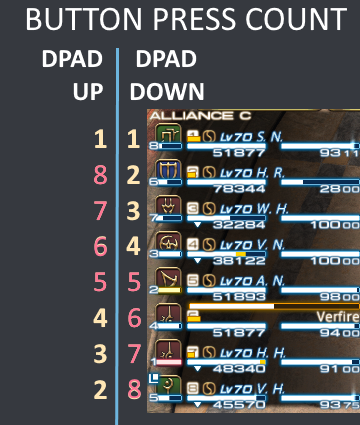
Illustration of cycling with the d-pad UP! Get access to those last three party members faster!
How to temporarily change the party list order
Knowing how to temporarily change your party list order for an instance can be very useful for content with atypical party structures, such as Eureka or Bozja. It is also the only way to organize a party of blue mages by their mimicry, as the game’s party sorting does not look at that at all.
- Open up the Party Member menu - either from a shortcut, or by going to your main menu. Use the d-pad to select a party member
- Press your confirm button (X) to select
- Use the d-pad to move them up or down
- Press your confirm button (X) to apply the change
Note to blue mage parties: If you have any macros that have /psort , you may wish to remove that or it will undo your manual temporary changes.
How to permanently change the party list order
In Character configuration, UI Settings, Party List, you can set your own order based on your current role. By default, all of them are set to Tank, Healer, DPS.
You can also set the order of the jobs within their roles by going into “Role Sort Settings”
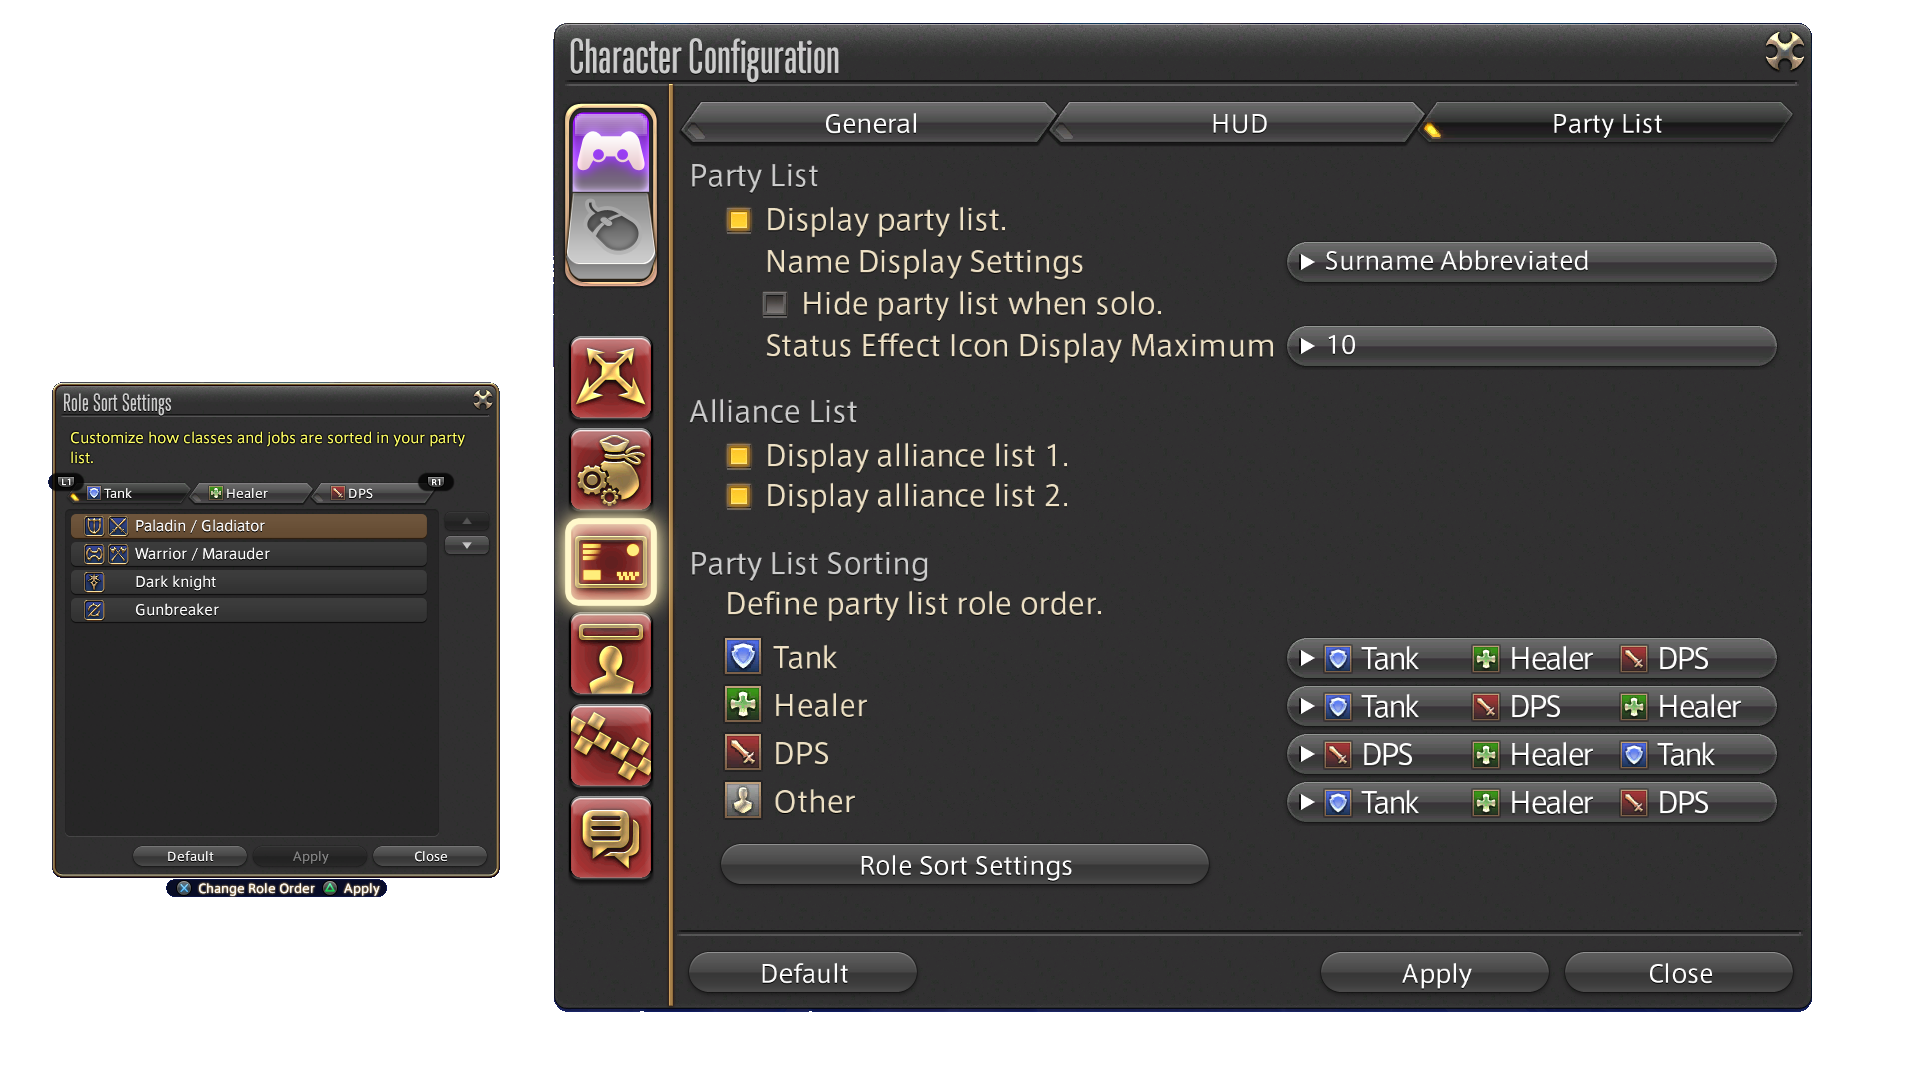
A customized setting by role.
When you enter an instance, this is the setting it will use. You can also force it to reorder by using the macro /psort or selecting the “Sort Party List” button in the Party Members menu.
Should you change the party order list?
First off, a note for healers:
Keep in mind that if you ever do any content where you say to heal/Esuna "top 3" or "bottom 3", such as The Epic of Alexander's first phase, your party list would therefore be different from your co-healer! This isn't an issue if you communicate this - perhaps your co-healer doesn't mind changing to your settings, or you can use a different way to assign people.
That being said there can be some benefits with changing up your party list to allow for better efficiency in selecting party members.
These are just a few examples of a person’s thought process behind using a specific party order. These are of course highly subjective, and you should do what is best for you.
Tanks generally target their co-tank, if they need to apply a cooldown on them. Because of that, having your co-tank 2 down (tank first) or 2 up (tank last) can be beneficial.
Dancers can assign a dance target, but typically do not change during a fight. Order therefore doesn’t matter since it doesn’t affect efficiency during battle much, if at all.
Dragoons can assign Dragon Sight, which breaks if a target is too far. Having melee (and tanks) in your easiest d-pad presses might be beneficial. Because of this, having DPS first might be useful, especially since by default the melee jobs are first.
Black Mages can manipulate to teleport to other party members. This can be done via macros, or by using your party list efficiently (or a combination of both!). A black mage who prefers the d-pad might want to use Tank, DPS, Healer so that way tanks are available quickly on the d-pad down if they need to manipulate to melee range, or they can manipulate via d-pad up to get to Healer to quickly go to a ranged section. (There are many ways to handle this and this is only one example)
If using the screenshot above, where DPS is set to DPS, Healer, Tank, a black mage using that set up has the choice to use d-pad up or down to reach melee range via either the DPS or the tank, and can use a macro for party member #4 to reach whichever healer is there. They would also have fairly quick access to the first ranged DPS, at least in a standard party.
Healers generally AOE heal DPS, unless a specific mechanic on a DPS requires immediate heals. For the most part, single targeting would be on their tanks, and of course if multiple people die, keeping their co-healer alive or resurrecting them would be a fairly high priority in order to attempt a recovery. A set up of tank, dps, healer would therefore fit that.
Astrologians also have to give out cards. Unfortunately it’s not possible to sort the DPS separately. For example, you cannot do: Tank, Melee dps, Healer, Ranged DPS. The DPS are one big group, though by default the melee are up top while the ranged are bottom. Astrologians also still have to heal and work with their co-healers. This can make picking an order tricky, and it’s recommended for Astrologians to master the use of the party list cycling in order to reach party members in the middle of the party list quickly.
Astrologians who are trying to maximize DPS and who are playing in a static may also wish to switch the job order. Keeping with the example of “Tank, DPS,Healer”, an Astrologian playing with a Samurai and Ninja might wish reorder such that Samurai is first, since theoretically the samurai should have the higher DPS of the two melee if a card was given out. Likewise, reordering such that Black Mage is last would make reaching a Black Mage by cycling the first DPS after their co-healer!
Targeting Via The Enemy List
Even on controller, you can make use of the Enemy List, the list of enemies that have some enmity established to you.
You would hold your Auto-Run button (L1) and use the D-Pad Up/Down. Like with party targeting, you can cycle the list and therefore can reach enemies at the bottom by pressing up.
There is no configuration available to customize the order of this list.
Do note this is also used for the Enemy Team list in The Feast.
Targeting via the Alliance List
You can also make use of the Alliance List in a similar manner.
You would hold your Auto-Run button (L1) and use the D-Pad Left/Right. This also applies for the special alliance list in the Rival Wings PVP mode. You can also cycle this list to reach the second alliance faster. Still, some alliance members are going to have a lot of button presses no matter what.
There is no configuration available to customize the order of this list. There is also no way to use macros to access certain a specific alliance member faster and reduce the number of D-Pad button presses - though it is possible to set up a keybind and PC users who wish to set up their controllers to use custom keybinds can learn how to do so in the PC Setup Controller Guide section.
Filter Targeting
What is Filter Targeting?
Filter Targeting is one of the various ways you can target things in Final Fantasy XIV.
Specifically, it means targeting using the d-pad left and right buttons. Filter targeting is always done based on what is left and right of your current target, or yourself if you have no target. This is strictly a left to right scan and does not use depth at all. If there is nothing to target in that direction, it goes all the way around.
Because filter targeting does not use the option to include depth, it becomes crucial to manipulate your camera so as not to target things that are very far.
Automatic Filters
There are two automatic filters - one where your weapon is sheathed, and one where it is drawn. What this means is that if you use an ability or skill, it will automatically switch to your Drawn filter. When you no longer have anything on your enmity list, if you have auto-sheathe turned on, it will automatically sheathe and thus switch back to the sheathed filter.
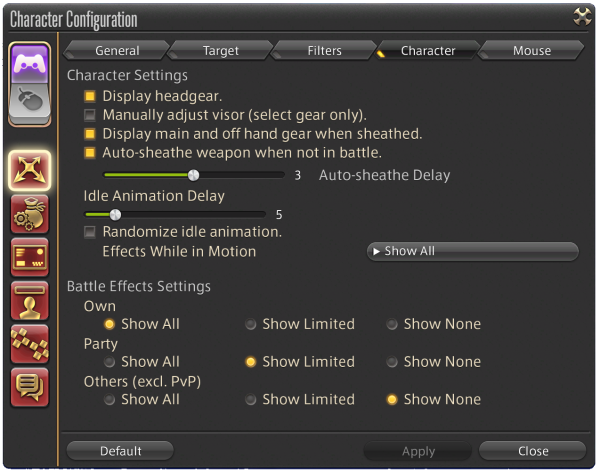
You can check your auto-sheathe setting in Character Configuration, Control Settings, Character.
Manually sheathing
If, for some reason, you have auto-sheathe turned off, you can make your character sheathe in various ways, such as by:
- Bringing down the Stance action into your hotbar
- Assigning one of your analog clicks to Draw/Sheathe Weapon
- Or using the button combination of your Targeting Modifier and Hotbar Set buttons, which are by default pressing L1 and R1.
The third option, of using L1 and R1 is the better way to manually sheathe and unsheathe, as using up a precious hotbar slot is a waste especially on higher-button jobs, and there are honestly better options for your analog clicks.
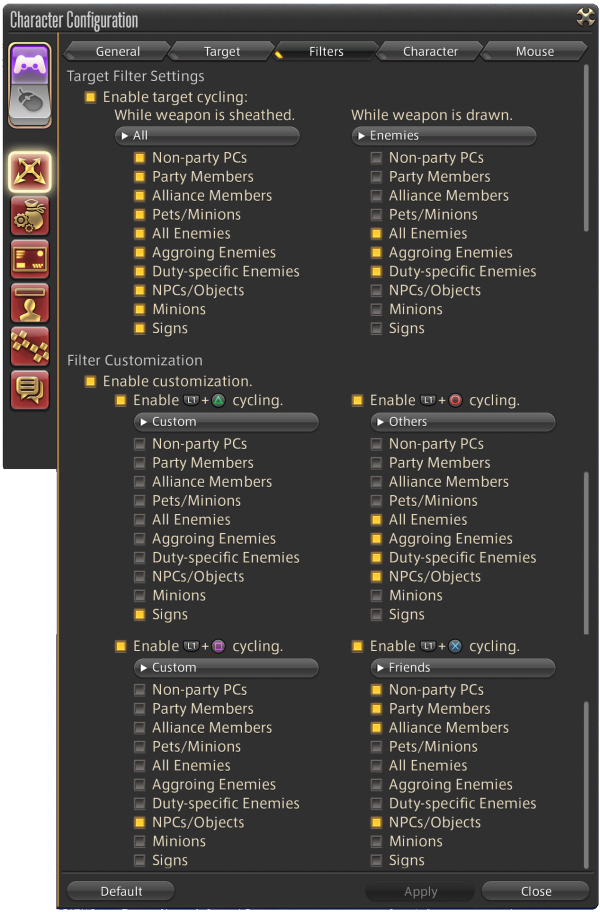
Customizing the filters
These filters can be customized by going to Character Configuration, Control Settings, Filters. The first two are for automatically switching your target filter whenever your weapon is sheathed or drawn. By default they use the presets for “All”, and “Others”. You can also individually select what to target to create your own custom filter.
If you turn off “Enable target cycling”, what this actually does is disable the automatic filter targeting switching for sheathing and drawing your weapon. You still have a default filter targeting of “All”, and you can still use the special manual filter targeting options below, which we will go into right now.
Manual Filters
So while sheathe and drawn filters are based on whether your weapon was just sheathed or drawn, and can be automated, there are also 4 extra optional filters you can manually turn on. You can choose which ones you want to enable, and you can clearly see what their shortcuts are. Each one of those you can choose a preset or make your own customized filter.
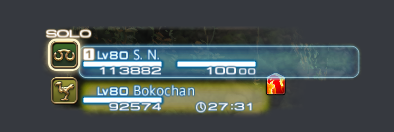
It’s very easy to switch from one manual filter to another, just press the other combination. You can even do it while casting and it has no impact to your uptime. You can see what filter you have on in your parameter bar.

Do note these filters are toggles. Once it’s activated, it remains activated until you switch, or the game auto-switches, to a different filter.
Because of this, it’s actually not possible to simply turn off the manual filter and go back to the sheathe/unsheathe filter. The only way to go back to those other two filters is to sheathe or draw your weapon. This means if you are in battle, and you need to go back to your Drawn filter, you will need to sheathe your weapon first. Sheathing is an actual animation, which means you cannot sheathe while casting, and it has a small animation lock from using your other actions, which therefore impacts your uptime.
Because of this, one possibility is to set your manual filters to be the same as your Drawn filter. If you do this on the same button as your cancel button, it might feel more natural, as if you are “canceling” your special filter.
Filter recommendations
So what should your filters be? Well that’s really up to you!
The default sheathe and drawn filters are actually pretty good. The “All” preset is great in town for any usage. The Drawn filter can allow you to target enemies if you choose to, though there are other targeting methods such as Enmity target and bumper targeting when it comes to enemies. More importantly, this filter has the NPCs that show up in a few fights that you might have to heal, like Estinien in the Aery.
For your manual filters, as mentioned you can set up one that is the exact same as your Drawn filter. For the other 3, you can put things that are NOT easily covered by other targeting methods, and aren’t already in your Drawn filter.
Signs filter is for targeting only things that have been marked. Very useful in certain fights with monster kill orders, or in pvp.
NPCs/objects is necessary for targeting game characters you need to heal. If you don’t have it in your Drawn filter, you should definitely include it. However, even if you have it, it can be very useful if you ever play healer to have a filter just for that, to get to your healing target faster. For example, it’s useful for targeting mammets in Rival Wings, or those pesky NPCs in healer job quest duties.
Non-party Player Characters would be useful in something like Eureka or Bozja. It’s great for targeting people who are not in your party or alliance and there isn’t really a way to target them outside of filter targeting without resorting to some kind of mouse cursor.
To auto-run or not
The targeting modifier button is also the game’s auto-run button. If you are planning on making heavy use of custom filters, it may be best to turn off the Auto-Run feature in System Configuration -> Gamepad Settings. This will save you the headache of accidental auto-runs if you are switching your filter settings, or using any of the other targeting modifiers that this button covers, while moving.
Soft targeting classification
Filter targeting is a type of “soft target”. There will be a separate video focusing on soft vs hard targets and the various options around it. However, to summarize:
A hard target is your real target. It is the one with the targeting ring.
A soft target, which has a targeting circle instead, allows you to pick a temporary target while you already have something else targeted. This lets your very next action to go to that temporary target, and then your targeting immediately goes back to your real target.
If you don’t already have a hard target, your soft target will immediately be converted to one. If you wish to convert a soft target to a hard target, to replace your current one, you simply need to press the confirm button.
And that’s Filter targeting. It can be a powerful tool when used properly, but at the same time, do keep in mind that there are also other targeting options that might be better suited depending on what you are trying to accomplish.
Keeping two profiles of filters
Filter targeting is stored separately for gamepad and mouse type. You can therefore use the two modes to keep a separate version of those filters.
Here is an example of a player who has the sheathe/unsheathe turned on in Gamepad mode, for PVE.

But that player has them turned off in Mouse Mode, utilizing this as a PVP profile despite still playing on controller.

Target Circle vs Target Select/Ring
Target Circle vs Target Select
There are three types of targeting selections:
- Target Circle, known in the community as Soft Targeting
- Target Select, known in the community as Hard Targeting. This type of targeting has a Target Ring.
- Action macro targeting, which does not result in the target being given any new target circle or select. This type of targeting can be less efficient due to losing out on action queuing (if it applies).
What is the difference between soft and hard targeting?
A soft target is “temporary”. It will attempt to use the next action on your soft target, and then go BACK to your previous target (your “hard” target). If you have no previous target, however, it will automatically convert your soft target to a hard target.
A target circle is shown for this “soft target”
A hard target is your primary target. If you make a new hard target and do an action, your targeting will not return to your previous target. For example, if you are an astrologian and you are using malefic to attack a boss (your hard target), and you use the d-pad to pick a party member (your soft target) to give a card to, once you hit that card button your target will automatically go back to the boss so you can get right back to attacking!
A target ring, with positional information, is displayed for a “hard target”
By default, any targeting that uses the d-pad is a Soft Target, it will get a targeting reticle that looks like a rotating circle. You can convert a soft target into a hard target by clicking your confirm button (X).
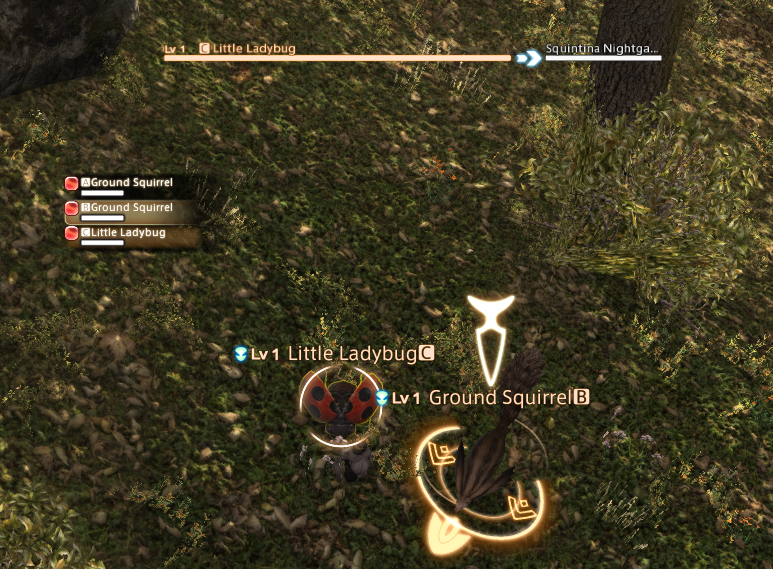
On this Enemy List, the second Ground Squirrel is a hard target - it has a target ring and the highlight behind its name on the list has a more solid border. The Little Ladybug is a soft target - it has a target circle and its name on the list has a softer border. The next action would assume the Little Ladybug to be the target and then go back to the second Ground Squirrel.
Targeting methods that do not use the d-pad are Hard targets - with the sole exception being using a mouse over macro while using the virtual mouse.
Hard targeting includes:
- Tab targeting
- Confirm (X) targeting
- Targeting via target macros (ex:
/target <f>) - Virtual mouse, if you use either the “Left Click” or “Right Click” on a target
All the above would all cause your hard target to change.
As stated, all d-pad targeting use this “Target Circle” feature.
Soft targeting includes:
- Party List targeting
- Alliance List targeting
- Enemy List targeting
- Filter targeting
Action macro targeting includes:
- Using a mouse cursor (physical or virtual/touchpad) over a target, but without clicking the “left click” or “right click” buttons. Then combine with a mouseover action macro (ex:
/action "Rescue" <mo>). - Or using any other action macro that has a placeholder specified
In this Party List, the first player was converted to a Hard target. After, the d-pad was used to highlight the chocobo as that Soft target.
If you head to the Target Display Settings section, you can change the behavior of the targeting circle and targeting select.
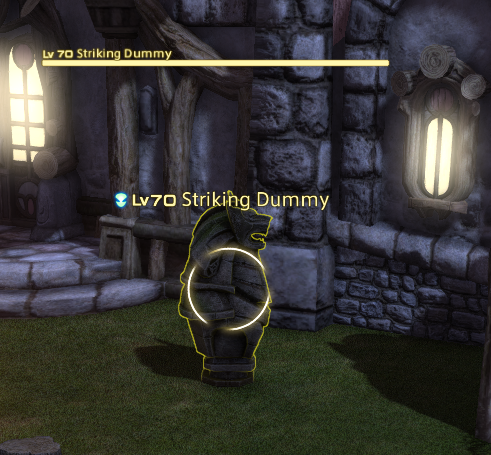
For soft targeting and mouseover only, the setting “Highlight Potential Targets” will cause the current target to have a yellow outline. Additionally the setting “Display aggro lines” will display the enemy pack lines - whether attacking an open world mob will summon nearby monsters to their aid.
“Display Target Ring” shows the target ring of a hard target . If you are currently on a soft target, you would need to convert that soft target into a hard target by pressing your Confirm button. This setting is what allows you to tell positionals so you most likely want to keep this on.
The remaining setting in the Target Display Setting of “Display Target Lines” is to show a line to whom the enemy is targeting when said enemy initiates aggro. It works in all target types.
Can soft targeting be turned off?
Soft targeting is very powerful, and it is recommended to learn to make use of it. However, if for some reason you do not like soft targeting, or perhaps there is a specific type of content where it would be more beneficial to have it off, you can turn it off by clicking “Switch Target Circle to Target Select”.
Turning this off means the d-pad will only make hard targets. There would no longer be a soft targeting option, and would only leave action macro targeting as the closest option to it.