What is the cross hotbar?
The cross hotbar is a way to access your job actions, items, and macros. It resembles the face and direction buttons of the controller and has a HUD element.
Turning on the cross hotbar
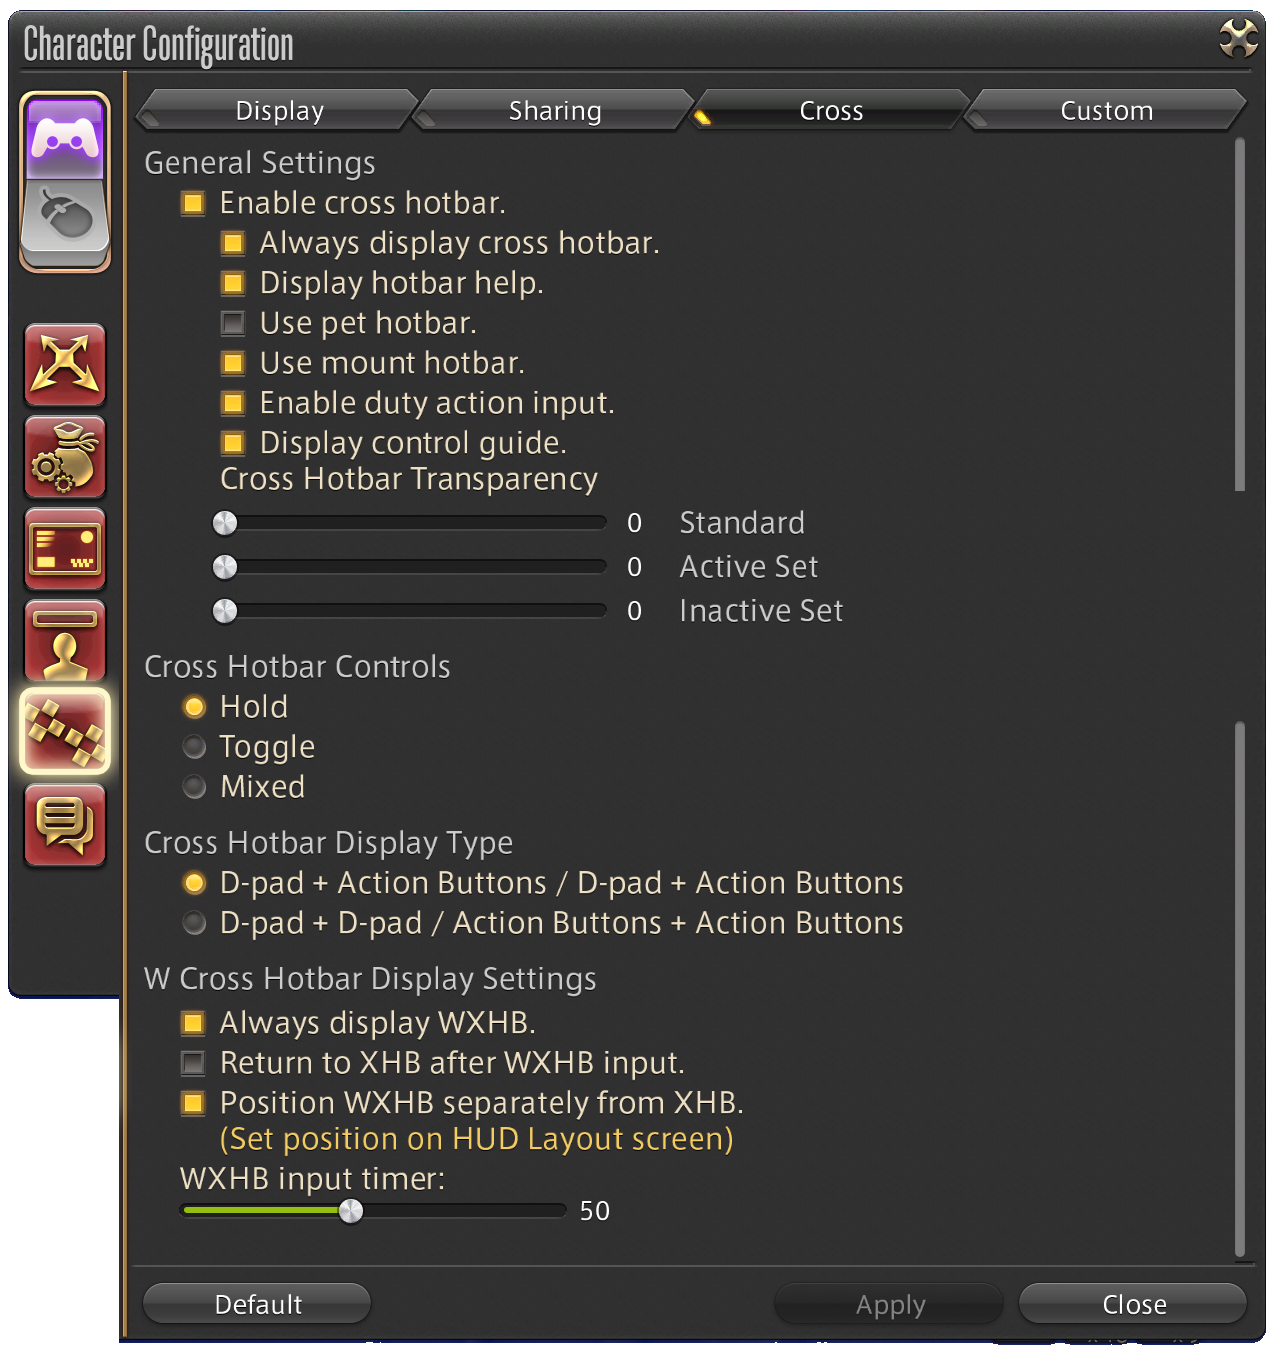
This is already enabled in the default settings for Gamepad mode. However, if you need to turn it on manually, you can do so in Character Configuration, Hotbar Settings, Cross.
How do I use the cross hotbar?
Activating a side of the cross hotbar
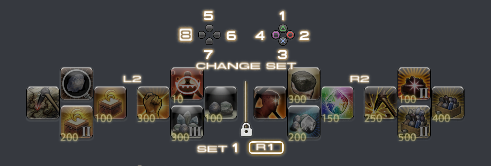
The idea of the cross hotbar is rather simple. You use an activator for the left or right side, then you press the appropriate face or d-pad button to use whatever action is placed there.
If you are using default settings, L2 will be the activator for the left side of the cross hotbar, and R2 will be for the right side of the cross hotbar. If you changed those, do check your button configuration in System Settings, as discussed in .
However, you can also just look at the cross hotbar as it will tell you which button you have mapped to that side.
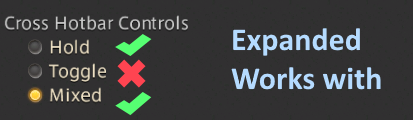
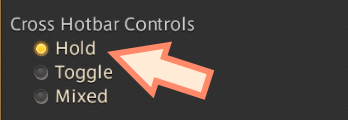
By default, you activate the respective side by holding the activator and press the button you need while the activator is being held. However, you can change that. There are three modes:
- Hold (default)
- Toggle
- Mixed
Toggle means you press the activator and that side stays activated without you needing to hold the activator down. Instead, you have to press again, or press the activator for the other side, to de-activate.
Mixed mode means you can either hold or toggle, based on how long you pressed down the activator for.
Should I use Hold, Toggle, or Mixed?
The majority of players use Hold mode, as it allows you to build muscle memory that is separate from the default button usage.
Let’s illustrate what that means:
Hold mode: X to confirm to target nearby target, R2 + X to use an action. This means X and R2+X are separate.
Toggle mode. X to confirm to target nearby target. R2 to activate. X to use an action. That means the act of pressing just X has 2 usage in a combat setting.
Mixed completely throws off muscle memory by allowing both types.
In addition, there are some other settings that we will discuss in the WXHB section that are not available in Toggle or Mixed mode.
That being said, there are some players who do use Toggle mode as their primary input method, often for accessibility reasons.
In addition, there are times when you might wish to switch to Toggle mode for specific content. For example, toggle mode works really nicely for fishing.
Customizing the look of your cross hotbar
In the same section (Character Configuration, Hotbar Settings, Cross), there are also some settings to customize a few behaviors about the cross hotbar.
- Always display cross hotbar: If you turn this off, the cross hotbar will disappear when no activators are activated.
- Transparency (Standard): How transparent the cross hotbar is when it’s not being activated. This setting is not used if you disabled “Always display cross hotbar” since that would hide it entirely.
- Transparency (Active + Inactive): When you activate a side of the cross hotbar, the active side will have the transparency setting for Active, while the remaining parts of the cross hotbar will use the transparency for Inactive.
In addition to the transparency settings, you can also hide/unhide certain parts of the cross hotbar using the following settings:
- Display Hotbar text: controls the names of the actions/items/macros, and a blurry black background behind that text.
- Display Guide: This will show the little icons to represent the d-pad and action buttons.
And lastly, you can change whether the cross hotbar is grouped by activator , or by d-pad/face button. Most people use the first option.
About the transparency settings
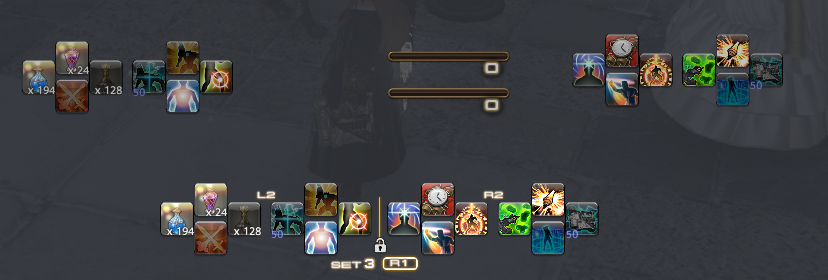
The transparency settings only affect the icons and button slots. It does not hide the yellow background behind the activated side, the line in between the sides, or the helper text (and its background) to let you know which actions/items are allocated.
Do note there is no way to use the cross hotbar and keep its UI fully hidden. The moment you activate, something will appear. This is because it is not possible to use the cross hotbar without having it enabled, and as mentioned above, it is not possible to set everything to fully transparent. Even if you turn off everything that’s optional, and use all the transparency settings, you would still have the line, the yellow background for the activated side, the set number, and the hints for which buttons are used to activate or change set.
There is also no way to hide an empty action slot (unlike keyboard hotbars).
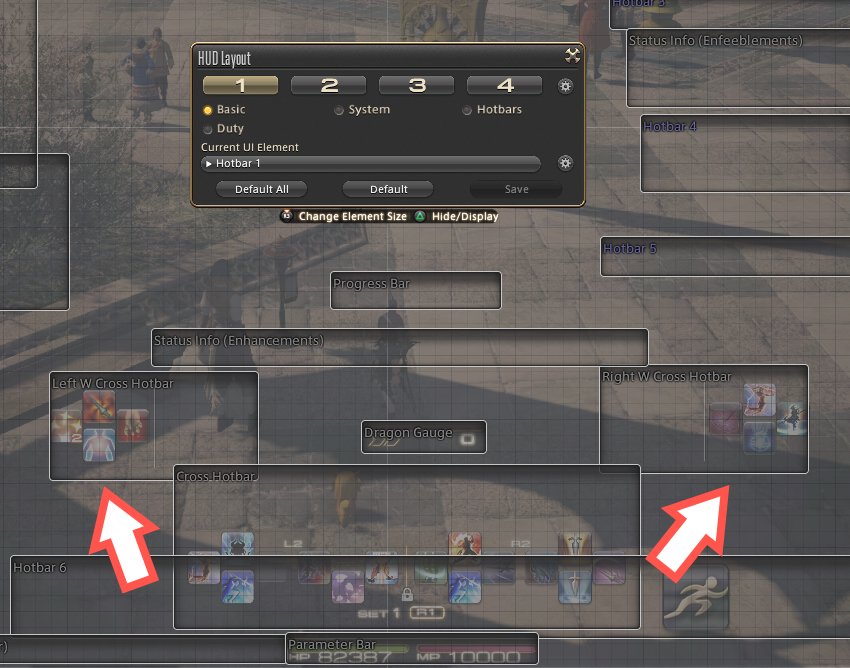
Customizing where the cross hotbar is located
This can be changed in the HUD layout screen
Using Duty Actions on the cross hotbar
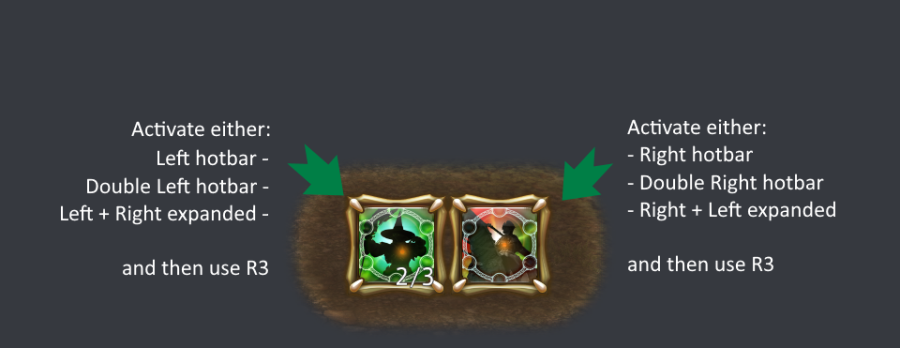
If you have a single Duty Action, activate any hotbar and press R3 to use it. This can include the expanded and double cross hotbar.
If you have two Duty Actions, then the side of the hotbar matters.
Left hotbar for your left duty action.
Right hotbar for your right duty action.
This does include the double cross hotbar.
- Doube left = left
- Double right = right
It also includes the expanded, based on the starting hotbar.
- Left + Right = Left
- Right + Left = Right
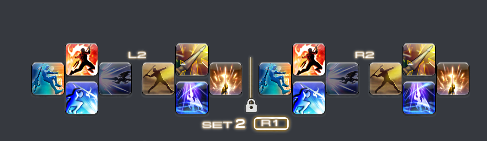
Set Selection
If you’re looking at that cross hotbar and thinking “wait, I can only use 16 actions?”, no worries, there are more cross hotbar sets! 8 of them actually, so 8 x 16 = 128!
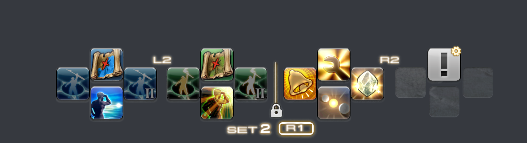
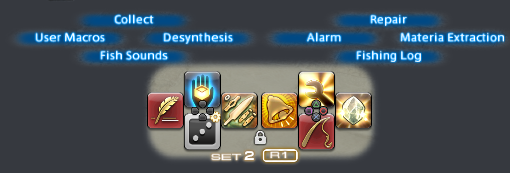
The above cross hotbar is active on set 2! Also notice it says “R1” as a reminder that it’s my button for switching cross hotbars!
There are multiple ways to switch sets, but let’s cover the first few basic ones: Change Set (Manual Switch), Set Selection (Quick Switch), and Auto Hotbar Switching. The names in parentheses are not official names, but they illustrate the principal differences between the two methods.
Change Set (Manual Switch)
Learning this method is very important as this is how you will place action down on your cross hotbar sets. This is essentially the building block of all other methods of accessing your cross hotbar sets.
To do this, press and hold your Change Set button (R1). Then press the face button or d-pad button that correlates to the set you wish to go into. This can be done very quickly, so you don’t have to hold for very long.
However, it does take about .2 to -.5 of a second, which can make you late for double weaves, especially since you also have to move your thumb to the button needed to change sets, which may not be the same location as the action you wish to use on that set.
Set Selection (Quick Switch)
It’s actually kind of funny that this one is called Set Selection, even though you don’t actually select a set! Rather, you cycle through sets tapping, but NOT holding, your Change Hotbar Set button (R1). You don’t have to press anything else after that. Just tap and stop.
So why is it called “Set Selection”? Because you can customize what sets it’s allowed to cycle through. By default, it cycles through any non-empty sets you have, but you can change that.
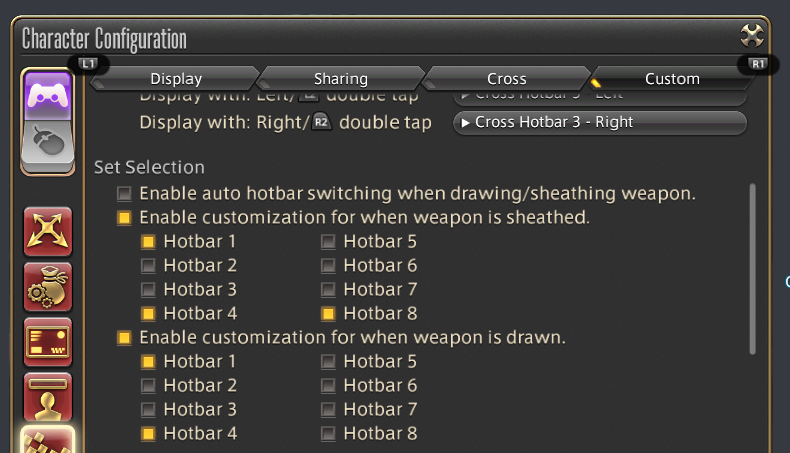
In Character Configuration, Hotbar Settings, Custom, you can go to Set Selection (PVE settings). In there you can enable two customizations: sheathed or drawn.
In the below example, when a weapon is drawn (such as in battle), it can only go to set 1. This means no accidentally going to another set - the player is using other methods that are not Quick Switch to access other actions.
By contrast, that same player is allowing 3 sets when the weapon in sheathed, such as in cities or gathering in the open world. This likely would include a set that has their mount, gear sets, etc…
The less hotbars you have enabled, the faster your Quick Swaps are. If using in battle, the recommendation is to only have your primary bar (likely hotbar 1) and ONE other hotbar.
Auto Hotbar Switching
When drawing or sheathing a weapon, it automatically switches to the first non-empty set. If you have customization for drawn/sheathe, it will adhere to those settings as well. This can be useful for automatically switching sets when you enter combat.
Expanded & WXHB
In addition to the Manual Switch, Quick Switch, and Auto Switch methods already introduced, there are two extra methods of accessing your cross hotbar sets. The first of these is the Expanded Controls.
Expanded
The Expanded is an alternative way of accessing an existing cross hotbar set by using both activators together. When used, the hotbar will change to show your expanded, which can only show up to 8 actions at a time.
This can be configured in Character Configuration, Hotbar Settings, Custom. Turn on the expanded controls and then assign a set & side for doing Left + Right activator, and another for Right + Left activator. Yes, the order matters.
Expanded is only possible for players on Hold or Mixed.
Do note:
- You don’t have to assign sides from the same set. You could do Set 3 left side for one, and Set 2 right side for another - if you really wanted to.
What if I don’t want order to matter?
There are two ways to make order not matter.
Method 1:
You can assign the same set & side to both. So you can have Left + Right be Set 2 left side, and also have Right + Left be Set 2 left side! While this effectively costs your expanded access by half the buttons, it does mean you do not have to worry about order.

This will apply to all jobs and classes (though you can have a different setting for pvp).
Method 2:
Another way is to not force it to the same Set & Side for both. Instead, you just repeat your setup on both sides.
For example, this configuration is using Set 2 left, and Set 2 right.

But in Set 2, left and right are the same:
The downside is that if any time you make a change, you need to make it to both sides. However, the upside is that now you have the freedom to have some jobs/classes with an expanded that doesn’t matter, while having others where it does.
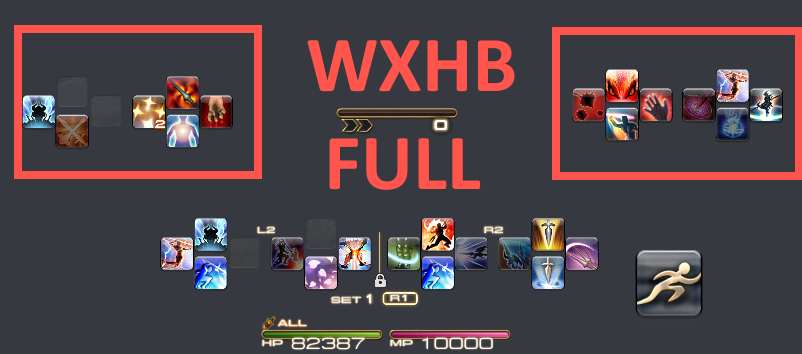
WXHB
This is the Double (W) Cross (X) Hotbar (HB). If you’re wondering how W and X came about:
- Pronounce W with a Japanese accent. Then pronounce Double. In both cases, it will end up as Dabburu. So for a Japanese player, and FFXIV is a Japanese game, W = Double.
- X = Cross on a PlayStation controller. Square, Triangle, Circle, and Cross are shapes. The PlayStation buttons are all shapes. There isn’t a random letter mixed in with 3 shapes.
Etymology aside, WXHB means a cross hotbar you access by quickly double tapping the modifier. Because of this, double tapping to reach the WXHB is only available if you are using Hold mode. If you are using Toggle or Mixed mode, you cannot use this to access a hotbar set (though you can use this to just have another cross hotbar set on your screen, for cooldown visibility).
Just like with the expanded, you assign an existing Set & Side. You can assign for the left double tap, and right double tap, and yes you can assign the same Side & Set to both if you wanted to.
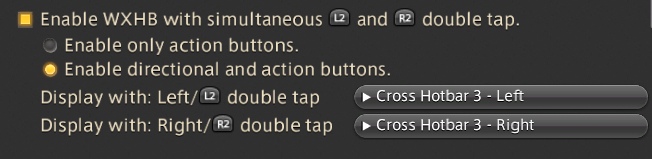
Beyond that, you can either choose to enable only face buttons (shapes), or all 8 buttons by including the d-pad.
Face buttons only:
All 8 buttons:
People who don’t like much clutter are more likely to only use the 4 buttons per side, but at the cost of losing half of the WXHB’s access, so they’re more likely to make use of the full expanded (L+R and R+L separately), or using Quick Swap/Manual Swap to go to another set if necessary.
Double tap timer and other WXHB configurations
In the previous section (Cross), there are a few extra WXHB settings.
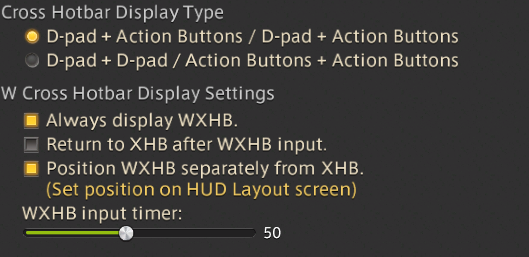
Always display WXHB: This setting means the WXHB is always visible. Turning it off means it is hidden until you double tap.
- Return to XHB after WXHB input: After using an action on the WXHB, it automatically returns to the regular cross hotbar on the same side you are holding. This means you have a setup that definitely does not have two actions that would be double weaved together on the WXHB, since it would mean having to go back to the WXHB right after using an action.
- Position WXHB separately from XHB. This creates new HUD elements for the left and right side of the WXHB that you can place individually on the HUD layout screen. Otherwise, it is at a default distance.
- WXHB input timer: Up to how long taps can be apart to be recognized as a double tap instead of just tapping twice.
Bigger number = more time to get into double tap, but more likely to end up “accidentally” going into the WXHB when you didn’t mean to
Small number = less chances of accidentally ending up on the WXHB when you changed your mind, but it means you need to be faster at double tapping.
Having a number too small can potentially cause issues in content with a lot of players and/or effects if it causes your frame rate to drop, as the WXHB input timer is negatively affected by frame rate drops.
Benefits of changing the button configuration
Double tapping in a specific time can get very tiresome, especially if your controller has digital triggers with feedback. Failure to double tap correctly could lead to loss of downtime during high pressure moments if you don’t double tap far enough in your triggers.
There are three solutions to that:
- Get better at it and your fingers will get stronger
- Use a controller that doesn’t have digital triggers (ex: PC players using Switch pro controller), or supports putting in trigger stops (ex: getting an expensive PS4 controller for professional gamers)
- Not using triggers!
In the button configuration, you can have bumpers become your activators. If you’re finding yourself getting tired easily, or making a lot of mistakes, but you want to keep using the WXHB, you should consider changing your button configuration so that your “Highlight Left Hotbar” and “Highlight Right Hotbar” are both on your bumpers. Bumpers will have less feedback and are generally faster to press.
Do note this will change other button combinations too, not just the cross hotbar. For example, let’s say your were using L1 and R1 for left and right hotbar, and L2 as Auto-Run, and R2 as Change Hotbar set. Now to do a manual or quick swap, you would use R2. To do Enmity targeting or use your auto-run (if you haven’t disabled it), you’d use L2. So this would be a big change, but possibly for the better.
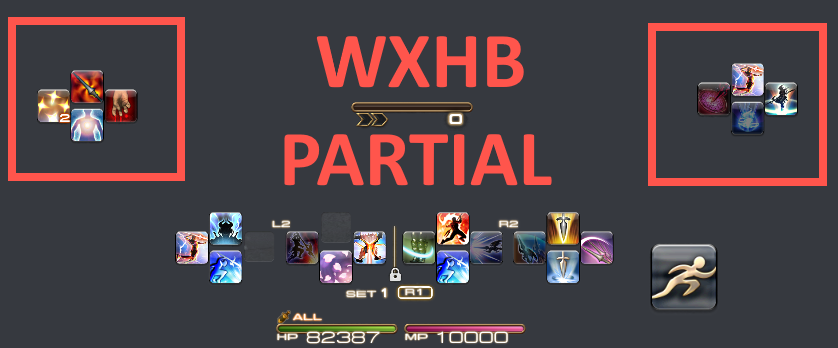
Using the WXHB for visibility only
As mentioned, players who are on Toggle/Mixed cannot double tap, but they can still use the WXHB to view actions, so for their it’s already available for “visibility only”. However, even a player using Hold can do that!
If a Hold player wants to use the WXHB for visibility, but does not wish to accidentally double tap into it, they will need to:
- Turn on WXHB in the Custom section to set up your WXHB to look exactly as you want
- Once you are done, and your WXHB is perfect…..
- Make sure “Always Display WXHB” is turned on
- Go back to Custom section and disable WXHB.
The reason you have to disable last is because once you disable the WXHB, you can no longer edit which set & side it’s using. So you’d have to re-enable it temporarily to change that.
Assigning actions to the expanded and WXHB
The expanded and WXHB controls are not separate hotbar sets, they are just a different way of accessing your existing ones. In order to change them, you have to change the underlying set they are using. This is why, even if you’re not using the Manual Swap as part of your overall style, you still need to know how to access each individual set so you can edit them.
Changing Sets Via Macros
It is possible to manage cross hotbar sets via macros - sort of. But the question is “why?” and there are generally two reasons:
- A Toggle/Mixed style player who needs a faster way to access actions from another hotbar without using Manual Switching. This is common for players with accessibility obstacles who may not be able to use the WHXB and/or expanded.
- A player making a macro menu - a way to keep non-battle features such as UI shortcuts, gear sets, emotes, mounts, etc… accessible to all jobs/classes without using up a lot of shared cross hotbars.
Managing Sets for Battle Use
For a player using macro sets for battle use, you’ll need:
- Set 1 is your display set
- Your real sets will be hidden sets
- These hidden sets should not be using the same hotbars as your expanded, wxhb, or “quick swap” (set selection). If you’re a toggle/mixed player, you won’t have WXHB anyway.
Here’s an example, let’s say a player has the following needs:
- Cannot hold, only Toggle (no WXHB or Expanded!)
- Might have accessibility issues with fingers and is pretty much only using one finger (hence why toggle).
- But still wants quick access to 4 cross hotbars
They could do:
- In Set Selection for Weapon Is Drawn, Hotbar 1 and Hotbar 2 are selected. These will be the sets they use during battle.
- In Sets 3, 4,and 5 they put in actions for their rotation, to use via macros. Each of those will be copied to set 1 so they can stay on set 1 the whole time. Set 2 (quick swap) would be used for less common battle things like Limit Break.
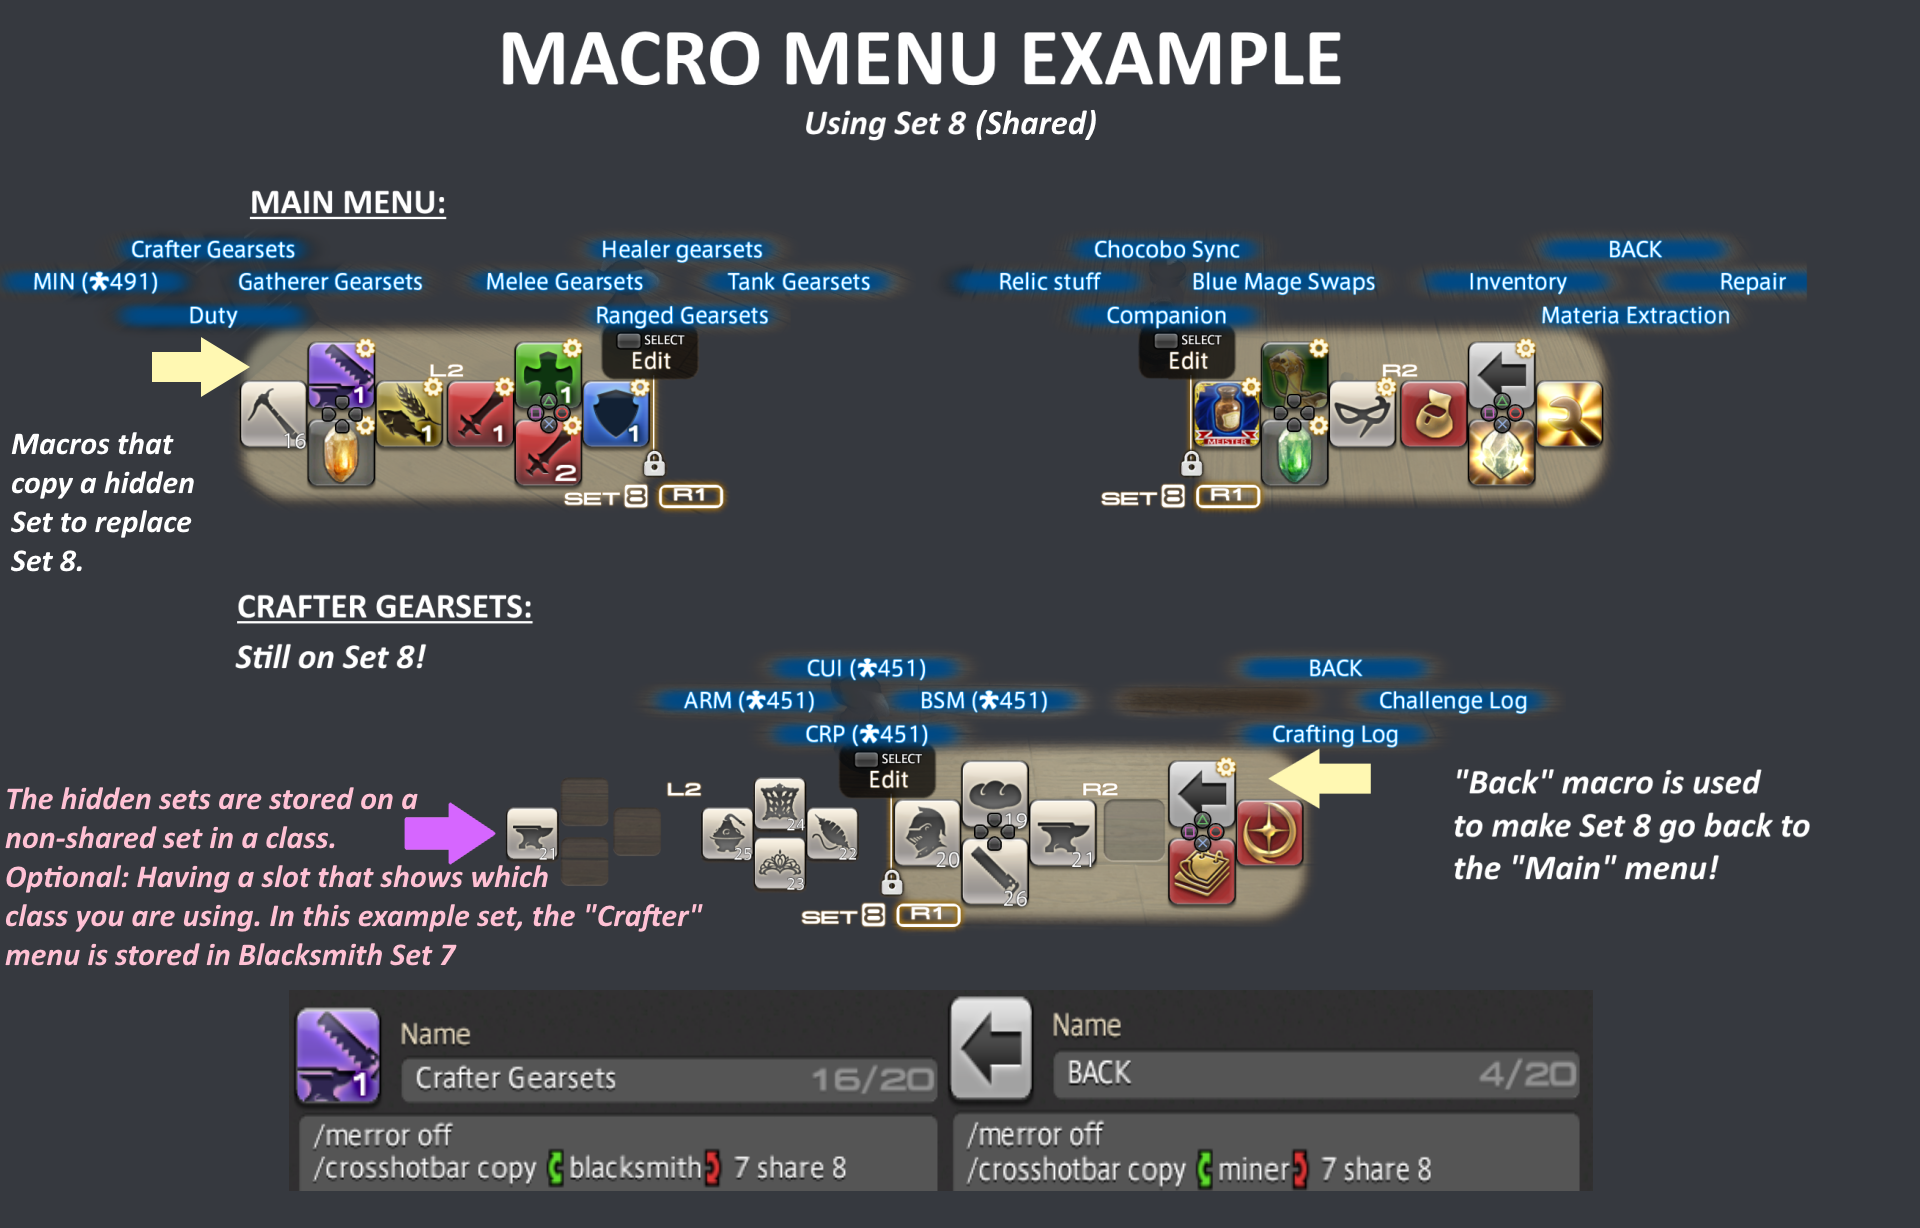
Making a Macro Menu
Job actions generally fit into 2 or 3 cross hotbars, depending on the job, so it’s common to reserve 3 cross hotbars for battle.
Then you might need a 4th cross hotbar if you’re doing special content like Bozja or Palace of the Dead solo, where you might need extra items available quickly that you normally wouldn’t need in other content (Lost actions, potsherds, echo drops, etc…)
But of course you also need a place for your gearsets, mounts, emotes, menu items you access often, etc… It all adds up quite quickly! It might feel difficult to fit everything within 8 cross hotbars.
But that’s where the macro menu comes in.
It’s possible you might have seen some mouse & keyboard players with a fancy hotbar setup where the hotbars seem to change as you click. Controller users can also make use of a similar macro menu.
How to make a macro menu for controller
The idea is fairly simple:
- You pick a SHARED set to be your menu’s display (what you will interact with)
- You pick a non-shared set to be your menu’s behind-the-scenes system (where the menu is stored)
- One of those non-shared sets will be used as your top-level. It just has a list of macros to your other menus.
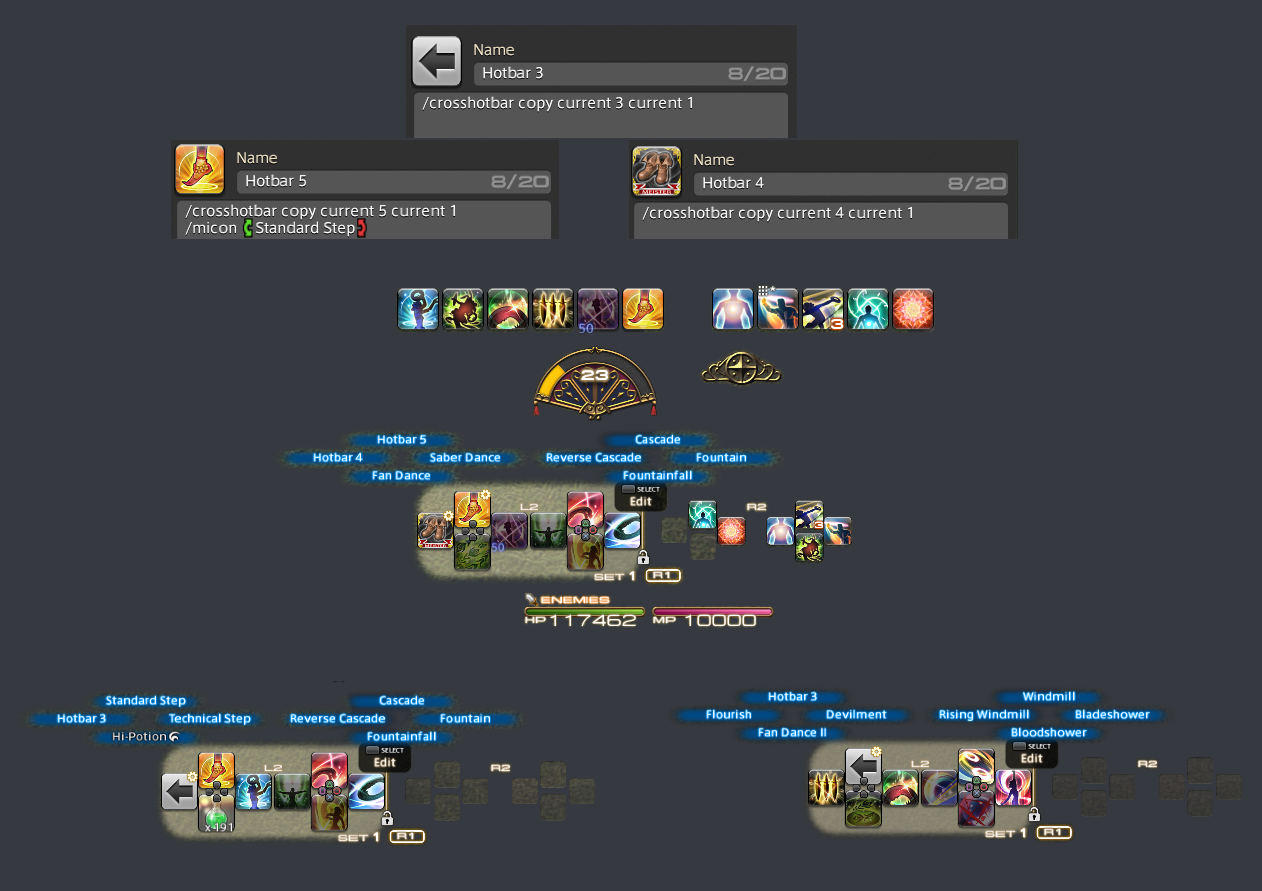
- You copy from one set to another using macros.
Example:
/crosshotbar copy miner 7 share 8
It is recommended, though not required, to store your menu in classes, so you can focus your battle jobs to have meaningful sets for content. Crafting and Gathering classes are great for this purpose.
Organizing Actions on the Cross hotbar
This will only cover how to do this via the gamepad. However, everything can be done via mouse (or the virtual mouse) via left-click drag and drop as well.
Assigning Actions
Open up the menu that contains what you wish to place. So the Actions menu for your job actions, your inventory for an item, or the macro menu for a macro, or any other menu that has the relevant action you wish to bring down (minion, mount, etc..)
Once you have located what you wish to bring, you will use the Subcommand button (Square).
The action menu takes it directly to “Set to Hotbar”

But other menus, such as the Inventory, might require first selecting an option such as “Set to Hotbar” from the subcommand menu:
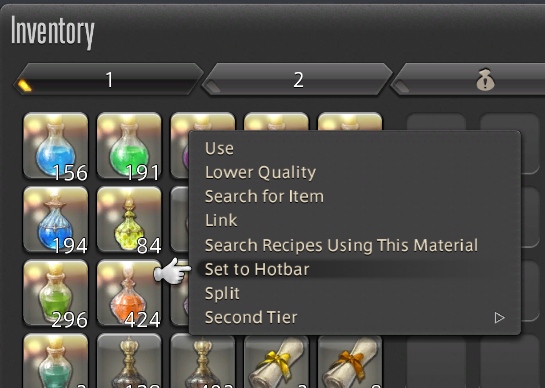
Either way, you will reach the Hotbar Palette:
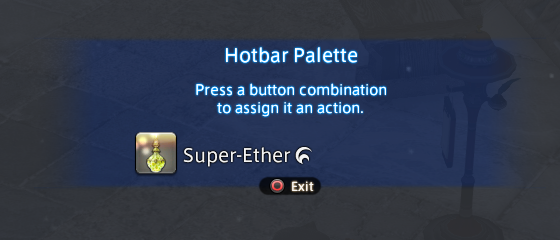
From there, you can go to any cross hotbar you wish to edit and do the combination necessary to assign it. So if you want it on the R2 + Triangle, you press R2 + Triangle.
Do note that if you have something already on there, it will simply replace it. It will not ask you to then place it elsewhere. If you do want to switch it with something else, you will either need to place both, or you can place one into an empty spot and then skip to the section on how to swap actions on the cross hotbar.
For the WXHB and Expanded cross hotbar, you will need to go into their actual cross hotbar to place actions there. You cannot place using the WXHB and Expanded modifiers. So if your Expanded cross hotbar is using Set 3 as its underlying cross hotbar, you will need to go to Set 3.
In the above screenshot, set 3 is used as the WXHB hotbar.
Moving Actions
Maybe you don’t want to assign a new action, but you realized you want to move some of them around.
First, activate the cross hotbar. It doesn’t matter if you activate it via the left or the right modifier. (Do not activate the WXHB). Once the cross hotbar is activated, use your HUD Select button to enter Edit Hotbar mode. The game will even show you:

Note: The above screenshot may look different on PS4/Console as it would show something that looks more like a touchpad.
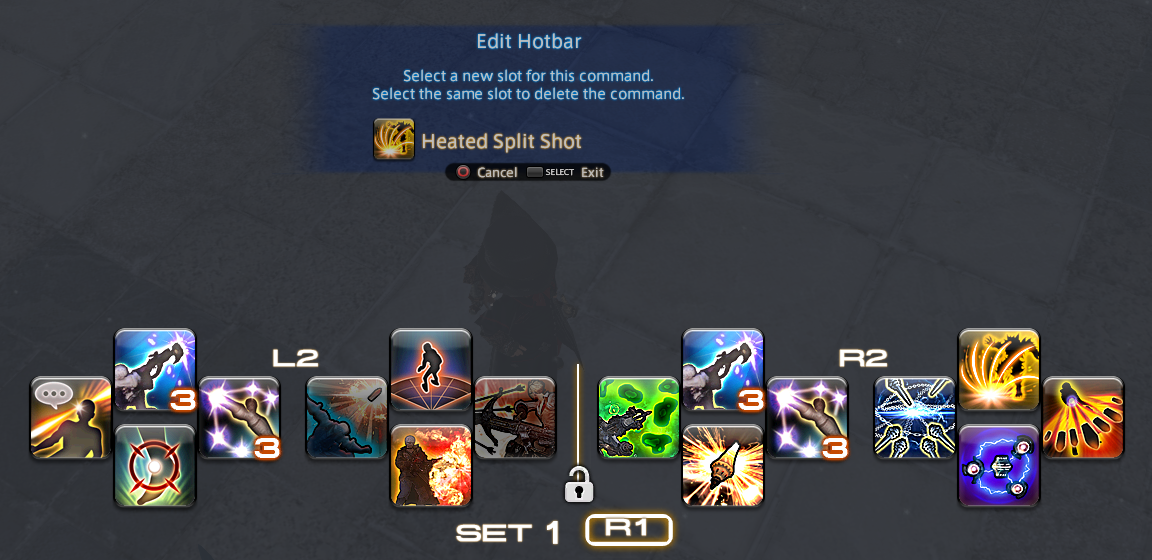
Do a button combination to select an action to move
Do another button combination to move it there.
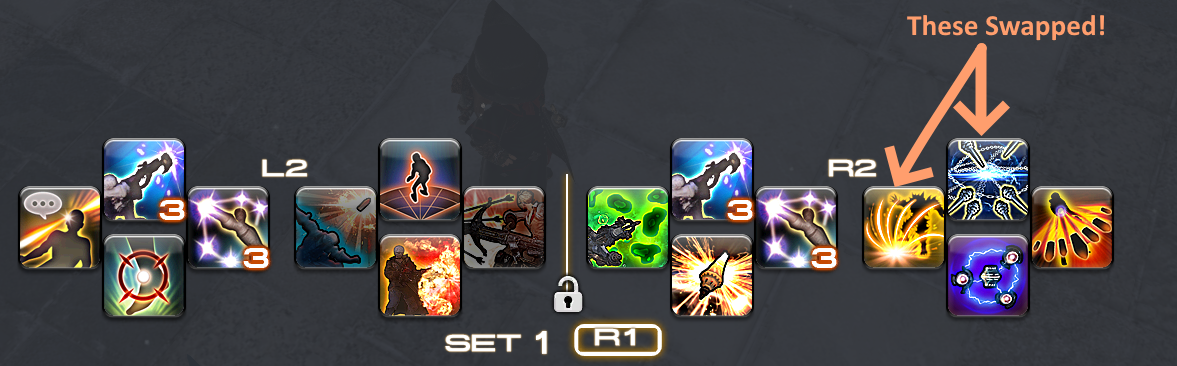
If there was already another action in the new location, they will swap.
You can use the HUD select button to exit Edit mode.
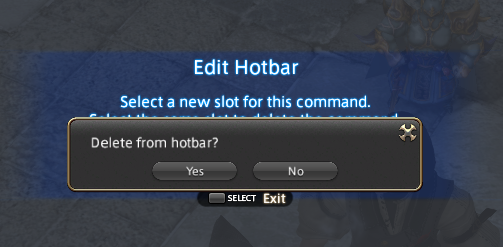
Removing Actions
Similar to Swapping actions, first you will need to enter Hotbar Edit mode by activating the cross hotbar and pressing your HUD Select button. Do the button combination for the action you wish to delete to select it, then do it again. In other words, if you try to “move” where it already is, it will ask you if you wish to delete it.
You can use the HUD select button to exit Edit mode
Pet and Mount Hotbars
Most likely the most confusing of all settings are the ones related to pets and mounts, mostly because the in-game text is written in a way that just isn’t clear. Perhaps it’s better written in the Japanese version. Perhaps.
In order to explain the confusion, let’s go over the types of pets and mounts in this game:
- The pets most players think of: the scholar Faeries and summoner Egis. These use the Pet Hotbar.
- The mounts that players can summon that have special actions, like the Starlight Bear. These use the Mount hotbar.
- The mounts you have to use for quests and duties, which the game settings calls pets too! These use the Pet Hotbar Display. Notice the extra word at the end?
That last part is where the confusion about the settings come in. In the character configuration, in Hotbar settings, there are two sections that refer to the pet and mount hotbars: Display and Cross. Let’s start with Cross.
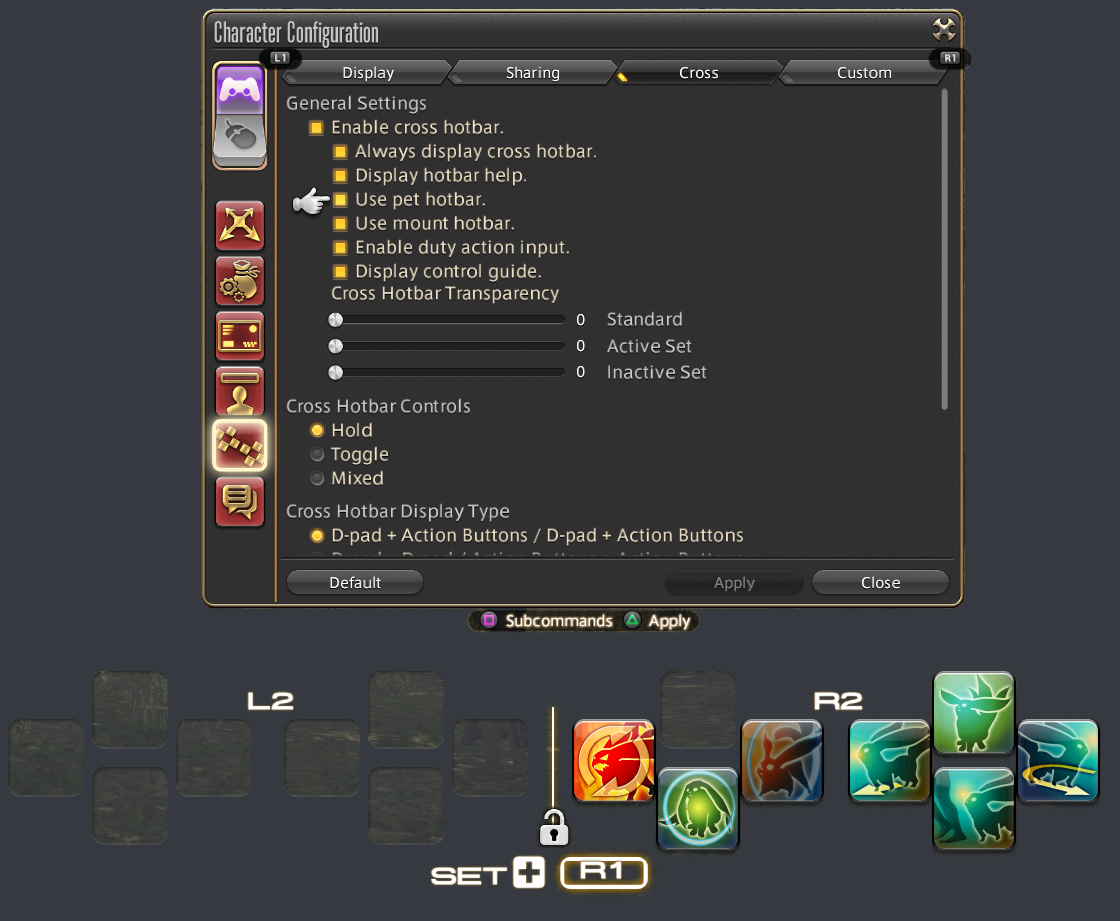
Pet hotbar for scholar and summoner pets
To enable the special pet cross hotbar, go to Cross section and turn on “Use pet hotbar”. Now, whenever you have a job pet summoned and you are not mounted, using your Change Hotbar Set button (R1) will result in cycling to the pet cross hotbar and back to the previous cross hotbar you were on. This completely ignores any Set Selection settings you might have in Custom.
You also have no say on where the actions are placed. Because of these restrictions, it is recommended to turn the setting “Use pet hotbar” off and instead manually place the pet actions you are most likely to use directly into your own cross hotbars.
Turning off this setting will not affect the mount hotbar or the “pet hotbar display” for duty mounts.
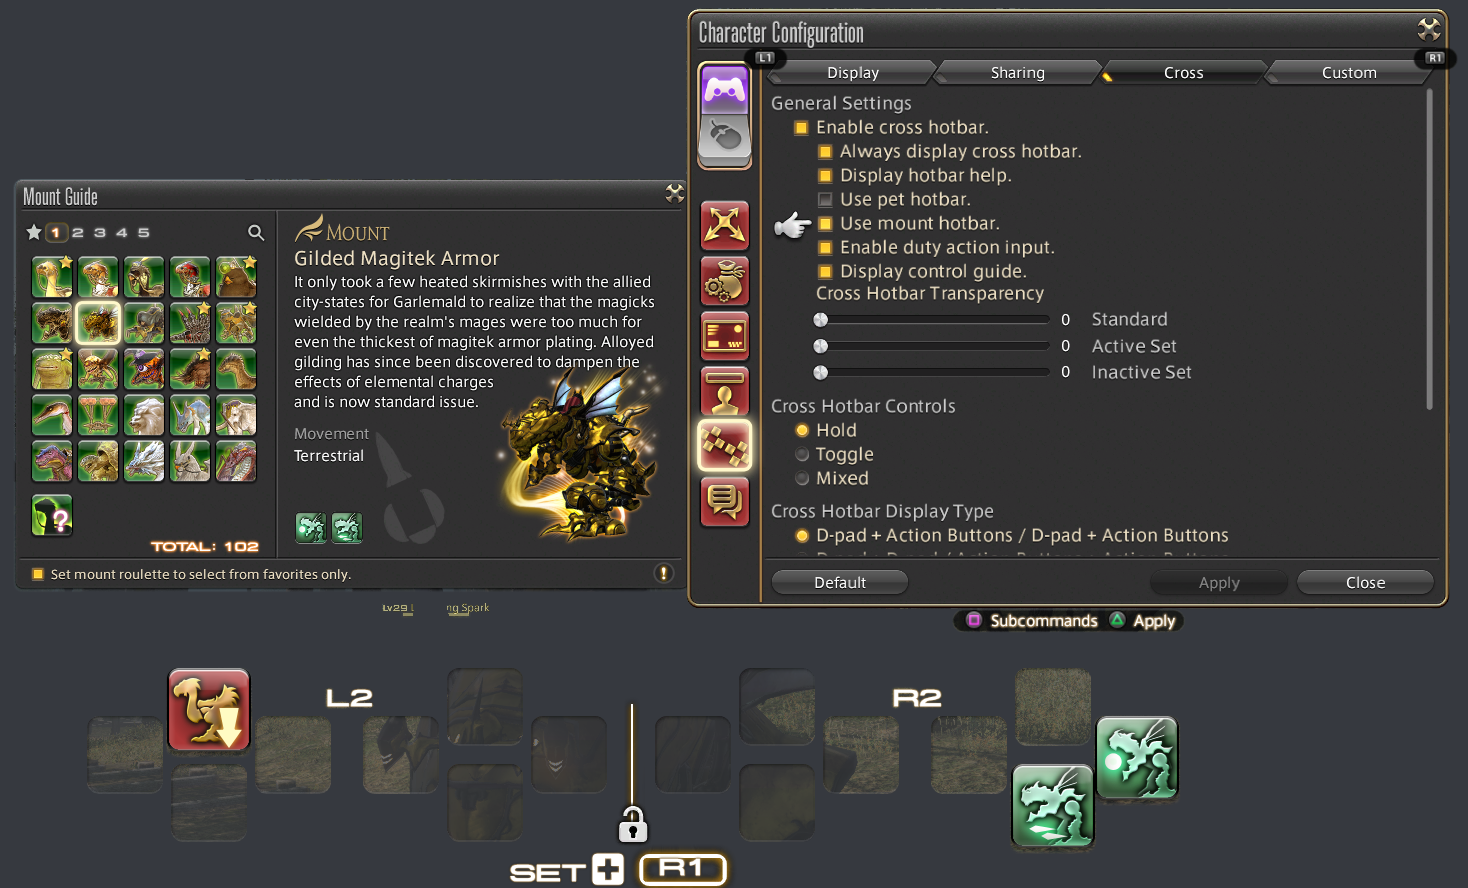
Personal mount hotbar
Remaining in the Character Configuration, Hotbar Settings, Cross section, there is a setting called “Use mount hotbar”. If you are on one of the mounts you own, and it has a special action, you can now use your Change Hotbar set button to get to it. Like the pet hotbar, this also affects your Set Selection settings, but since you are mounted anyway, this is not as big a deal. It is recommended to leave this setting on.
This setting does not affect the special cross hotbar for job pets or duty pets.
The Pet Hotbar Display for duty mounts
To be extra clear: This is a completely separate special cross hotbar. Even if you turned off both the “Use mount hotbar” and “Use pet hotbar” settings in the Cross section, you would still have access to the special duty pet cross hotbar.
So where do this cross hotbar’s settings exist? In Character Config, Hotbar Settings, Display, go all the way down to reach the Pet Hotbar Display Settings.
You can have it change the:
- Cross hotbar and the keyboard pet hotbar
- Just the cross hotbar
- Or just the keyboard pet hotbar
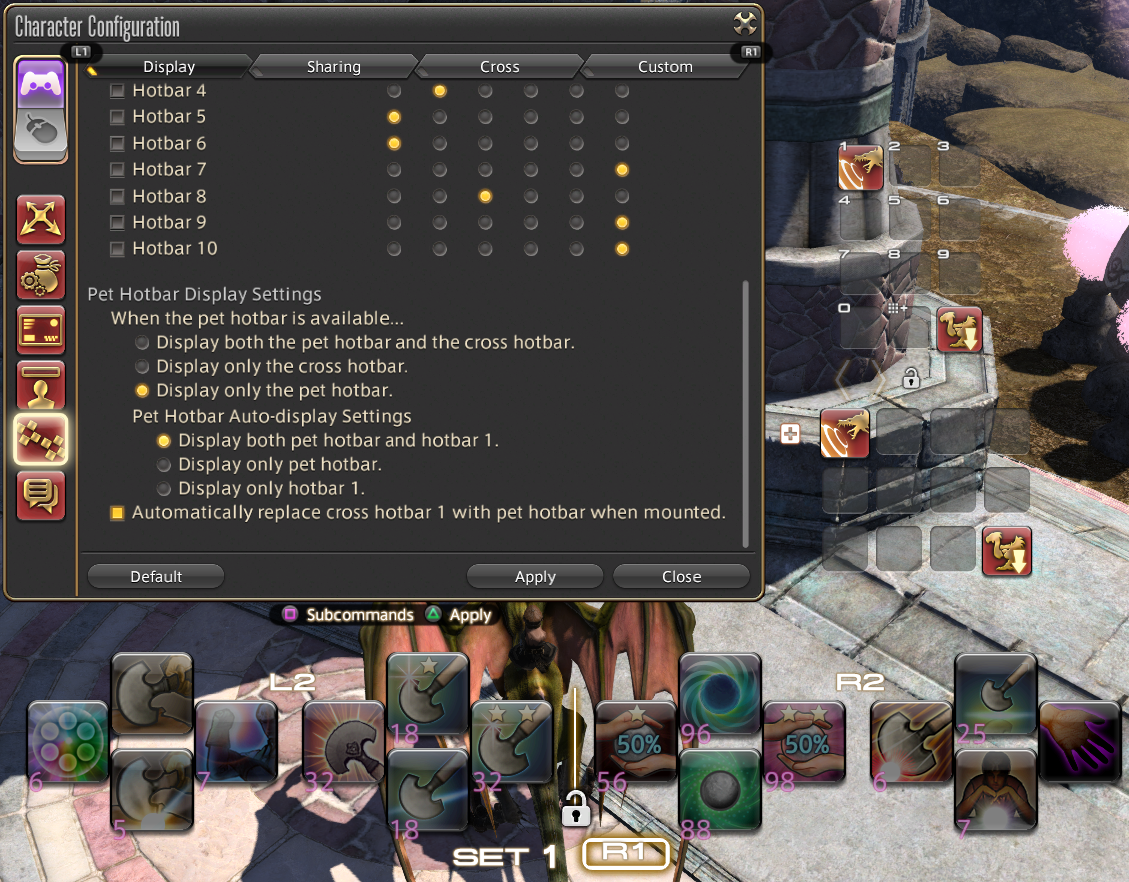
In addition, if you choose the first or last option (for keyboard pet hotbar), you can choose whether to have the keyboard pet hotbar using the extra pet hotbar, hotbar 1, or both.
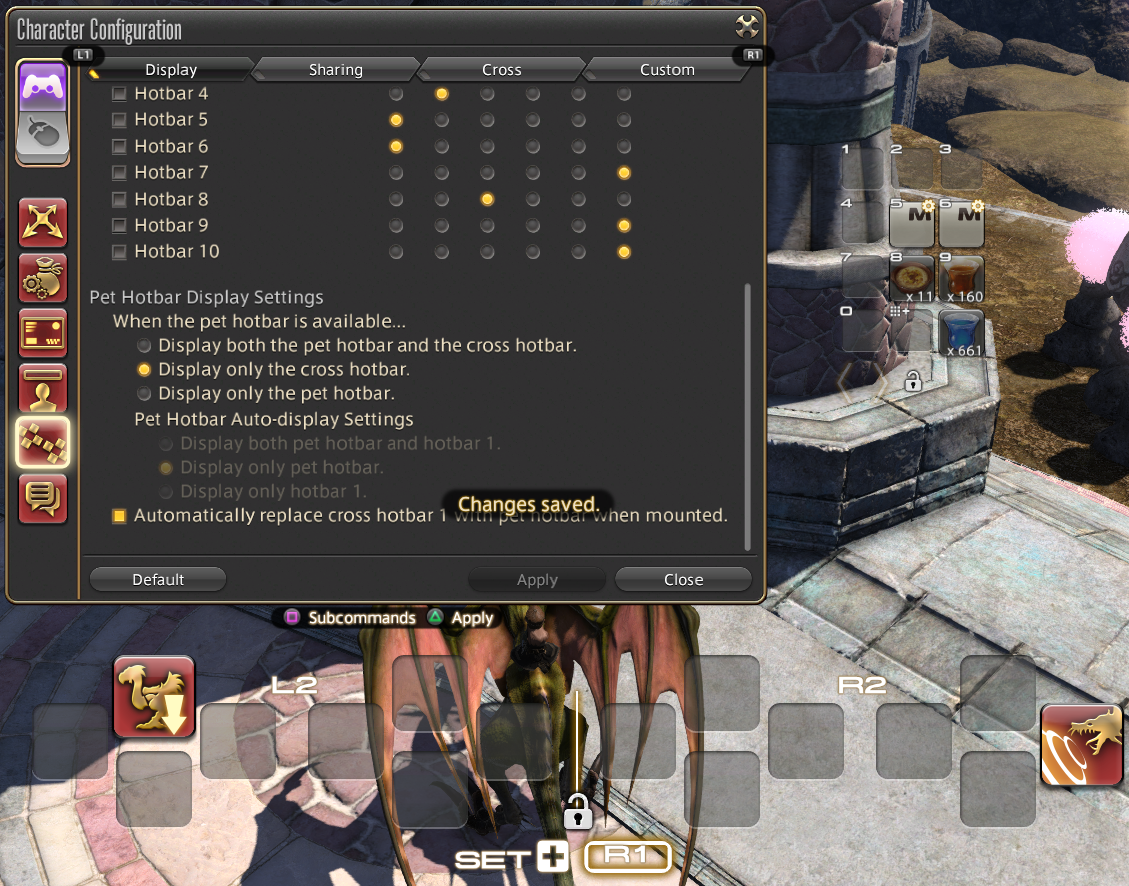
As a controller player, you will want either the first or second option. It really doesn’t matter which, unless you’re also using hotbar 1 or the keyboard pet hotbar for visibility, and even then it really won’t matter too much. The second one is the cleaner option. What it does is add a special pet hotbar that automatically gets focused on when you get on the special Duty “Pet”.
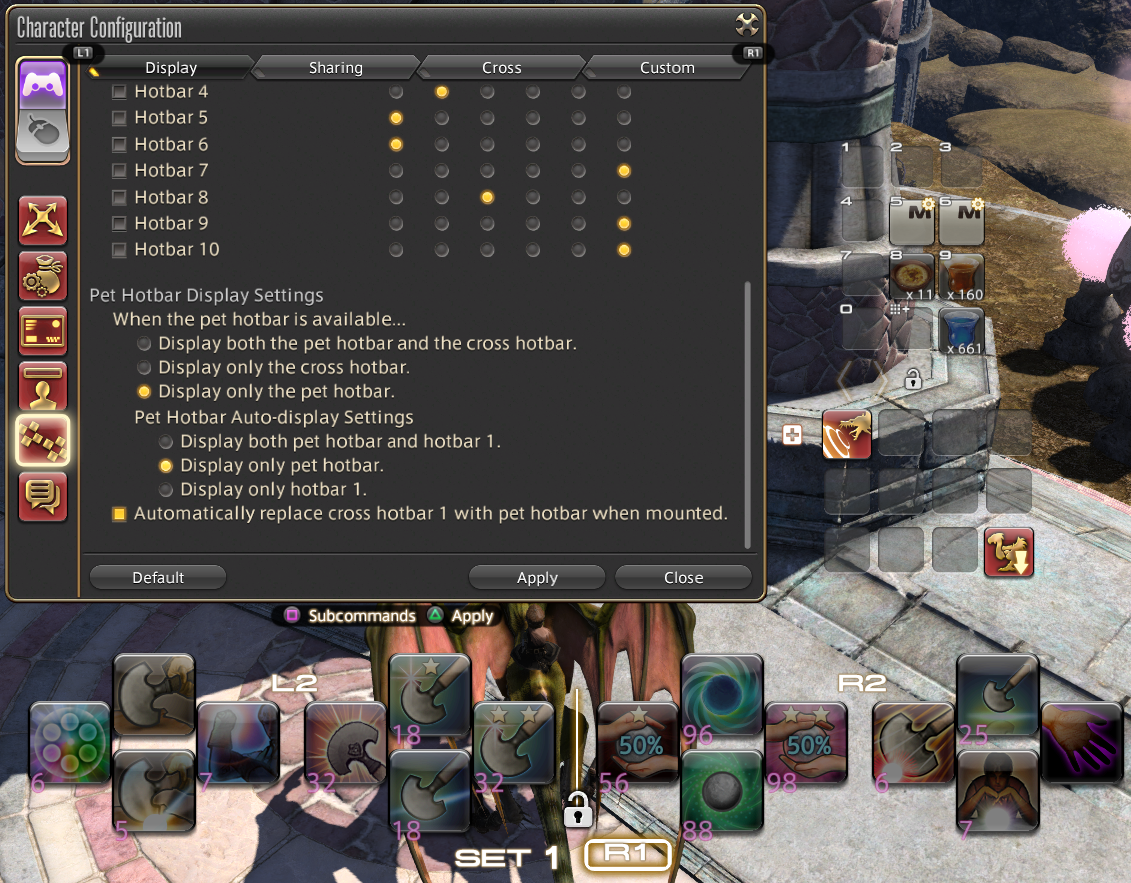
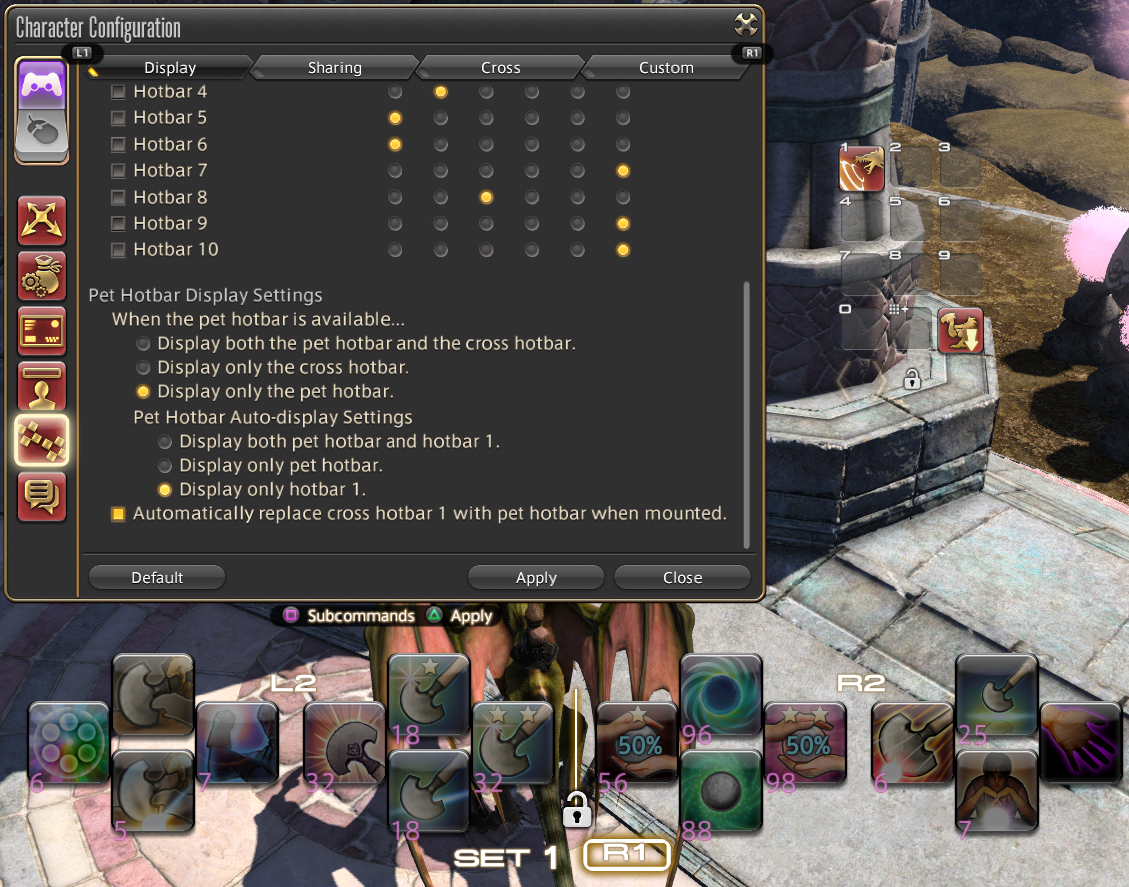
To make this easy to visualize, here are pictures of each possibility.
Each screenshot features the Cross hotbar, Hotbar 1 (top right), and the pet display hotbar. If it doesn’t appear, that’s because the setting didn’t use it.
Cross hotbar and Pet Display hotbar change:
Viable for controller play

Cross hotbar only changes:
Viable for controller play
Hotbar 1 and Pet Display Hotbar change, but not cross hotbar.
Not recommended for controller play.
Pet Display hotbar changes, but not the cross hotbar.
Not recommended for controller play.
Hotbar 1 changes, but not cross hotbar.
Not recommender for controller play.
If you end up leaving that cross hotbar by manually selecting another cross hotbar, you can go back to it by pressing your Change Hotbar Set button. Like the other two special hotbars, this also overrides your Set Selection settings, but that should not matter as if you’re on a Duty “Pet”, that means you only have access to its actions anyway.
What about the setting “Automatically replace cross hotbar 1 with pet hotbar when mounted”?
That setting’s text must have a mistake. It should say hotbar 1, not cross hotbar 1. Despite exhaustive testing, it seems to have absolutely no effect on the cross hotbar. What it does is change the keyboard hotbar 1 into the mount hotbar when you are on a personal mount with a special action.
This is only useful for people who use regular hotbars but have the “pet hotbar” HUD element hidden, since the pet, pet display, and mount hotbar all use the same HUD element. (Though pet display hotbar does not care if the element is set to invisible as its visibility is entirely driven by the character settings covered above instead).
So for players who have the pet hotbar set to invisible, they can use this to have the mount hotbar show up in hotbar 1 instead.
Choosing a Cross hotbar Style
Different players have different playstyles. It’s true for mouse and keyboard, and it’s true for controller as well. Some of the various styles build on each other, so let’s try to go over them from the simplest to the most complex.
Complexity in this case means the effort to configure, not the ease of use. Many of the more complex setups can be more comfortable to use than the simpler ones, if it fits you.
Style 1A: Default
The most basic of all styles is sticking with the game’s default setting.
Players who do so just have a basic cross hotbar, and will use either Direct Set Selection or the Cycled Set Selection to get to their actions.
While common for the very newbies, it’s not as common among veteran players.
Style 1B: Default, but with cooldown visibility!
This style is actually fairly common. Just the simple default cross hotbar settings, but with using some keyboard hotbars to keep track of ability cooldowns.
Style 1C: Optimized Simple Swap Crossbar
The whole point of players who like Style 1 is that they don’t need all the bells and whistles of using the Expanded or Double Cross hotbar (WXHB). They like switching from one cross hotbar to another without worrying about double taps or only seeing half of the cross hotbar. But, that doesn’t mean they don’t want to be optimal.
To do so, they would use the Set Selection to limit the Cycle Set Selection to only 2 or 3 cross hotbars for battle. Those who choose to only have 2 would manually set select if they needed a third cross hotbar. The idea is to quickly switch from one crossbar to another without needing to specify one - at least for your most common actions.
Since these players still want to be efficient, they would also be likely to have a keyboard hotbar for cooldown visibility.
Style 2: Expanded
Most likely the most common setup I see is someone using style 1C (or 1B), but with an expanded added. Players like this would prefer not to use Cycling for 3 cross hotbars, but also would prefer not to have to manually go into a cross hotbar since it can be awkward. Instead, they are more likely to use Set Selection Cycling to quickly switch between 2 cross hotbars, and have the Expanded as their third cross hotbar for ease of accessibility.
Once again, such players would also likely have a keyboard hotbar for cooldown visibility.
Style 3A: Frequent WXHB
This is actually the style of the author. Players of this style have the WXHB enabled and use it extensively. Likely they enjoy playing fast paced button combo games such as fighting games or rhythm games.
People of this style are likely to create a motion of doing a GCD on the primary cross hotbar, and then immediately double tapping to weave their OGCDs.
Players of this style may or may not have a cooldown hotbar. It is possible to place abilities in such a way that all of the actions with cooldowns worth tracking are visible in this style, since many OGCDs would end up on the WXHB, it is very possible to not have them solely on the expanded.
Style 3B: WXHB for AOE
Style 3A can be difficult, even annoying, for people who prefer a slower pace of buttons. However, that isn’t to say the WXHB cannot be useful to them.
WXHB Held is a style where instead of constantly switching from the primary to the double, you try to stay in the double as long as possible while you are using it. Because of this, it can be used to place AOE abilities (and single target abilities used during AOE periods).
Players of this style are likely to also have an expanded bar, for actions that are used infrequently. Because of this, they are also likely to have a cooldown hotbar to keep track of actions placed on the expanded.
Style 4: Toggle/Mixed Mode
This is not a common style, but it is one that might be more accessible to certain players than all the other choices above.
Players with limited mobility might prefer to use Toggle mode, which stops being able to use the WXHB and the expanded (Players using Mixed can use the Expanded).
Such players will use a style more similar to 1B, making use of Set Selection Cycling to tap to another cross hotbar. However, if they don’t want to cycle between more than 2 cross hotbars, they might make use of cross hotbar copy macros to quickly copy another hotbar to the primary and turn it back.
And many more!
There are even more combinations. Here are a few other quick examples:
- “All the things”: a 4-cross-hotbar setup with a primary cross hotbar and 1 extra cross hotbar to use Cycled Set Selection into, with also a WXHB and an Expanded. Can be useful for players using 3A but realizing they need an extra bar for specialized content (ex: Bozja)
- “I like wxhb but only sometimes”. Not everyone likes having two cross hotbars on the screen. Some players just want the WXHB for the face buttons. Likely they use these for very rare abilities, like Limit Break or Potions, and actually play quite similar to a non-WXHB style. Those players are more likely to put the WXHB on the side rather than above the primary cross hotbar.
- “I don’t like double tapping but I like having my cooldowns match”. These players have the double tapping disabled, but have the WXHB itself visible. Although they can’t go into it by double tapping, they use it to view the cross hotbar that they would Set Select into. This is to reduce the amount of keyboard hotbars used for cooldown tracking, and also to make it more obvious where that cooldown is placed on the actual currently-inactive cross hotbar.
Play around with the possibilities and really ask yourself what you would prefer to play and how to optimize it. If you understand all the options available to you, and the restrictions that come with certain choices, you should be able to find the right choice for you.