Enabling Controller Support in FFXIV
If you are on console, this will already be turned on - as a matter of fact, it’s not even a setting for console. However, if you are on a computer, it might not be. To do that, you will need to go to the main menu using your keyboard.
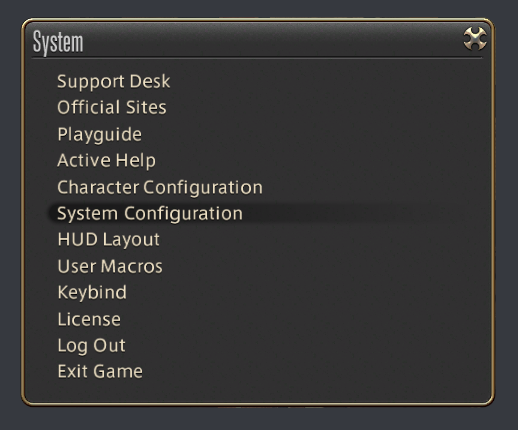
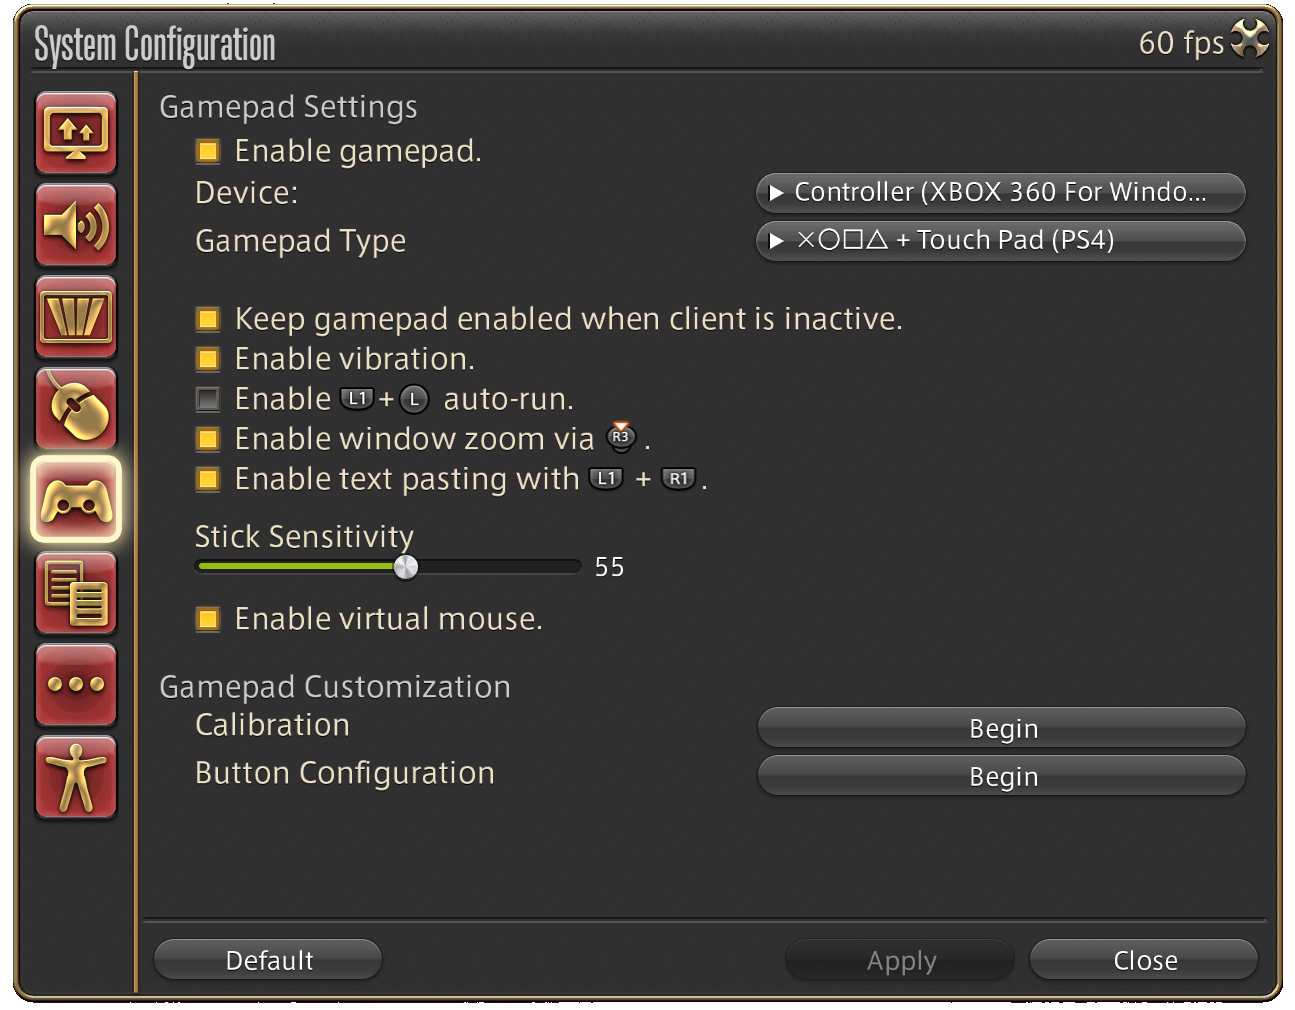
To access the main menu using your keyboard, press the escape key and go to System Configuration, then go to Gamepad Settings and turn on enable gamepad.
Pressing Escape to reach the System menu:
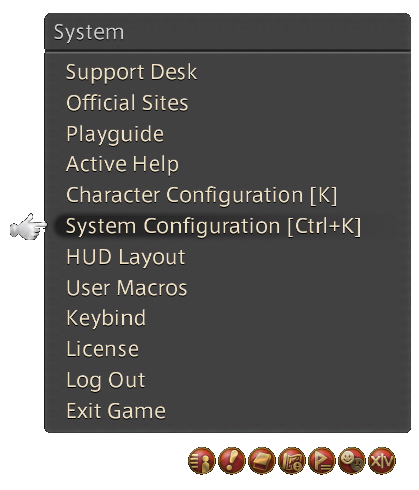
Or using the mouse to click on the System menu in the game menu, if you have it set to visible:
Picking a Controller
Having Enough Buttons
Final Fantasy XIV was made with a PlayStation controller in mind. While you can play with a different controller, you ideally want enough for:
- Analog/Camera sticks
- D-Pad and 4 face buttons
- Ideally 4 buttons for your bumper + triggers, but it can be comfortably doable with just 3, and even with just 2 if absolutely necessary.
- Ideally 2 analog stick clicks, or 2 extra buttons that can take on that feature, but it can be doable without
- 2 buttons for Start and Select(pad) are also ideal, but not required
For anything you do not fill out, expect to have to reach out to a keyboard or mouse to fill in the gaps. For example, you do not need Start if you just reach out for your mouse to go to your main menu. Likewise you do not need the Select/Pad button if you use the mouse to interact with the HUD elements like the Duty List, which admittedly you only do so often.
You can also bind keyboard buttons to a controller button, which is why you can get away with not allocating all 4 bumper & triggers, as if you use WXHB and expanded, you can manage not to use the Change Hotbar Set button in battle at all, and thus can just use a keyboard when you need to access that outside of battle.
Using a controller without enough buttons, but just barely enough, can be OK if you’re using it for combat, but not for other things.
That being said, it’s much easier to just have enough buttons!
Analog Stick Placement
Another factor for your choice of controller will be its analog stick placement. Generally it comes down to two styles. As a PC player, you have a greater selection of controller styles than a Console player, and you can and should make sure you take this into consideration:
Adjacent Analog Sticks (PlayStation style)
Place your left thumb on the movement stick and your right thumb on the face button.
Now, try to reach the d-pad while still moving the movement stick. You can do this two ways:
- Move your right thumb up and over to the d-pad
- Move your right thumb to the movement stick and the left thumb goes to the d-pad
Keep in mind you have to do the above while also being able to access both of your hotbar activators (the triggers).
If you find both of these options uncomfortable, adjacent analog sticks might not fit you well. This can be especially difficult for people with small hands/fingers or who can’t control the movement stick accurately using the other thumb.
Non-adjacent Analog Sticks (Xbox style)
Xbox and switch pro controllers, and many other controllers from other manufacturers offer this style. Generally if you need to move while also being able to access your d-pad if you had to use an action while keeping uptime, you would:
- Move your right thumb down and over to the d-pad
Keep in mind you have to do the above while also being able to access both of your hotbar activators (the triggers).
Depending on how high the right analog stick is, you might end up hitting it. So see if this fits you well or not.
Digital VS Analog Triggers
When it comes to trigger buttons, there are also two styles:
- Analog triggers. These are just bumper buttons. There is no force feedback, and there isn’t a lot to press. This is found in the Switch Pro, PS1, and PS2 controllers.
- Digital triggers. These triggers have sensitivity, which means there is a bigger push to do to reach the end. To be clear, it might not be required to go all the way. For example, the PS4 controller registers about halfway. However there is still some feedback and it’s natural to go the full way without thinking about it. This can lead to more time spent pressing. This can make prolonged use of the cross hotbar, and especially using the double taps that FFXIV also supports, very uncomfortable. This can be overcome if the controller supports a trigger stop, to force the distance to be shorter, or by configuring FFXIV to use the bumpers, instead of the triggers, for the cross hotbars.
Other Devices
As a PC player, you can use more devices than a console player would. Sure, the PlayStation 4/5 allows for a mouse and keyboard to be used, but not necessarily other devices. A particularly useful tool to have is a foot pedal.
This can be mapped to a keyboard binding to grant you access to more bindings with your feet. It can also be used as a Push-to-talk for Discord, or other voice program of your choosing. While those are not technically part of a FFXIV controller guide, people use such things often enough that it is a worthy consideration.
Such devices can also be used to overcome any discrepancies with your controller buttons if you are using a very non-standard controller.
This is not limited to foot pedals. If you have accessibility obstacles to overcome, there are other devices, whether it’s the xbox accessibility controller or anything else you can find. If that game supports it natively as a controller, great. If it doesn’t but it can be mapped to a keybind, you can either bind that key to a button in the game, or you can use a program like AntiMicro - which would allow you to use those bindings while also using a controller if you wanted to use both.
Connecting Controller to PC
There are multiple methods for connecting controllers to Final Fantasy XIV to a PC. The correct method will depend on the controller, and how many adjustments you might need to make for said controller to work properly.
Please note this entire section is for Windows computer users only. Sorry Mac users and Linux users using Wine!
Let’s talk about your options. Later on, there will be in depth sections about some of these options, but not all.
IMPORTANT:
Please note that directions provided are on a best-effort basis. Applications do change over time, and can react differently from one computer to another due to computer hardware differences and OS patches. If one method does not work well despite following directions, try another method.
General Guidelines For Picking A Connection Method
- Always try out built-in support first, so you can see if it’s playable should something happen to any other methods that require other program.
- If you want a working rumble and it doesn’t work natively, try DS4W (PS4/PS5/Switch), Steam (all controllers), or BetterJoy (Switch)
- If you want to fix analog stick dead zones, try DS4W (PS4/PS5/Switch), Steam (all controllers), or x360ce (all controllers)
- If you want to create customized bindings that use 2+ buttons, try DS4W (PS4/PS5/Switch) or Steam (all controllers)
Calibrating Controllers
If you are using the built-in support or x360ce, both of which are in the next section, you may need to calibrate your controller through the Windows Game Controllers menu if things are not reacting appropriately. For those methods, it is best to try to calibrate here first, then x360ce (if using), and then FFXIV.
Other software like Steam or DS4Windows do not need for you to calibrate the controllers here, but they may still need for the controller to at the very least show up.
When in doubt, it generally doesn’t hurt to calibrate your controller in Windows first.
Read More About Calibrating Controllers
- Go to Properties and Test
Before you even try to calibrate, you need to figure out what your axis names are. This is because it changes from controller to controller.
The way to do that is to use Test and press your buttons to see what makes the axis cursor move, and what makes the axis/rotation bars move. The buttons in the Buttons and Point of View Hat don’t matter too much at this point as calibration is only for sticks and triggers. Write these down somewhere.
However, if you don’t wish to test, here are some common ones:
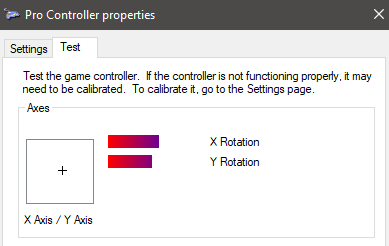
Switch:
- Left Analog Stick: X Axis & Y Axis
- Right Analog Stick: X Rotation (left, right) & Y Rotation (up, down)

PS4:
- Left Analog Stick: X Axis & Y Axis
- Right Analog Stick: Z Axis (left, right) & Z Rotation (up, down)
- R2: X Rotation
- L2: Y Rotation
Xbox 360:
- Left Analog Stick: X Axis & Y Axis
- Right Analog Stick: X rotation (left, right) & Y Rotation (up, down)
- RT and LT are both Z Axis, with LT being Z axis down and RT being Z axis up, so do press both for the Z Axis calibration.
FF-GP1:
- Left analog stick: X Axis & Y axis
- Right analog stick: Z Axis & Z rotation
Once you are ready to calibrate, go to the Settings tab and hit calibrate.
Sometimes the directions for the X Axis and Y Axis will be confusing.
For example, this is an Axis Calibration, and it even says X Axis / Y Axis at the bottom, but the directions mention the d-pad. That’s wrong.
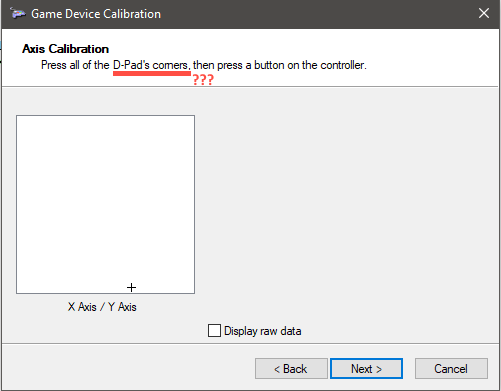
But then for some other controllers, the directions will be fine.

Regardless of whichever version you get, the X/Y Axis calibration means to press your left analog stick in a circle as far as possible several times.
The rest of the directions should be mostly straightforward as long as you wrote down which buttons have what names (ex: Z rotation, X rotation, Z Axis, etc..) as instruction earlier.
Built-In support
These are controllers that will work natively through the Windows drivers and the game will recognize them properly.
Good for:
- Xbox 360 and newer controllers without stick drift/sensitivity issues
- PS4 controllers without stick drift/sensitivity issues. Don’t expect the touch pad to work (but the click-in will)
- Third party Xbox and PS4 controllers without stick drift/sensitivity issues, or that come with software to fix such issues separately.
Read More About Built-In Support
Xbox
Xbox controllers (360 and newer) will automatically work with Final Fantasy XIV with usually no issues.
Playstation 4
Final Fantasy XIV does natively support the PS4 controller’s Windows drivers. However, if you are trying wired first, it is possible your computer might not install the driver. This isn’t an issue with FFXIV, it’s an issue with the driver detection. If that happens, try to connect via Bluetooth instead.
- Make sure the light bar on the controller is off.
- If the light bar is on, press and hold the PS button until it turns off. If a USB cable is connected to the controller, disconnect it.
- While pressing and holding the SHARE button, press and hold the PS button until the light bar flashes
- On your computer, go to your bluetooth settings and enable it.
- If done successfully, the light bar will turn a solid color.
Even if you have your game set to PS4 + Touch Pad, it may assign the SHARE button to HUD Select. If you want it to be just like Console, where the touchpad click-in is used for HUD Select, you will need to go to Calibrate.
https://www.playstation.com/en-us/support/hardware/ps4-pair-dualshock-4-wireless-with-pc-or-mac/
Regardless, using the built-in support for the PS4 controller will not allow for touchpad functionality beyond the click-in, regardless of what Gamepad Type you pick. For that, you will need to either use DS4Windows, DS4Tool, or Steam Controller API
X360CE
This is an emulator to make the system believe your controller is actually an Xbox 360 controller. It is essentially a layer on top of the Windows Game Controller. This is great for other controllers that are recognized by Windows, but do not seem to be working properly, as x360ce offers some customization for stick sensitivity that go beyond what FFXIV has to offer. A great choice if you have controller stick sensitivity or drift to fix.
Good for:
- Switch Pro (bluetooth) controller, to fix stick deadzones. Wired does not get its inputs recognized correctly by Windows drivers to the point that it can’t even be fixed via x360ce.
- Other controllers that Windows recognizes properly in the Game Controllers menu, but need button/stick fixing beyond what FFXIV offers
x360ce does let you map extra buttons if your controller has any, but only to existing Xbox 360 functionality. For example, you can map an extra button to push just left on your movement stick, if for some reason you wanted something to go perfectly left. However you can’t bind it to A or Q on your keyboard (which are typically Left and Strafe Left).
Read More About X360CE
Pre-requisites
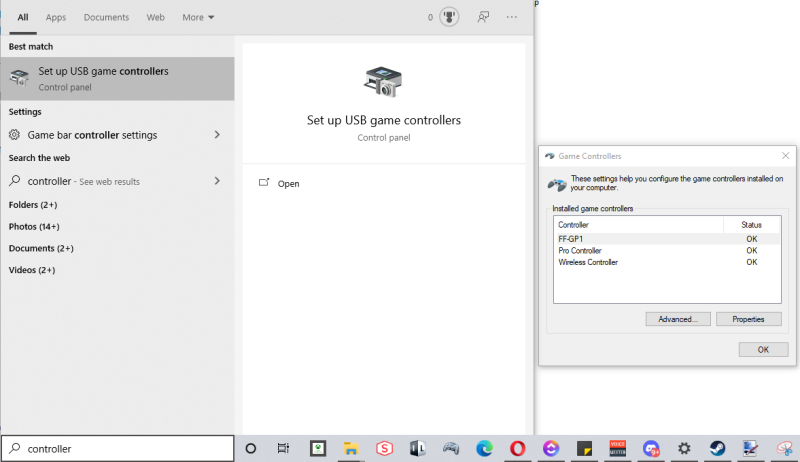
Connect your device and search for Game Controllers in Windows:
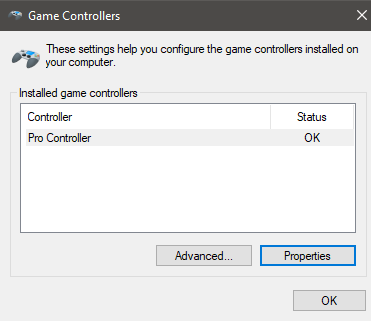
Go to Properties -> and ensure that buttons and sticks are being recognized
It will be assume you’ve already tried using the controller directly with FF14 and it did not work.
Install x360CE
There are two versions of X360CE.
Version 4 is the latest version and installed for the entire computer as a proper application. You can save multiple games’ settings in it. However, you need to keep it open the entire time.
Version 3 is installed specifically to a game (in this case FF14) by placing it in the folder (rather than an actual full installation). It needs to be closed while FF14 is running. This actually makes version 3 a bit nicer, as it means once you have it setup and working, you can just leave it and forget about it without having to open it everytime like version 4 does.
X360CE version 4 instructions
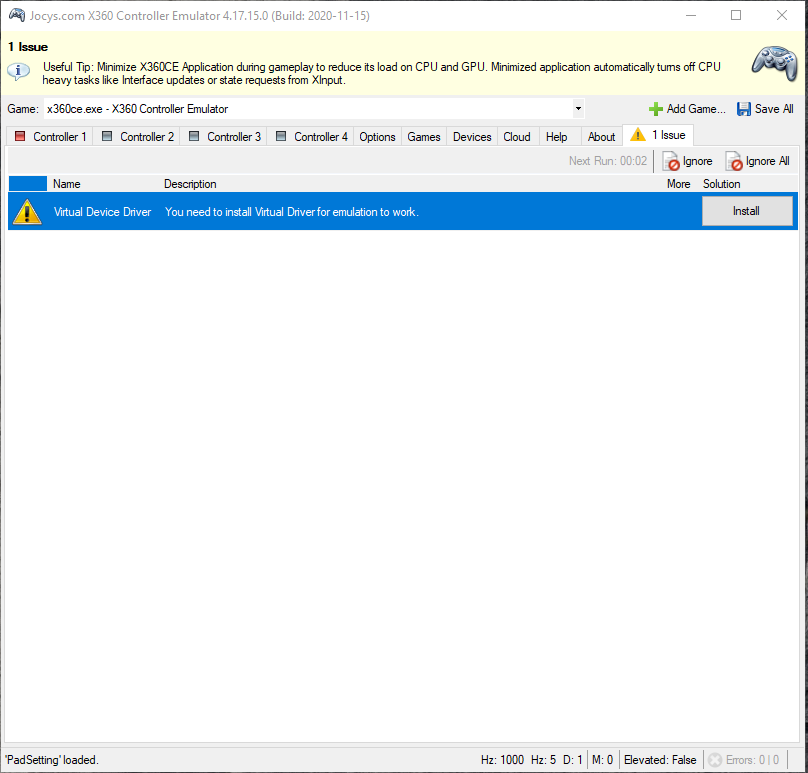
Open up x360ce.exe
First go to Options and turn off “Auto switch configuration when game focused”. Trust me. It gets real annoying when you’re setting things up. You can choose to turn it back on once you’re all done.
If you see the Issue tab lit up saying “1 issue”, open it. If it’s asking you to install the Virtual Device Driver, click Install.
Move ahead in the guide to the section about mapping buttons.
X360CE version 3 instructions
Download x360CE 64-bit
https://www.x360ce.com/#Help_Old_Version
Place the x360ce_x64.exe into FF14’s “game folder”
Open in Administrator Mode
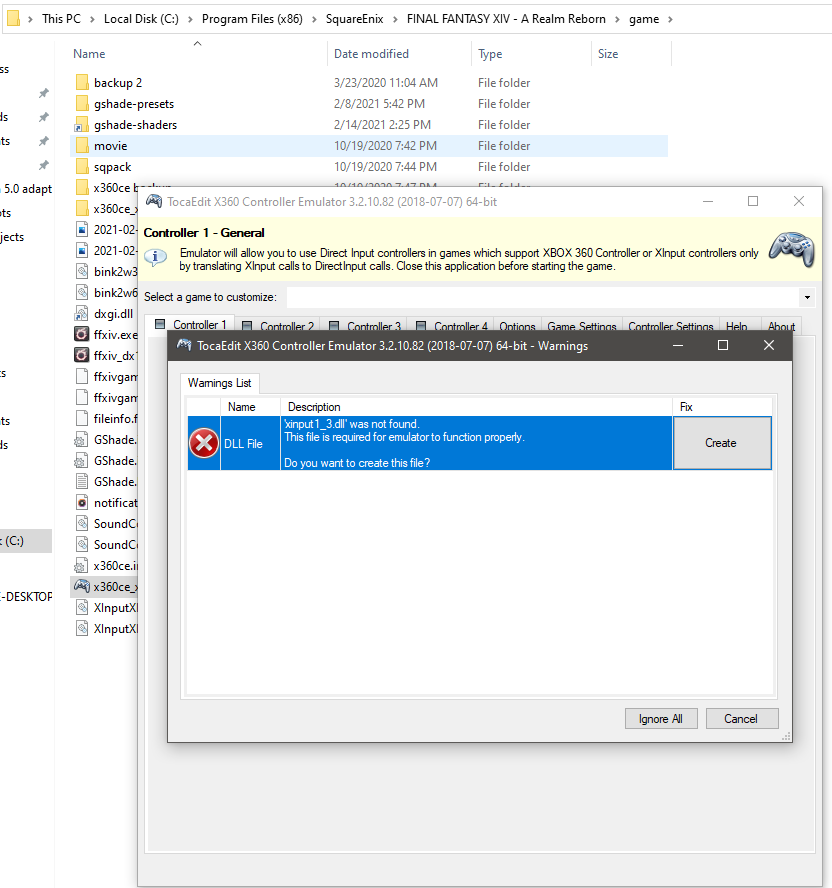
Click Create if it prompts you to. It should be called xinput1_3.dll. If for some reason it isn’t, rename it after it’s created.
If you have nothing there yet, it’ll ask you if it can search in its online repository for your controller. Sure. If they already went through the trouble of having it pre-configured, go right ahead.
Disabling x360ce Version 3
Make a folder and move the following 3 files inside it. That’s your backup. Being in a folder means the game will not use it as it cannot read subfolders.

Configuration for FF14
Version 4
Make sure you are actually on ffxiv_dx11.exe (it has a nasty tendency to go back to the x360ce setting), then ensure v1.3 64-bit xinput files, COM, DI, and PIDVID are selected.
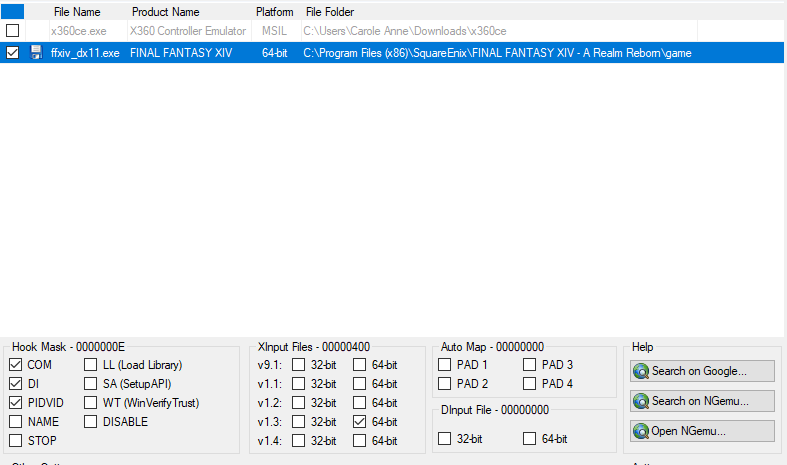
Hit the Save button
Version 3
Go to the Game Settings tab in x360ce, click “Add…” and select ffxiv_dx11.exe from the game folder (the other one is DX9. Maybe you’ll be lucky and it’ll work with it, but I could only get it to play nice in DX11).
Make sure COM, DI, and PIDVID are all selected.
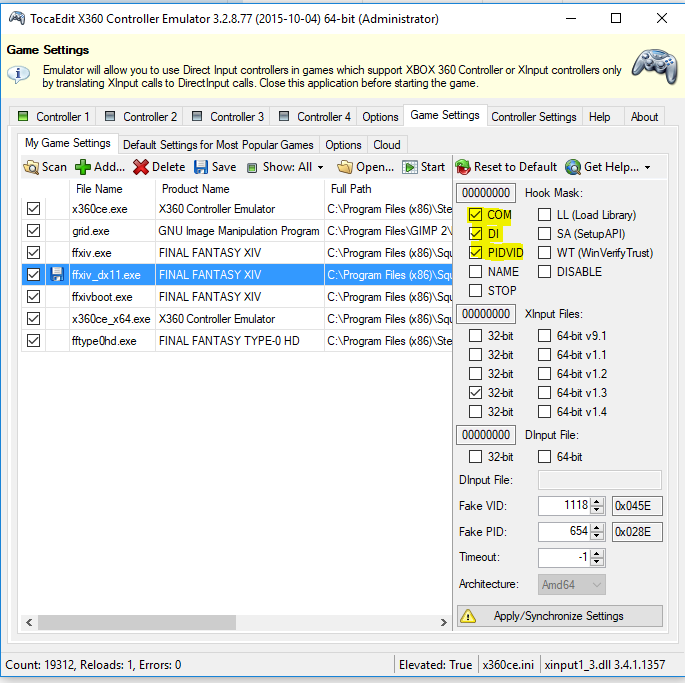
Apply/Synchronize Settings
Mapping Buttons and Sticks
Version 4 only
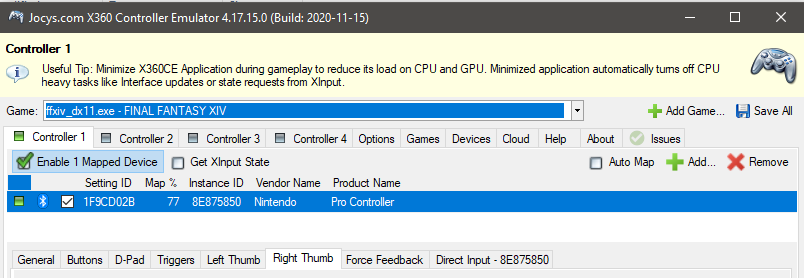
Pick FF14 in the game section. This is very important. Do not be on “x360ce” while adding this. If you accidentally added this to x360ce.exe, use the Remove button.

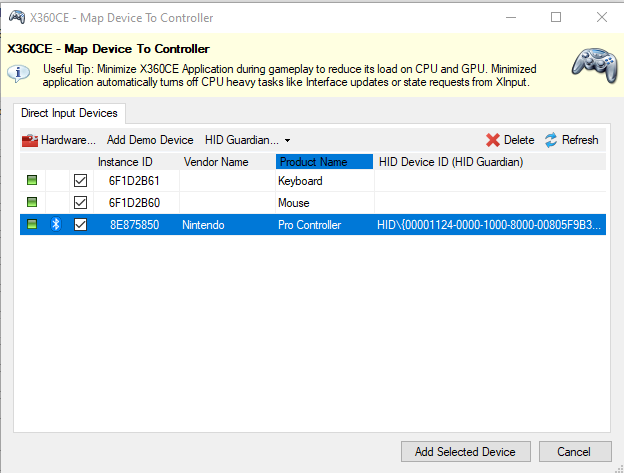
Click Add..
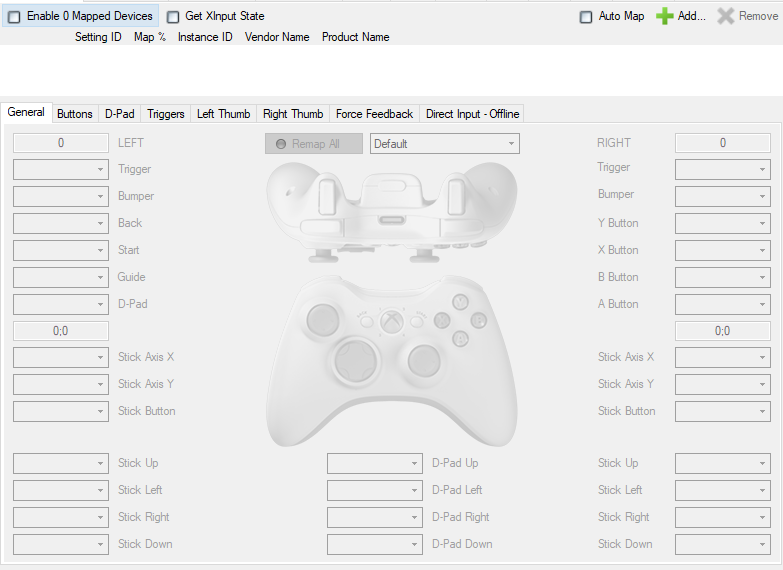
Select your device
Click on the “Enable 0 Mapped Device” so that it turns this controller into a mapped device too. You should see a checkmark.
Both versions
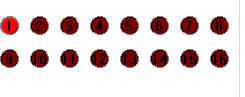
First, try using Auto. It’ll attempt to auto-fill as much as possible. Also open up where it says Game Controllers at the bottom. Properties -> Test. This is so you can see the button names. Notice how in X360CE it might say button 1? Well that would be whatever lit up as 1 when you pressed it. You can use Test to figure out what you’re trying to change.
Button 1 lighting button when I pressed it on my controller:
It’s a little harder to tell for the Axis (the analog sticks), but just keep trying them until it works.
Switch Pro controller setup:
In x360CE version 4, DPad might be called POV instead.
Hit Save (version 3), or Save All (version 4)
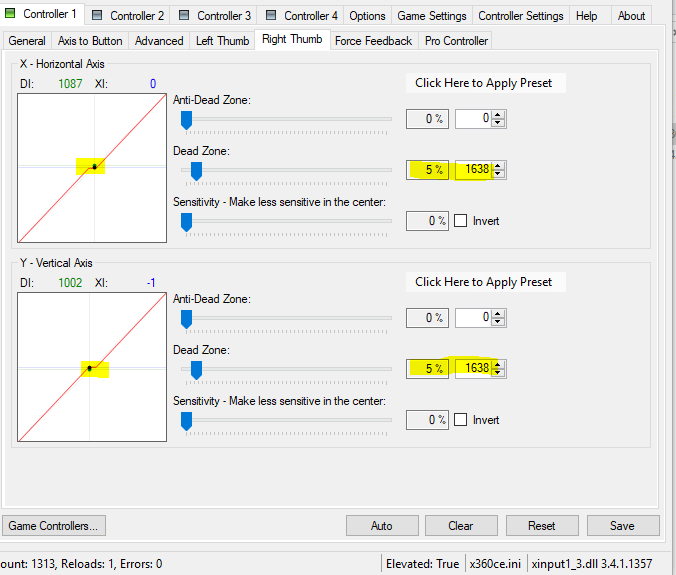
Setting up Deadzones
If you need to set up dead zones (how much the analog sticks DON’T recognize movement) like I had to for my Switch controller, so that it doesn’t require inhuman levels of accuracy to stop moving - go to the left or right Thumb (whichever stick needs the dead zone) and set it.
Don’t forget to hit that “Save” or “Save All” button
Applying it to the game
You are now ready. So what now?
Version 3:
Close x360ce.
(Re)Boot FF14, hope it worked.
You will need to open x360ce in administrator mode to make changes, and reboot ff14 to see the results each time.
Version 4:
Keep x360ce open (you can minimize). It needs to be open at all times.
(Re)Boot FF14.
In FF14’s system settings, pick the controller that says “Controller (XBOX 360 for Windows)”. If you don’t see this option, that means it didn’t take, so check your configuration.
Unlike in version 3, you can make changes anytime without needing to reboot either application.
DS4Windows
This is an option for PS4 controllers that are having issues with the built-in support, or if you wish to have touchpad functionality. Can also work with PS5 controller, Switch Pro, and Switch Joycon.
There are 2 versions of DS4Windows, the Jay2Kings version on DS4Windows.com, and an altered version made by Ryochan7. You should use the version on Ryochan7, as the one on the official site is no longer being updated.
https://ryochan7.github.io/ds4windows-site/#changelog
DS4Windows can be pretty easy to set up and go because it comes with premade settings for the controllers it supports. However, it can be a bit unstable at times, especially if you’re currently in the process of changing settings, such as creating custom bindings.
Read More About DS4Windows
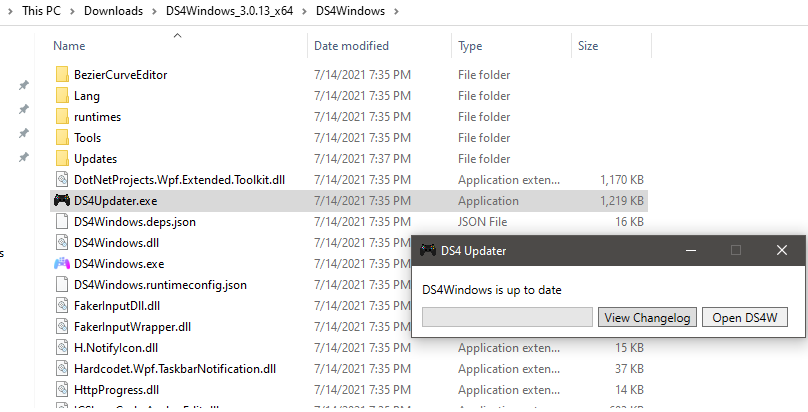
Installing DS4Windows
As stated in the overview version, do make sure you are using the ryochan7 version of DS4Windows. https://ryochan7.github.io/ds4windows-site/#home
Select the .zip (or .7z doesn’t matter) file for your system. Most computers nowadays are 64-bit so it would be the x64 version. Move the folder to the desired location. Open up either of the .exe inside of it to install and then click on Open DS. Pick the script location (folder or appdata) and you’re good to go: Open DS4W.
Connecting your controller
DS4Windows generally recognizes your controllers pretty fast as long as your support them, without too much hassle.
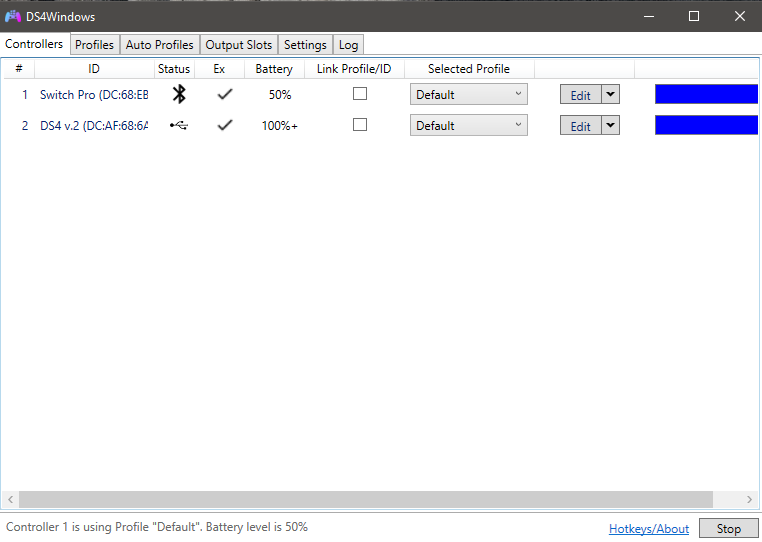
On this computer, there is a switch pro controller (bluetooth) and a PS4 controller (wired).
If the wired PS4 controller is not showing up, connect it via bluetooth while it’s wired and then disconnect it from bluetooth. This should hopefully allow it to recognize the wired controller.
It’s not recognizing it , or it used to recognize it but now it doesn’t anymore
If at the bottom right it says “Start” instead of “Stop”, then perhaps the application stopped the service to recognize controllers. This can happen if you’re changing settings around.
Otherwise, check if the controller is being recognized in window’s Controller menu, as was covered in . You don’t need to calibrate it there, as DS4Windows has its own ways of handling calibration, but the controller does need to be there so it DS4W can grab it.
I have multiple controllers and I don’t want it to recognize other ones
It’s not easy to stop it from recognizing multiple controllers of the same type, but if you have two different types of controllers, it’s not as difficult.
Go to Settings > Device Options and uncheck whatever type you do not wish for it to grab.
Press Stop and Start at the bottom if it doesn’t automatically adjust.
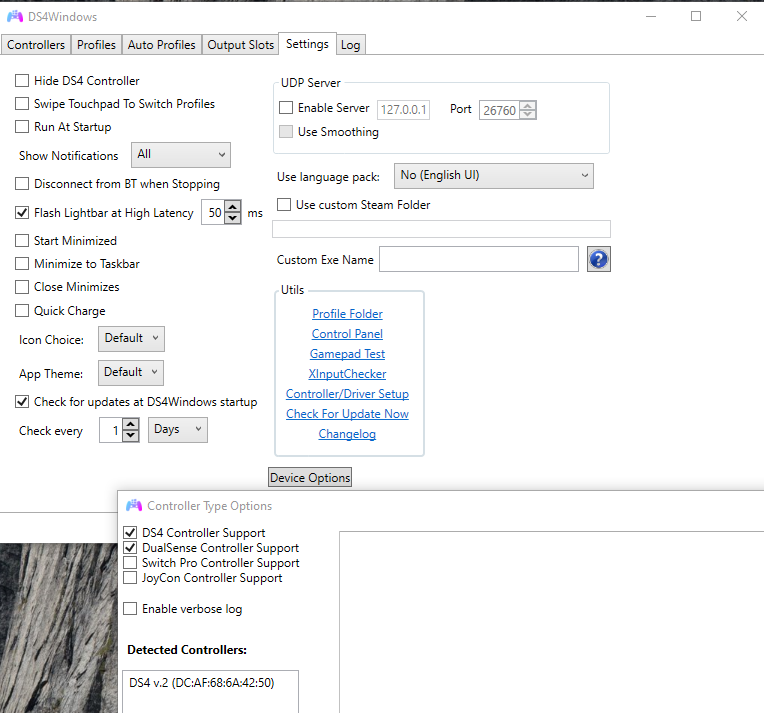
Likewise, if you re-enable a controller type, you may need to Stop & Start.
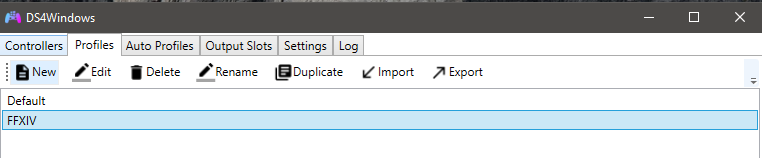
Set up a Profile (optional)
You can set up a profile for the game. This is optional, but if you’re planning on making custom bindings to FFXIV, it is highly recommended.
The easiest way to create a profile is to Duplicate the Default one. The Default profile has excellent settings, with working out-of-the-box touchpad (as computer mouse) support.
Telling the game to use the profile
With your profile now made, go to Auto Profiles.
If it’s grayed out, you’re probably still in the Profile edit menu and just need to hit save.
Add programs and locate ffxiv_dx11.exe, which should be in the game folder of Final Fantasy XIV - A Realm Reborn, and add it.
If you are using the DX9 version of FFXIV, pick the ffxiv.exe. Do keep in mind that officially FFXIV no longer supports DX9 and the client is only provided by Square Enix as a courtesy for people who have not yet switched.
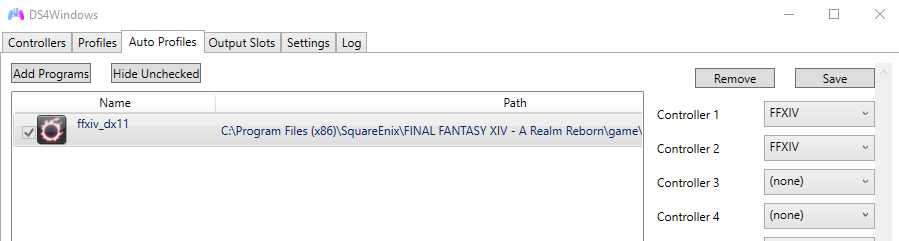
Then assign profiles to the game for the controller slots and hit Save.
Things to know about the touchpad support:
Do note that this is not at all like the FFXIV version of touchpad. Theoretically, if the output mode was set to Passthru, it should allow FFXIV to use the touchpad natively at long as in FFXIV you have your gamepad type set to + Touchpad (PS4). However, at the time of writing this game, the functionality does not seem to work properly, at least not with FFXIV.
Some settings you might wish to change:
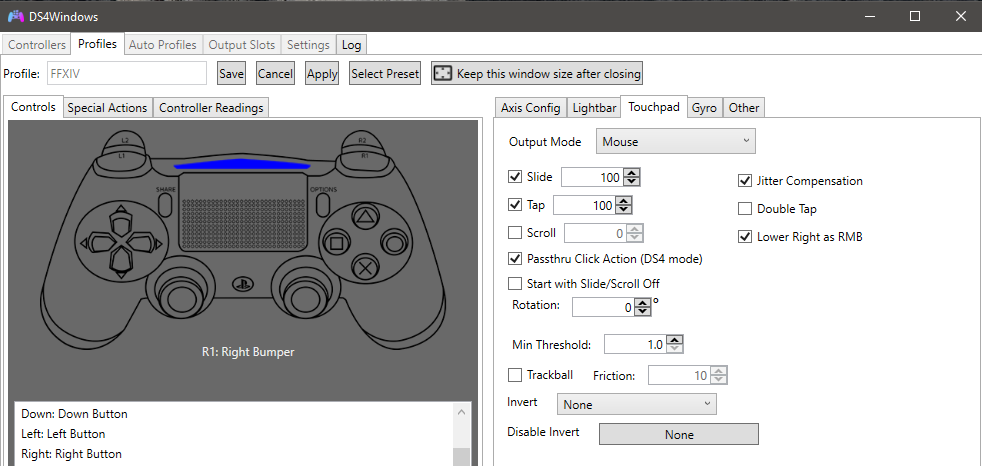
- Start with Slide/Scroll Off: If this is on, touch functionality will be off by default when you connect the controller. You can turn it on and off at any time by doing PS button + touchpad click.
- Lower Right as RMB: If this is not on, clicking-in will do left clicks. This allows it to be Right click.
If you wish to use the touchpad, you will need to use the Output mode of Mouse, which essentially lets your controller take over your mouse. Tapping can be finicky, so it’s best to leave the click-in for the middle button to be Left Mouse Click and Right Mouse Click. Because of this, you will most likely want to keep the SHARE button as the HUD Select button, which is what DS4W does by default. For a touchpad that more closely resembles the PS4 version of FFXIV, you may wish to try Steam instead.
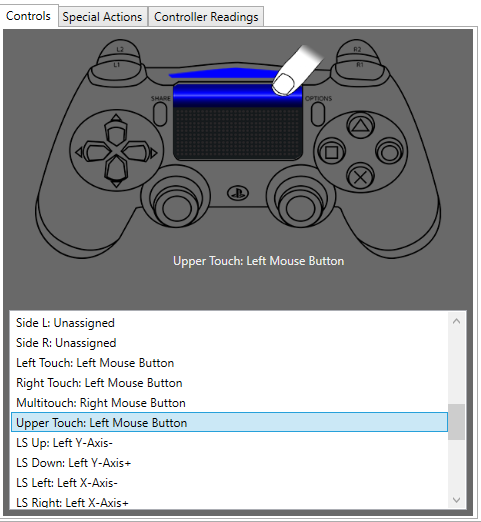
On the left side are button assignments. You may also wish to remap Upper Touch (which happens when you click in at the top of the pad, or at the very bottom of it along the edge). It being mapped to Middle Mouse can lead to a lot of “I clicked, but it didn’t do what it’s supposed to do”.
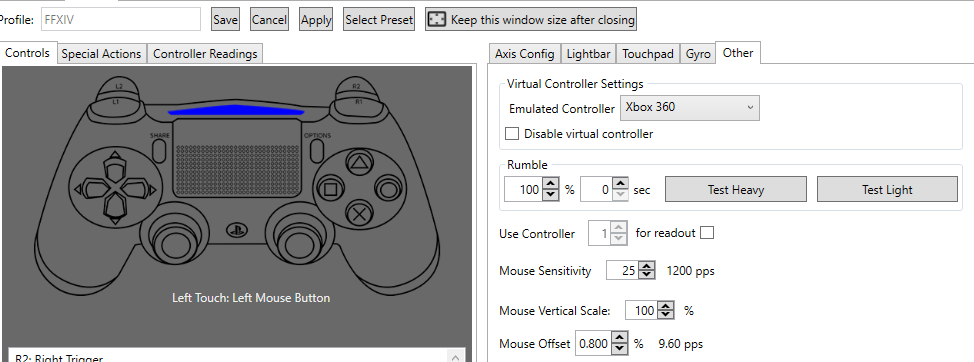
My rumble isn’t working!
In Other, try changing the Emulated Controller from Xbox 360 to PS4 and vice versa.
This software is a small project by a community, and bugs can happen. Sometimes features break for one emulated controller but not another. As of the writing of this guide for DS4Windows version 3.0.13, the PS4 rumble seems to work only when using the Xbox 360 emulated controller.
Everything was working, but I changed something and now it’s not!
Try pressing Stop and Start at the bottom. That fixes a lot of things without having to restart your computer and/or the game.
If Stop takes a while and it doesn’t want to stop, crash the application via Task Manager and reopen it.
How to I make custom bindings?
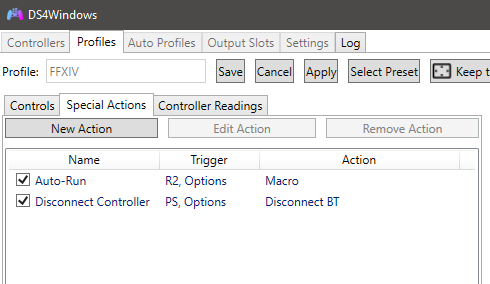
In the Profile you wish to edit, go to Special Actions and click New Action.
Example 1: Binding to the keyboard
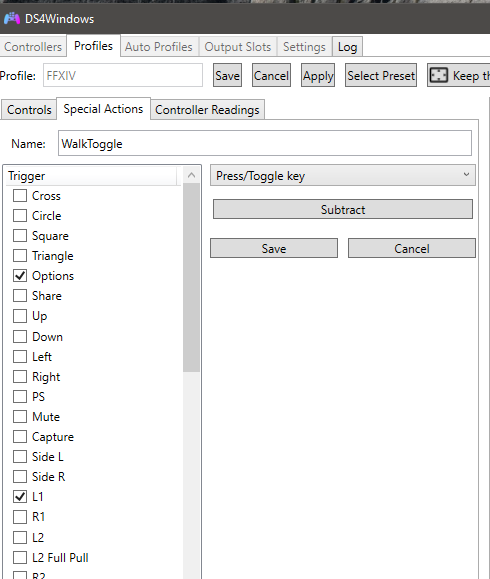
- Step 1: Pick your conditions. If multiple buttons at the same time, select them both. Above is L1 + Options.
- Step 2: Click Press/Toggle Key
- Step 3: Select the key you wish to bind.
In this example, the purpose of the binding was to take away the screenshot functionality that exists in the game (L1 + Options) and bind it instead to a key that has the Walk toggle, which for this player happens to be numpad subtract.
Taking away existing functionality is not often recommended unless you know you will not need it and/or know a keyboard alternative to reach it - in this example, the player would be just fine pressing Print Screen for the lost functionality.
Example 2: Binding it to a mouse click
For some reason, mouse clicks cannot be assigned to special actions via the “Press/Toggle Key”, but instead require the use of a macro.
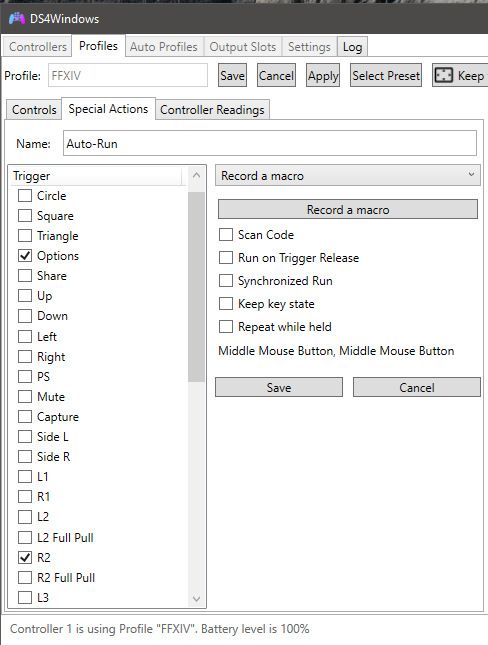
- Step 1: Pick your conditions. If multiple buttons at the same time, select them both. Above is R2 + Options (start button)
- Step 2: Click Record a macro
- Step 3: Click Clear if you want to remove anything already in there, such as if you are editing. Then click Record, do your mouse clicks, and hit Stop recording and Save!

In the above example, R2 + Options is bound to the middle mouse click. This is because the player using this has Auto-Run bound to Middle Mouse click instead of the default of R.
Can I bind things to Touchpad Swipes?
Yes, you can bind swiping on the touchpad left/right/up/down. This can either be done by changing the binding directly in Controls, or by setting up a Special Action.
Steam
Steam has its own set of controller drivers that can often provide support for controllers that don’t work at all with the built in Windows drivers. For example, the Switch Pro controller does not work properly in Windows built-in drivers when wired, but the Steam drivers have no problem with it.
Steam also offers customization options beyond just fixing up 1:1 button mappings and analog stick sensitivity/drift. You can create entirely new mappings such as:
- Setting up touchpad controls, and having a choice of multiple types
- Setting up custom button combinations, such as R2 + Start
- Setting up bindings to the keyboard and/or mouse
The advanced mapping can allow some very interesting configurations, especially if using a controller that might have less buttons than a standard PS4 controller. For example, a Gamecube controller does not have enough buttons for full functionality in FFXIV, but through some clever custom mappings, it is possible to create unique bindings to overcome it.
The biggest downside of Steam, however, is that since it passes the controller support through an overlay, the controllers often do not work if you are switching tabs, even if you tell FFXIV to keep the gamepad active while the game is not in focus. There are ways around this (which involves picking a second application to open after FFXIV. Not all applications allow this trick to work, but OBS works great one for it), but only if you’re ok with losing custom bindings. You do get to keep steam-level configurations, like controller deadzones and rumble.
Read More About Steam Controller API
Using Steam’s Controller Support
Regardless of whether you are using the Store version of FFXIV or the Steam version, you can use Steam’s controller support to fix up controllers that might not be behaving properly through the built-in support.
Connecting a non-Steam FFXIV client to Steam
Please skip this section if you are using the Steam version of FFXIV. This is only for those who are not.
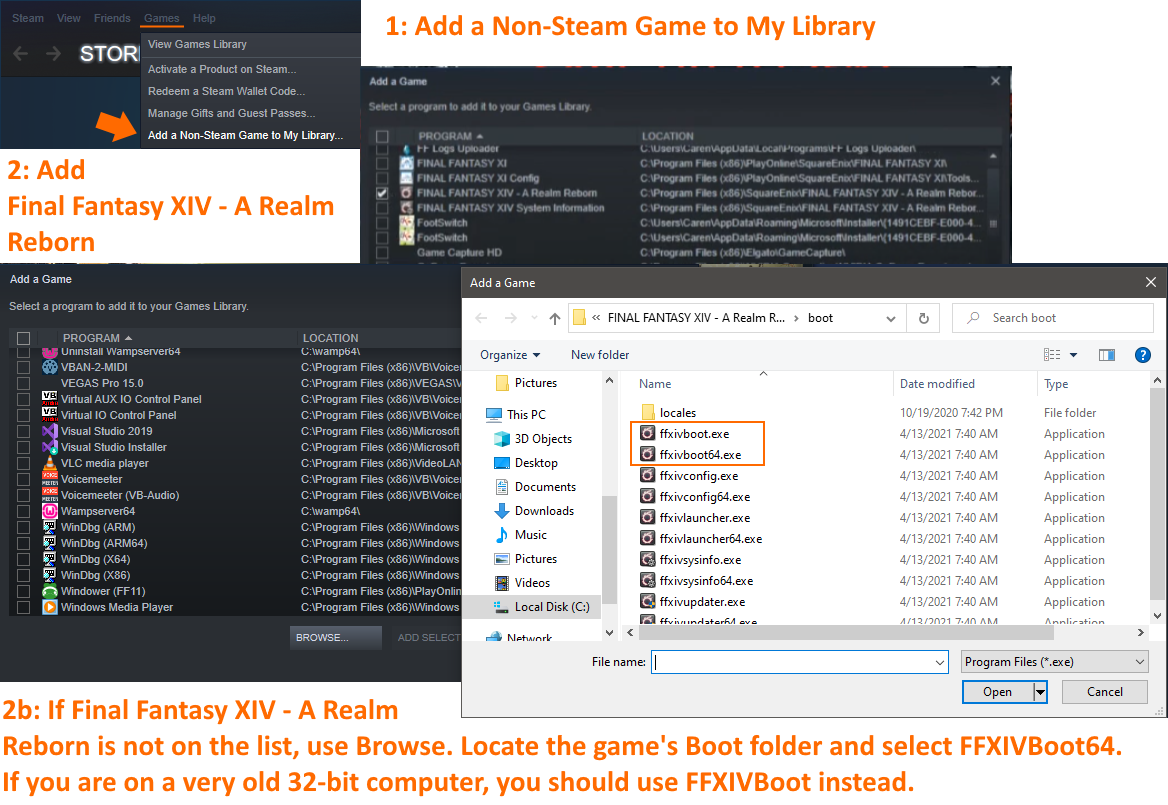
- Open up the Steam Client and go to Games and Add a Non-Steam game to the library.
- Add Final Fantasy XIV - A Realm Reborn if it’s on the list
- If it’s not on the list, you will most need to Browse. Add FFXIVBoot64.exe from the game’s Boot folder. If you are on a 32-bit computer, you should use FFXIVBoot instead - and also consider upgrading computers as FFXIV no longer officially supports 32-bit machines, which could lead to performance-related crashes.
This will add FFXIV to the Steam library
Configuring Steam to use the Controller properly
First, enter Big Picture mode. There are other ways to get to controller settings, but it’s easier to just do it via Big Picture.

There are a few things you’ll need to check in the Steam Settings
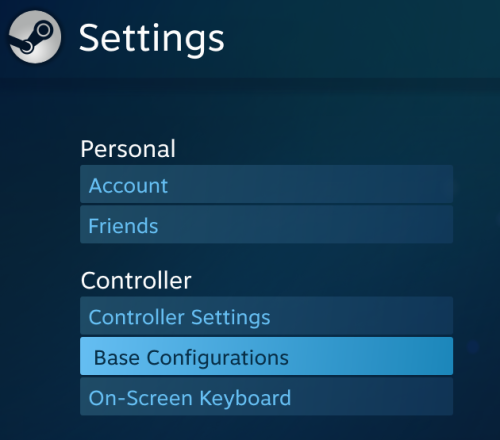
Controller Settings
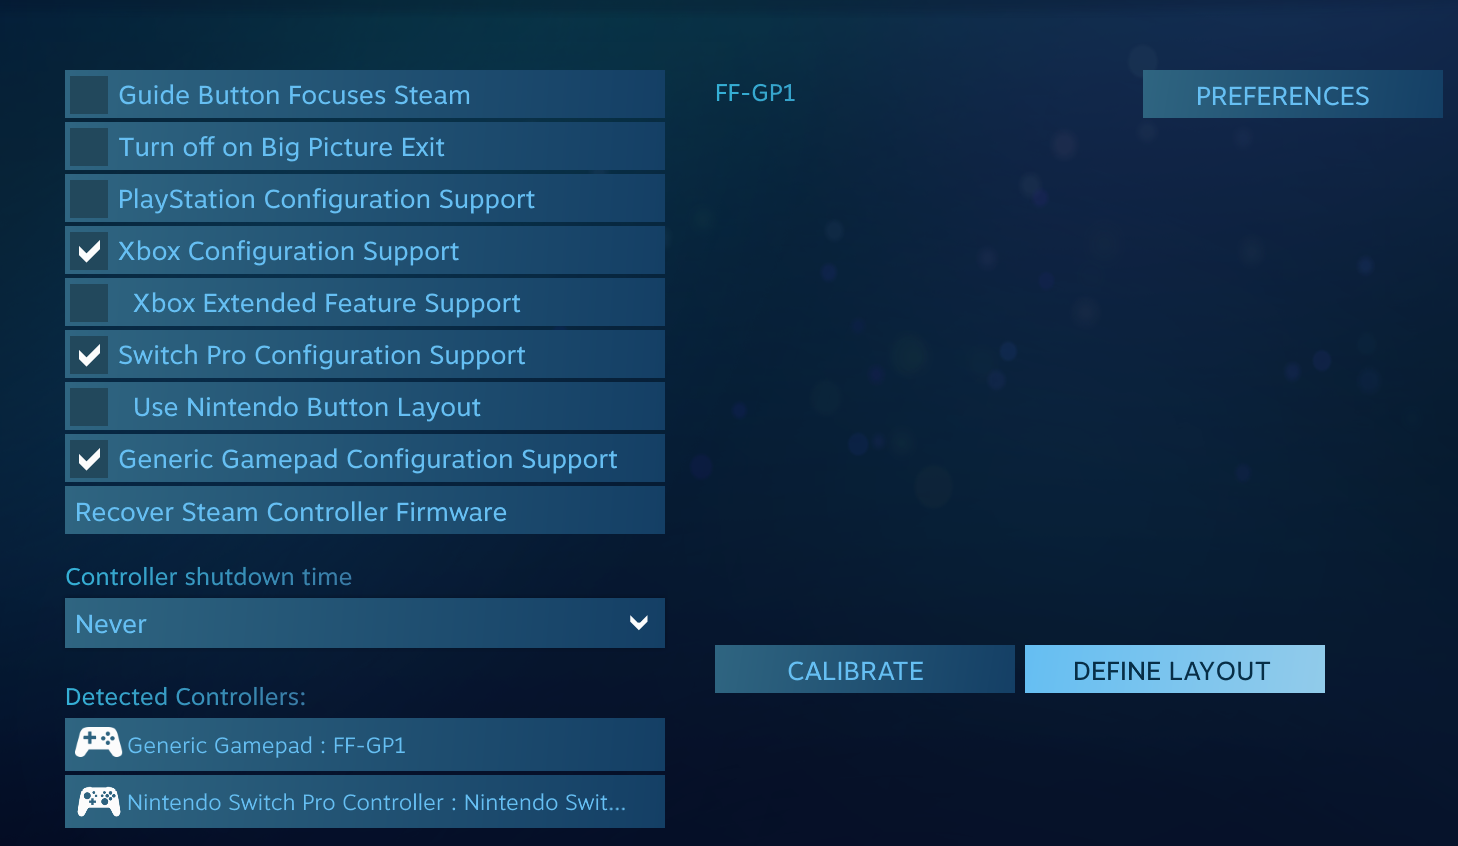
The main hub for making sure Steam is recognizing your controller.
Match the type to the controllers you wish to use. If you don’t pick a type, Steam will not take over those controllers (which can be good if you want some controllers to use steam and others to use something else).
If you are using a different controller than Xbox, Switch Pro, or Playstation 4/5, you may need to turn on Generic Gamepad support. If so, you may need to have to set up actual button bindings to set up your controller against the standard Steam controller via Define Layout.
Next up!
Base Configurations
This is optional, but often solves problems with FFXIV later.
Within this section, go into Desktop Configuration.
Browse and pick the Disabled config.
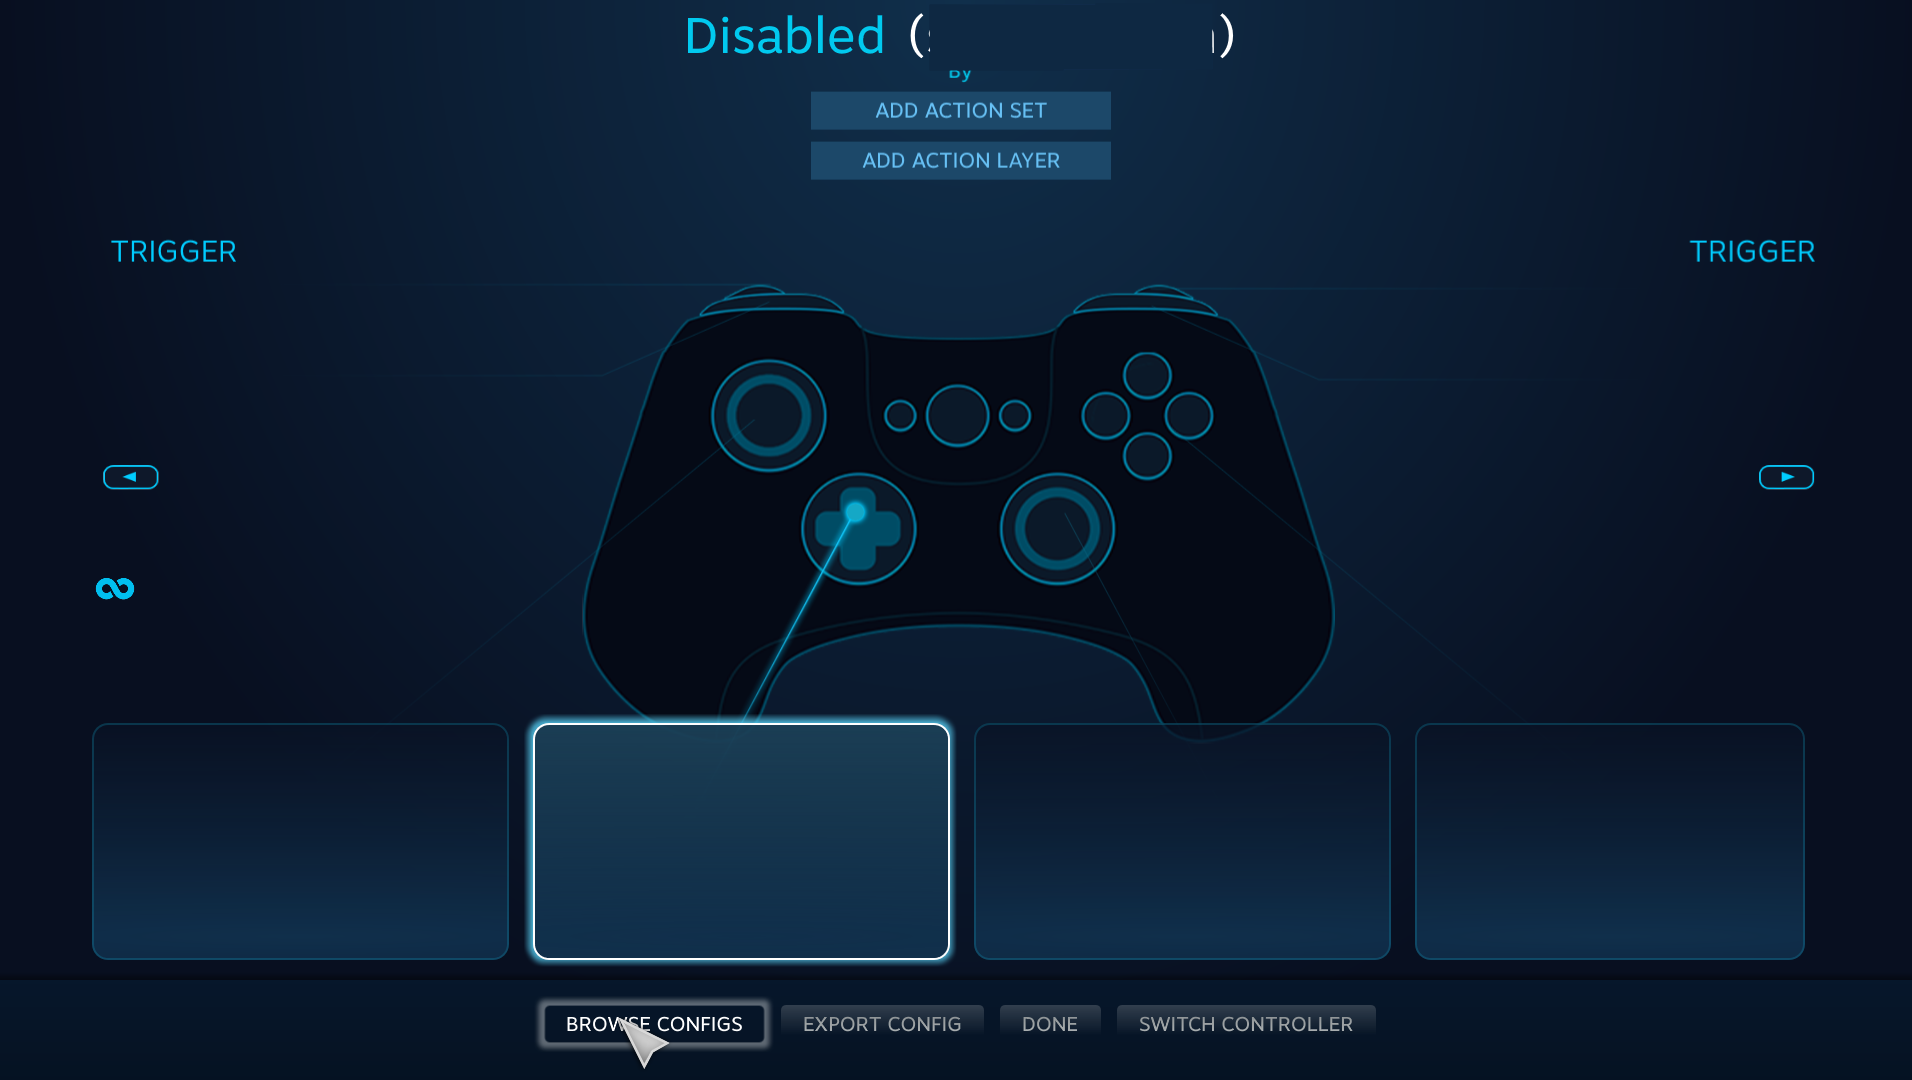
This makes it so that when you’re in the launcher, it won’t think your gamepad is supposed to be treated like a mouse. This ‘feature’ can make it difficult sometimes for the game to load the controller properly and you end up with the Desktop configuration activating and instead of moving your camera, you’re moving a mouse cursor.
Steam Overlay
Make sure Enable the Steam overlay is turned on.
This is necessary for it to pass the controller configuration properly.
Making Final Fantasy XIV Work through Steam
Adding the game to the library is not enough. Steam can get a little bit confused because of the Launcher and not load the game properly. One possible solution was already presented in the previous section.
Go to the game in your library and pick Manage Shortcuts and Controller Options.
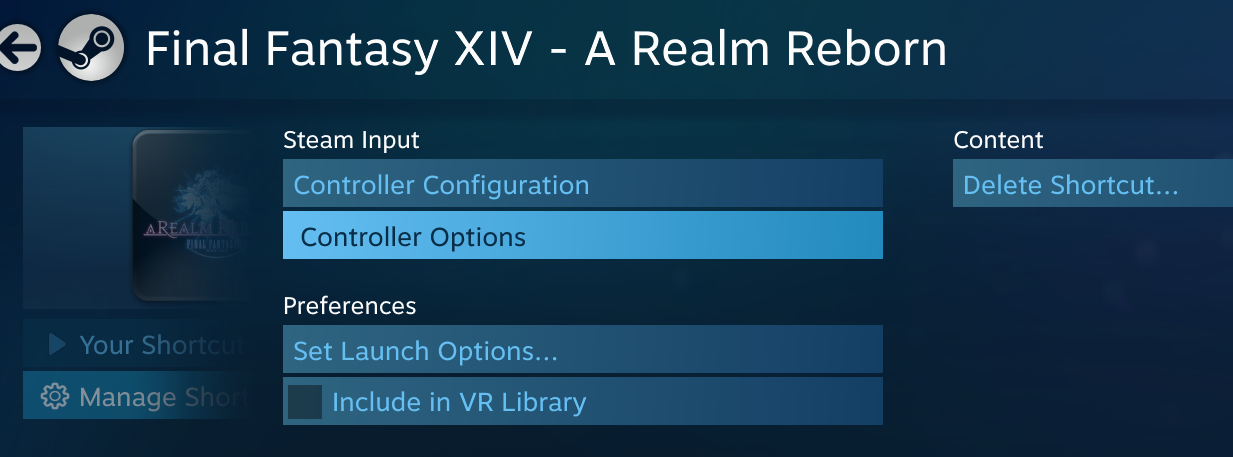
Make sure Enable Overlay on Non-Steam Game is turned on. The Steam overlay is how custom bindings get passed.
For Allow Desktop Configuration in Launcher, if you disabled Desktop configuration, this setting shouldn’t matter whether it’s on or off. But if you didn’t disable it, or if it’s still having issues, you can just turn it off. Overall, it’s better if this setting is off.

If this is done correctly, all of your controllers will say in the game that they are Xbox 360 controllers, regardless of what they really are.
Help! I’ve tried this and it doesn’t work!?!
Let’s go over the above checklist, did you:
- Make sure that Steam recognizes the controller. It should be listed in your controller list.
- Make sure Enable Overlay in the Steam settings is also turned on
- Make sure the Desktop Configuration is set to Disabled
- Make sure Allow Desktop Configuration in Launcher is turned off for the game
- Make sure Enable Overlay on Non-Steam Game is turned on for the game
- Make sure FFXIV has Gamepad set to Enabled
- Make sure you’ve tried to calibrate within FFXIV
“Yes, it’s all done right, but…”
- My game isn’t showing an xbox 360 controller on the gamepad list in FFXIV
Try closing the game and the launcher. Make sure when you open it, you do via the Steam page. It’s best to use the “Your shortcut” link on the game page within Big Picture.
If that still doesn’t work, reach out to Steam support, because it means Steam isn’t passing the hook to the game.
- My game is showing the xbox 360 controller on the gamepad list, but it’s not doing anything
First, make sure you have “Enable Gamepad” set to on in FFXIV.
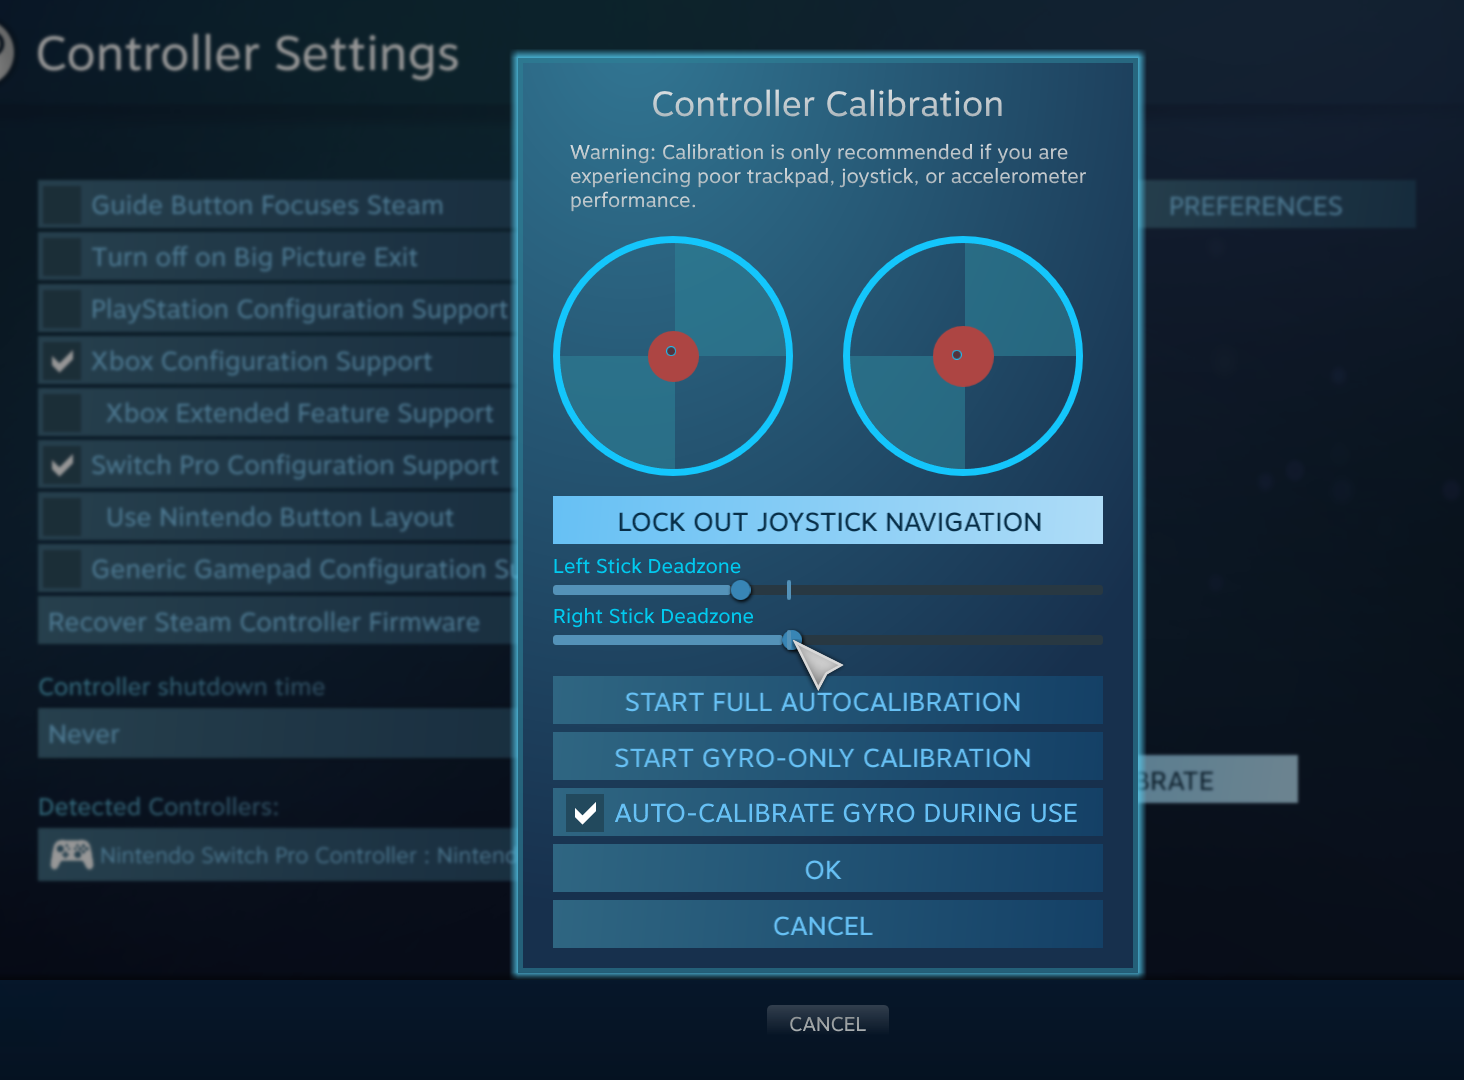
Second, try using FFXIV’s Controller Calibration. It’s possible that the inputs are being passed but FFXIV didn’t associate them as gamepad inputs. The in-game calibration would fix that.
If that still doesn’t work, reach out to Steam support or consider using a different method to connect your controller.
- My game is showing the controller as an xbox 360 controller and it works, but the sticks are being weird.
That’s not an issue with connecting. See Advanced Bindings section for help on that.
Steam Advanced Bindings
Read More About Steam Advanced Bindings
Everything in this section assumes you have a properly working controller going through Steam to FFXIV. This is about changing the way the bindings work, and not about getting it to work with the game in the first place.
Locate Final Fantasy XIV in you library within Steam’s Big Picture mode. (If you added a non-Steam version, it should be in your library, but it’s possible that instead of being called Final Fantasy XIV: A Realm Reborn, it might be called FFXIVBoot or FFXIVBoot64).
In there, select Controller Configuration. If you have multiple controllers hooked up, you can change the controller. Yes , you will need to set up each (though you can export one as a template and then attempt to force import it into another controller).
Fixing Analog Sticks
Locate the analog stick you wish to fix, then click Additional Settings.
My analog stick keeps walking instead of running
Easiest fix for that is the change the Stick Response Curve to Aggressive in the stick’s Additional Settings. This will make it harder to Walk, but easier to Run. Thankfully, there are other ways you can Walk than just using Stick Sensitivity. Please refer to
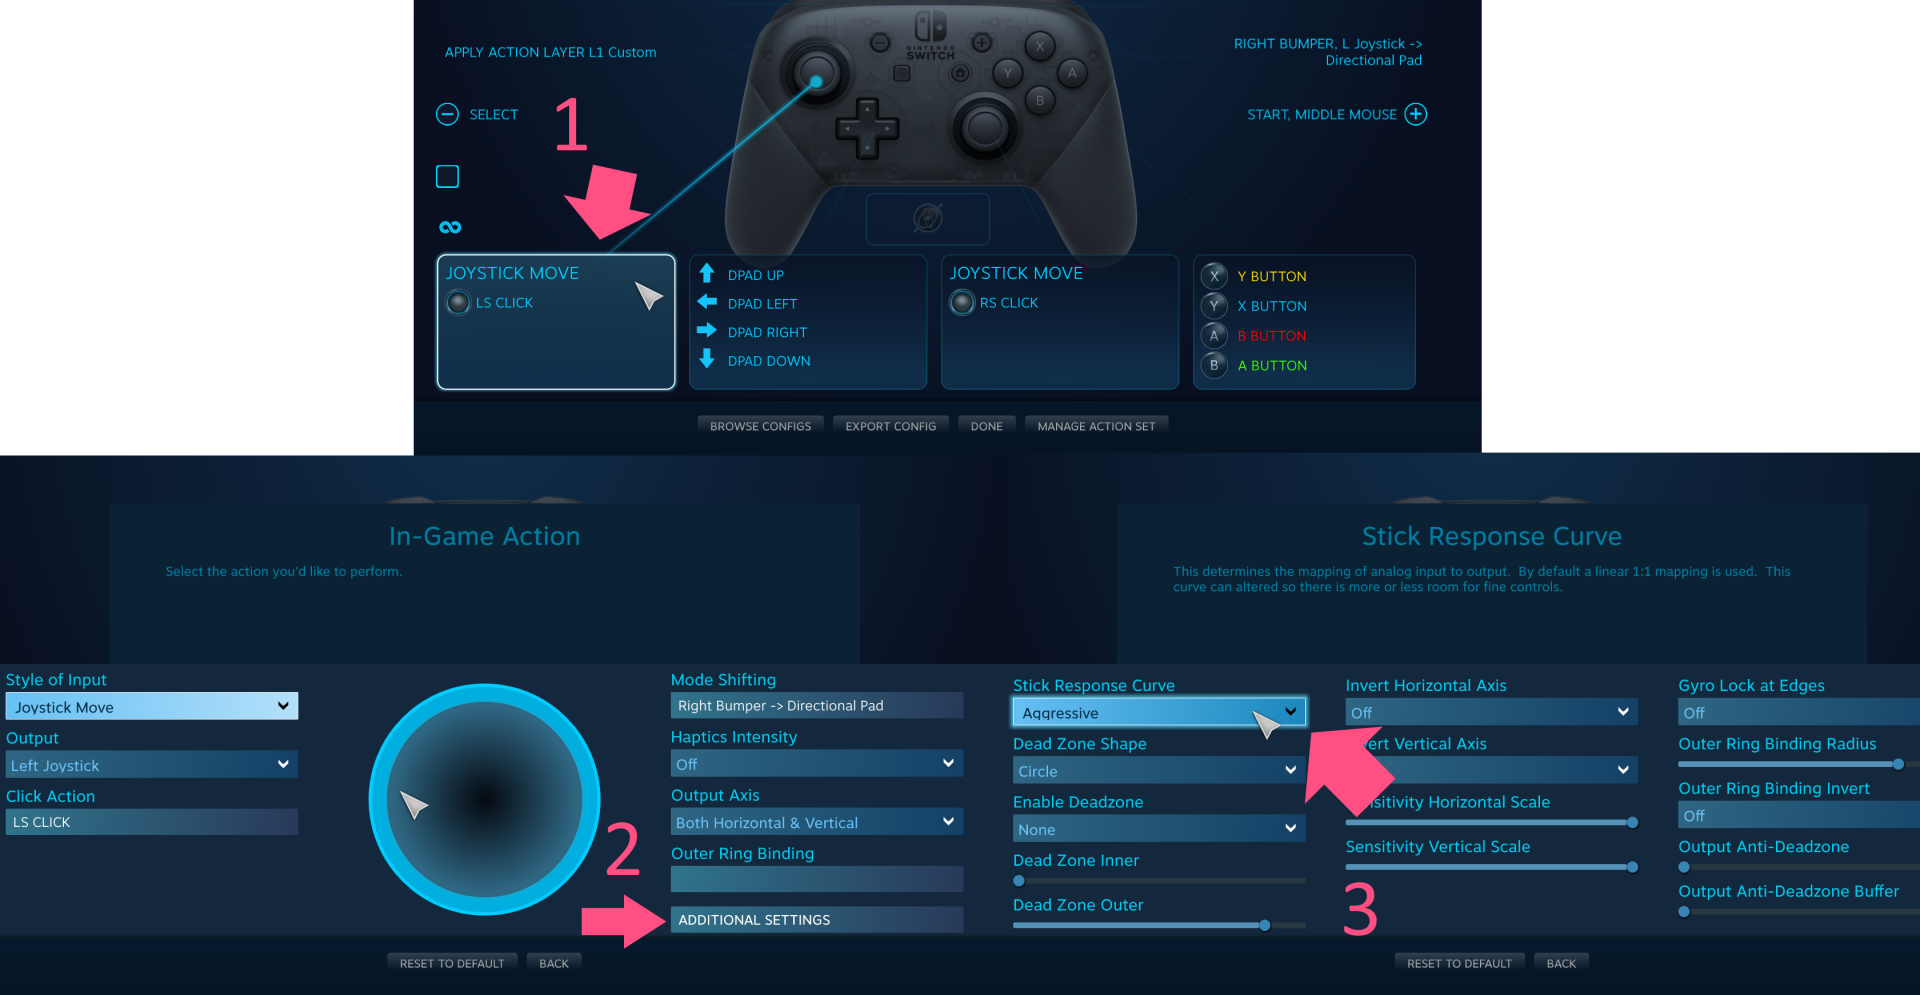
My camera stick seems to move on its own!
You might need to set up a custom deadzone.
- Same idea as above, to go the stick you need to change and its additional settings.
- Then increase the Dead Zone Inner slightly.
- Set “Enable deadzone” to Configuration. This allows you to change it per game.
Alternatively, if you wish to set up the same deadzone for multiple games, set it to Calibration. This will use the Steam deadzone settings set at the Controller level in the main Steam Controller Settings page. This is great if the controller is generally behaving faulty for multiple games, not just FFXIV.
To test, make sure you leave the Steam Controller Configuration completely, and end up back on the game’s page.
Setting up a different Auto-Run
In FFXIV, Auto-Run is done by using your Auto-Run button and moving, but that button is also a modifier for accessing the Alliance and Enmity list. This can lead to some unfortunate accidents if you need to dodge when you were previously targeting your Enmity List and now you’re potentially autorunning to your death.
As such, some players turn off the game’s Auto-Run and turn it back on as needed for content where it’s less dangerous, like gathering.
But if you set up your own Auto-Run, one that is a safer combination of buttons, you can do far more.
For this example, Auto-Run will be R2 + Start. This has no conflict with the game. There are multiple ways to set this up, but let’s do one that’s visually easy to understand.
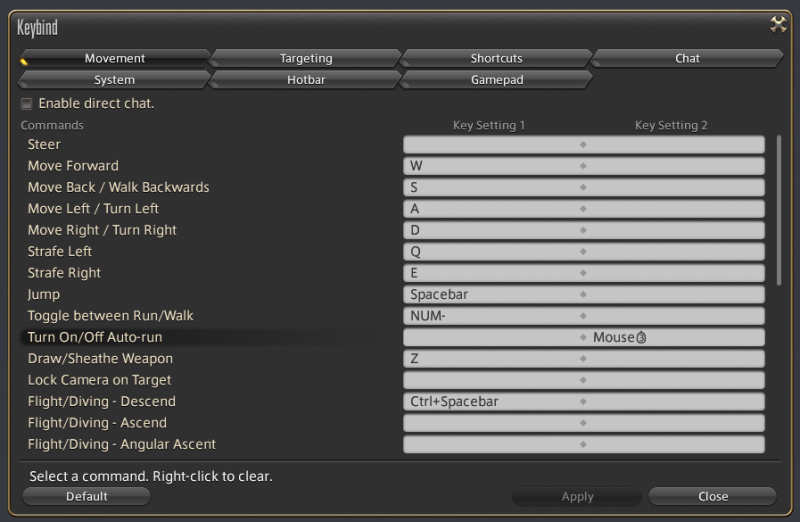
Step 1: Check your FFXIV Auto-Run binding.
In this screenshot, Auto-run is bound to the Mouse scroll wheel click. The default binding is R. It doesn’t matter if you keep the default or not, just as long as you know what your binding is. If it is a letter, make sure you are NOT using Direct Chat in Character Configuration.
Step 2: Change the binding in Steam
Open up your controller’s bindings in Steam for the game and go to Start.
In there, click “Add Activator” and make sure it’s a Chorded Press - that means a press that has a condition with another button. If you don’t see “Add Activator”, click on “Show Activators” first.
In Binding, make sure it’s whatever you had in Step 1. Since the example screenshot use Middle Mouse, so does this.
In Chorded button, because this example is R2 + Start, this will be Right Trigger. Full Pull or Soft Pull shouldn’t matter but Full Pull is easier to change your mind (since soft pull means it activates when the trigger is about halfway, for controllers with trigger sensitivity)

Make sure to exit out of the controller set up before testing it out in game as changes may not apply unless you do so.
Custom bindings so far
Setting up a Strafe
In the previous example, a custom binding was created through a Chorded press. Analog sticks don’t have Chording, but they have an equivalent called Mode Shift.
There is also another way and that’s by using Layers. It requires a few extra steps to set up, but the increased visibility into what you have done is well worth it. That being said, both versions will be shown.
In this example, we’ll be setting up a strafe by holding a bumper and the analog stick.
R1 + analog stick will be set up using the Mode Shift method.
L1 + analog stick will be set up using the Layer method.
Strafe Via Mode Shift
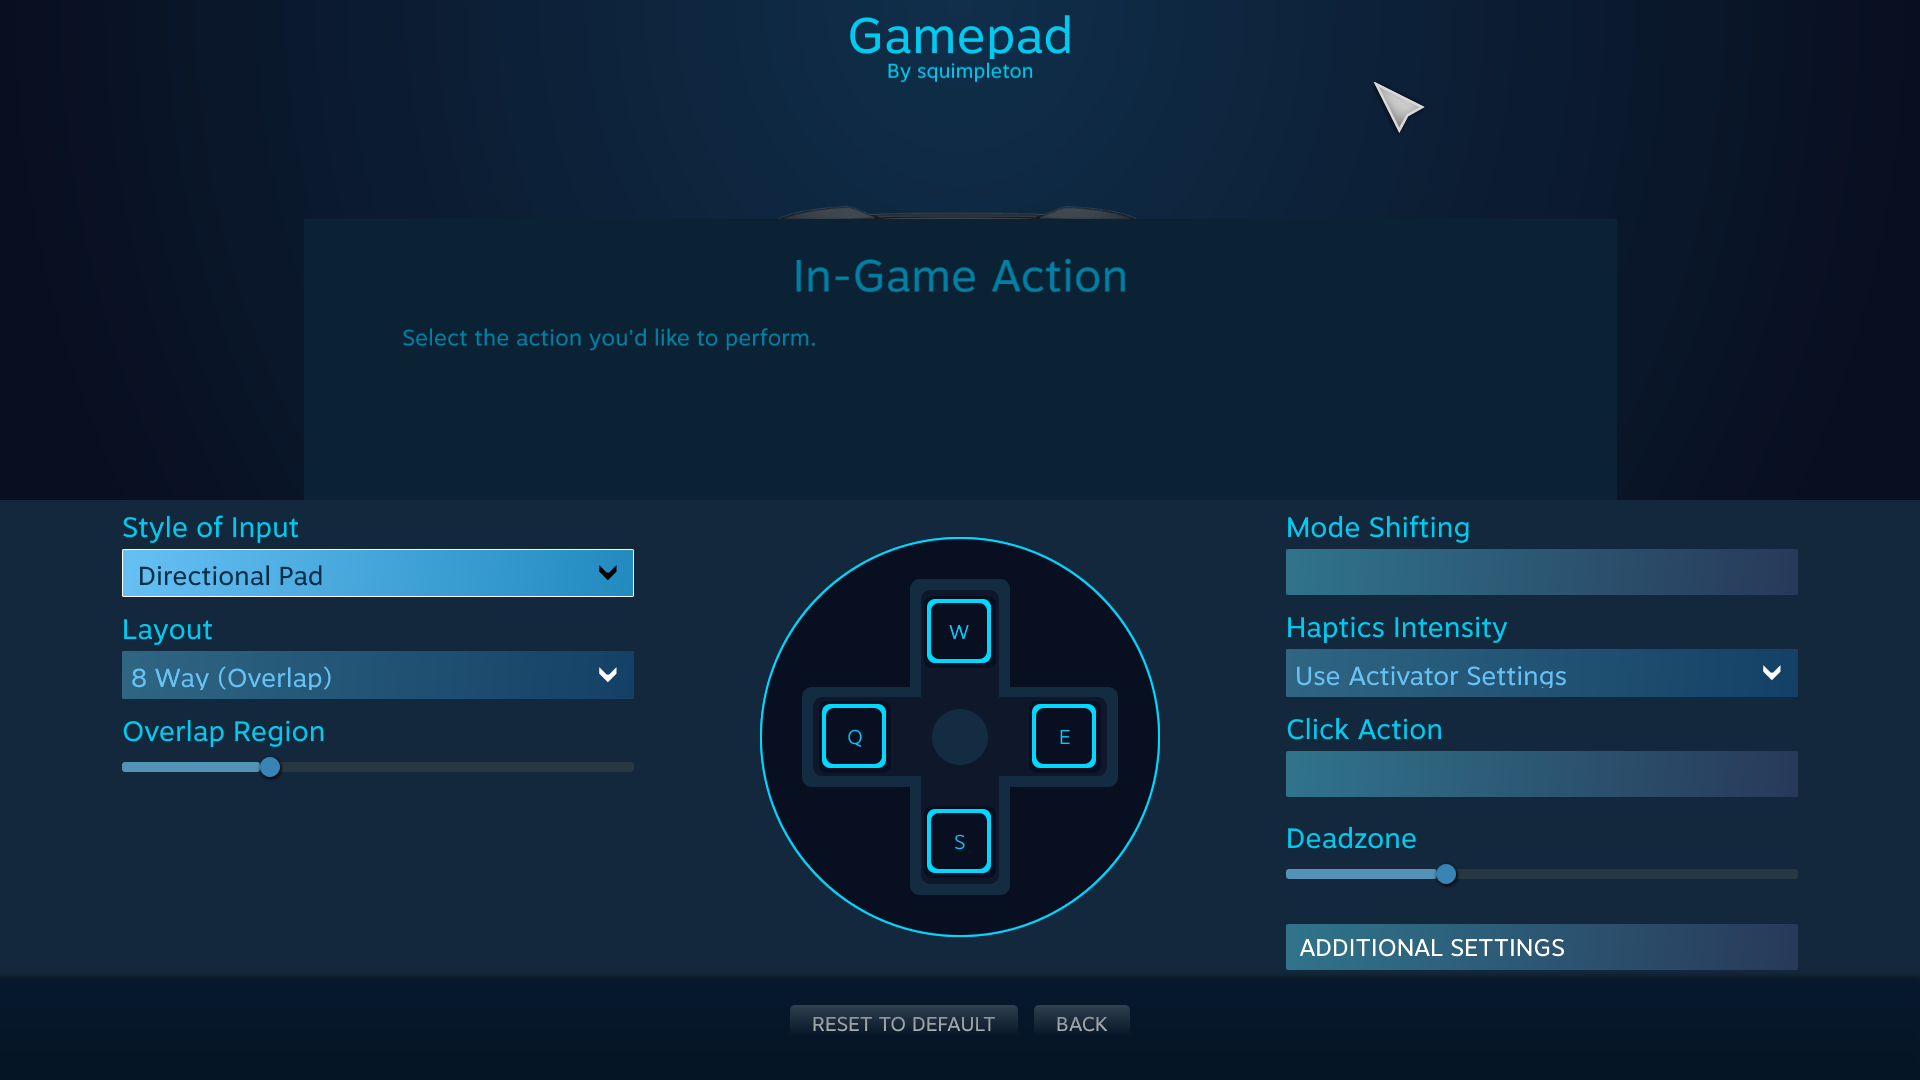
Open up the controller settings for FFXIV in Steam and locate your controller. Then select the Joystick Move.
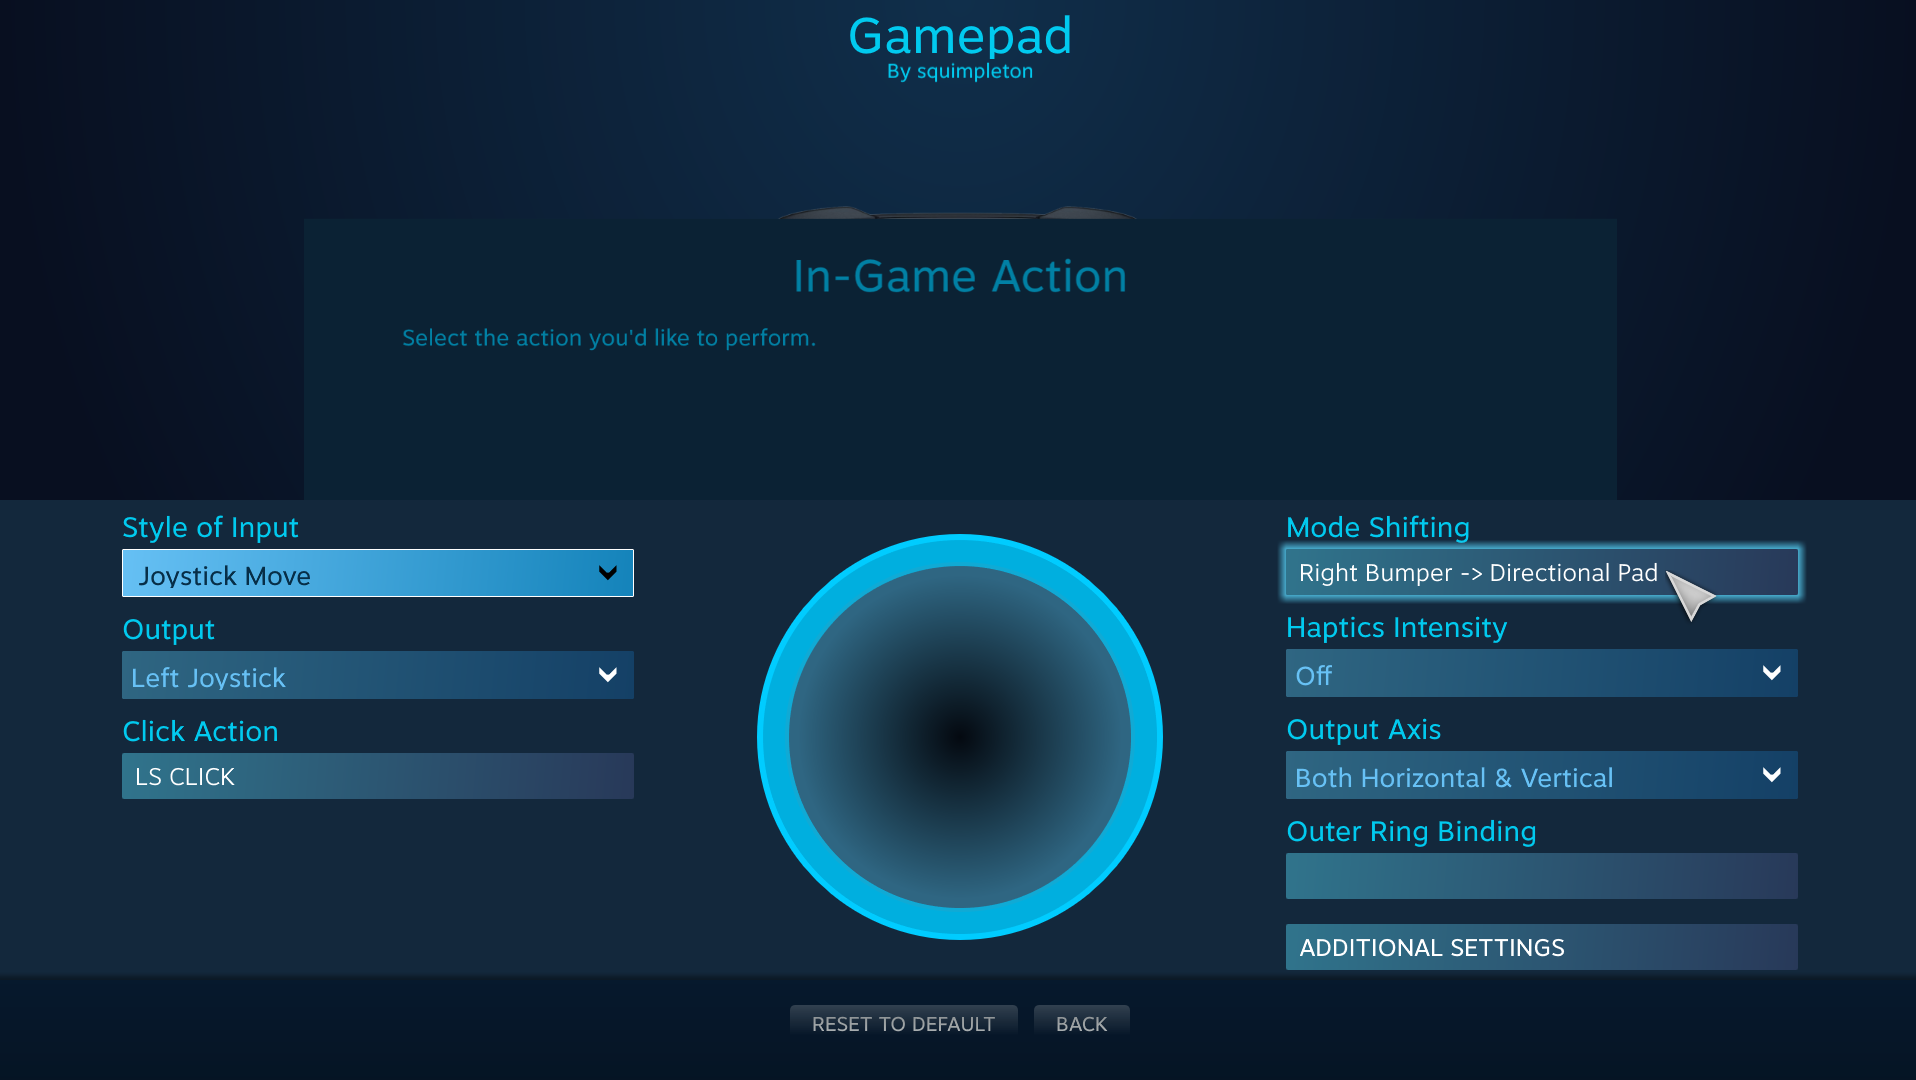
Your Mode Shifting will most likely be empty.
Select the box where it says Mode Shifting; It should be empty if this isn’t already being used.
- Style of Input: Directional Pad
- Layout: 4-Way (or 8-way but pick a small overlap region. 4-way is recommended)
- Mode Shift Button: Right Bumper
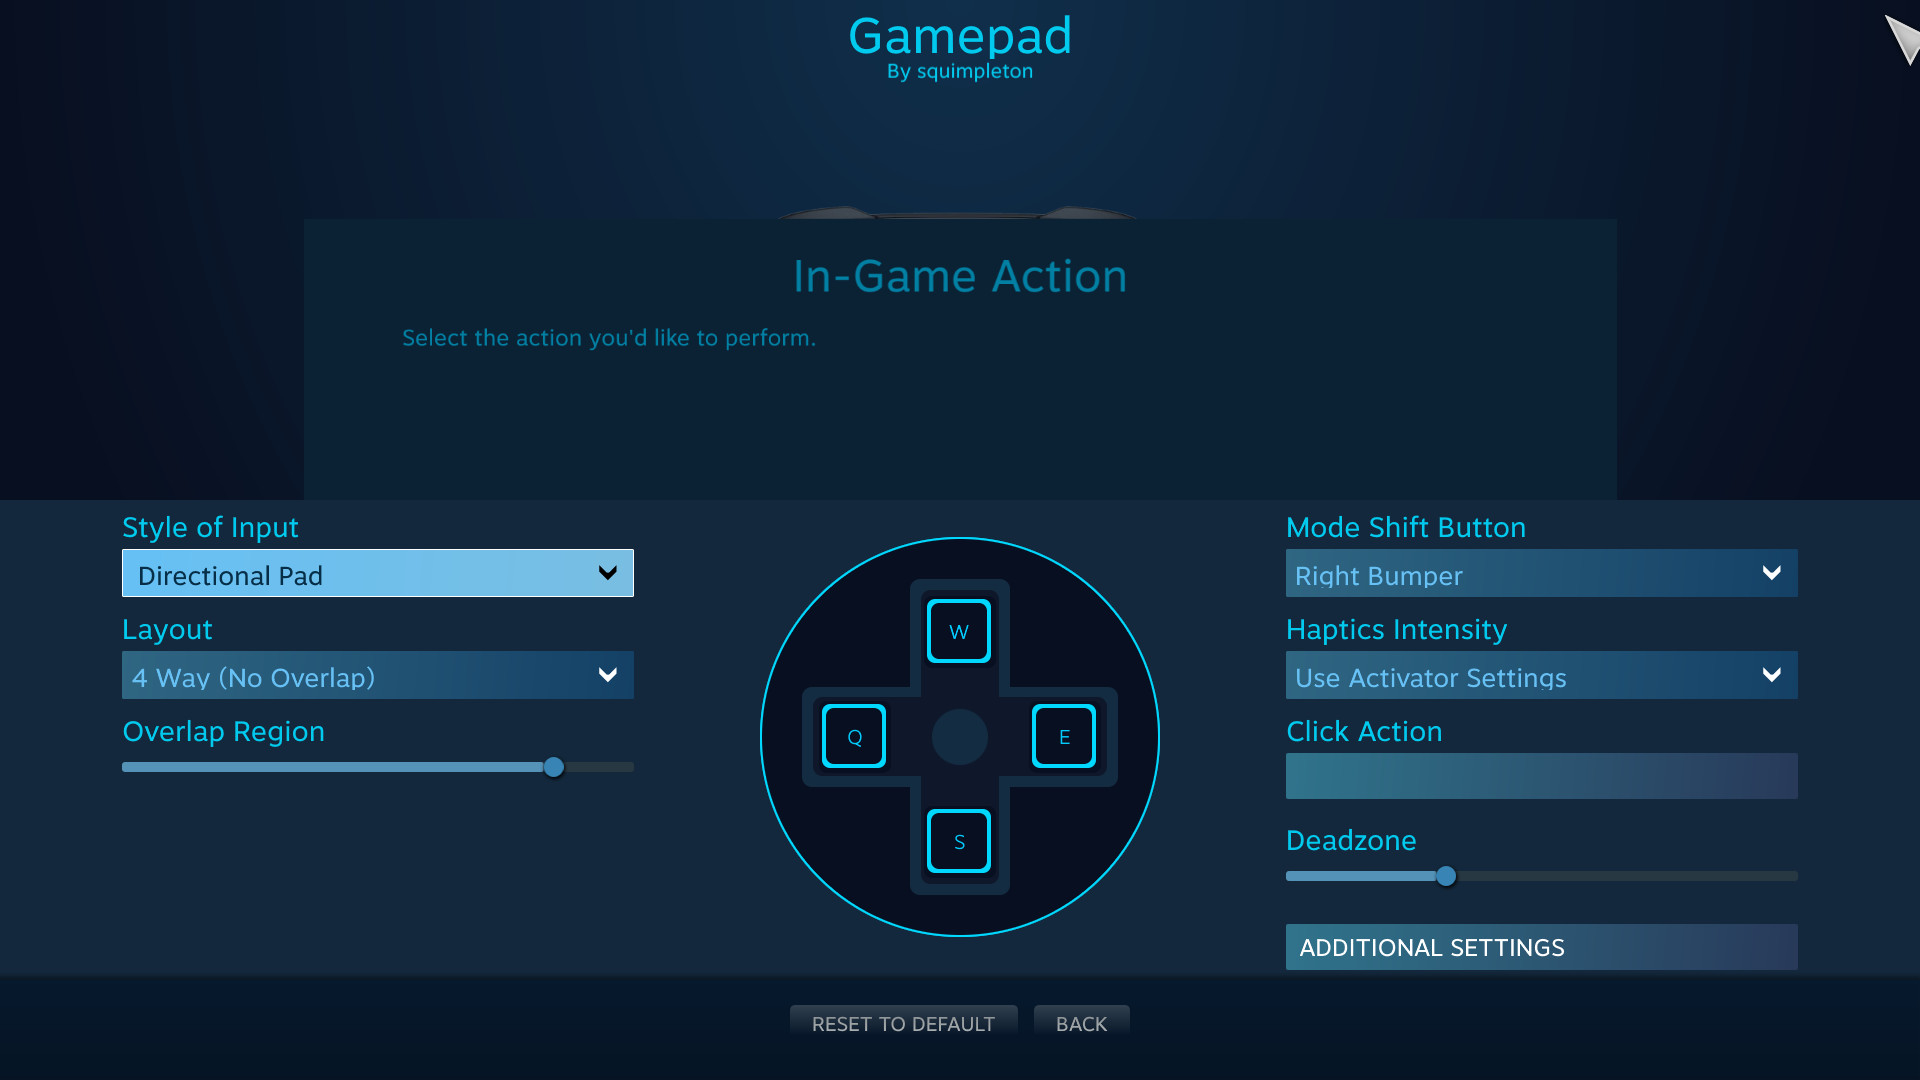
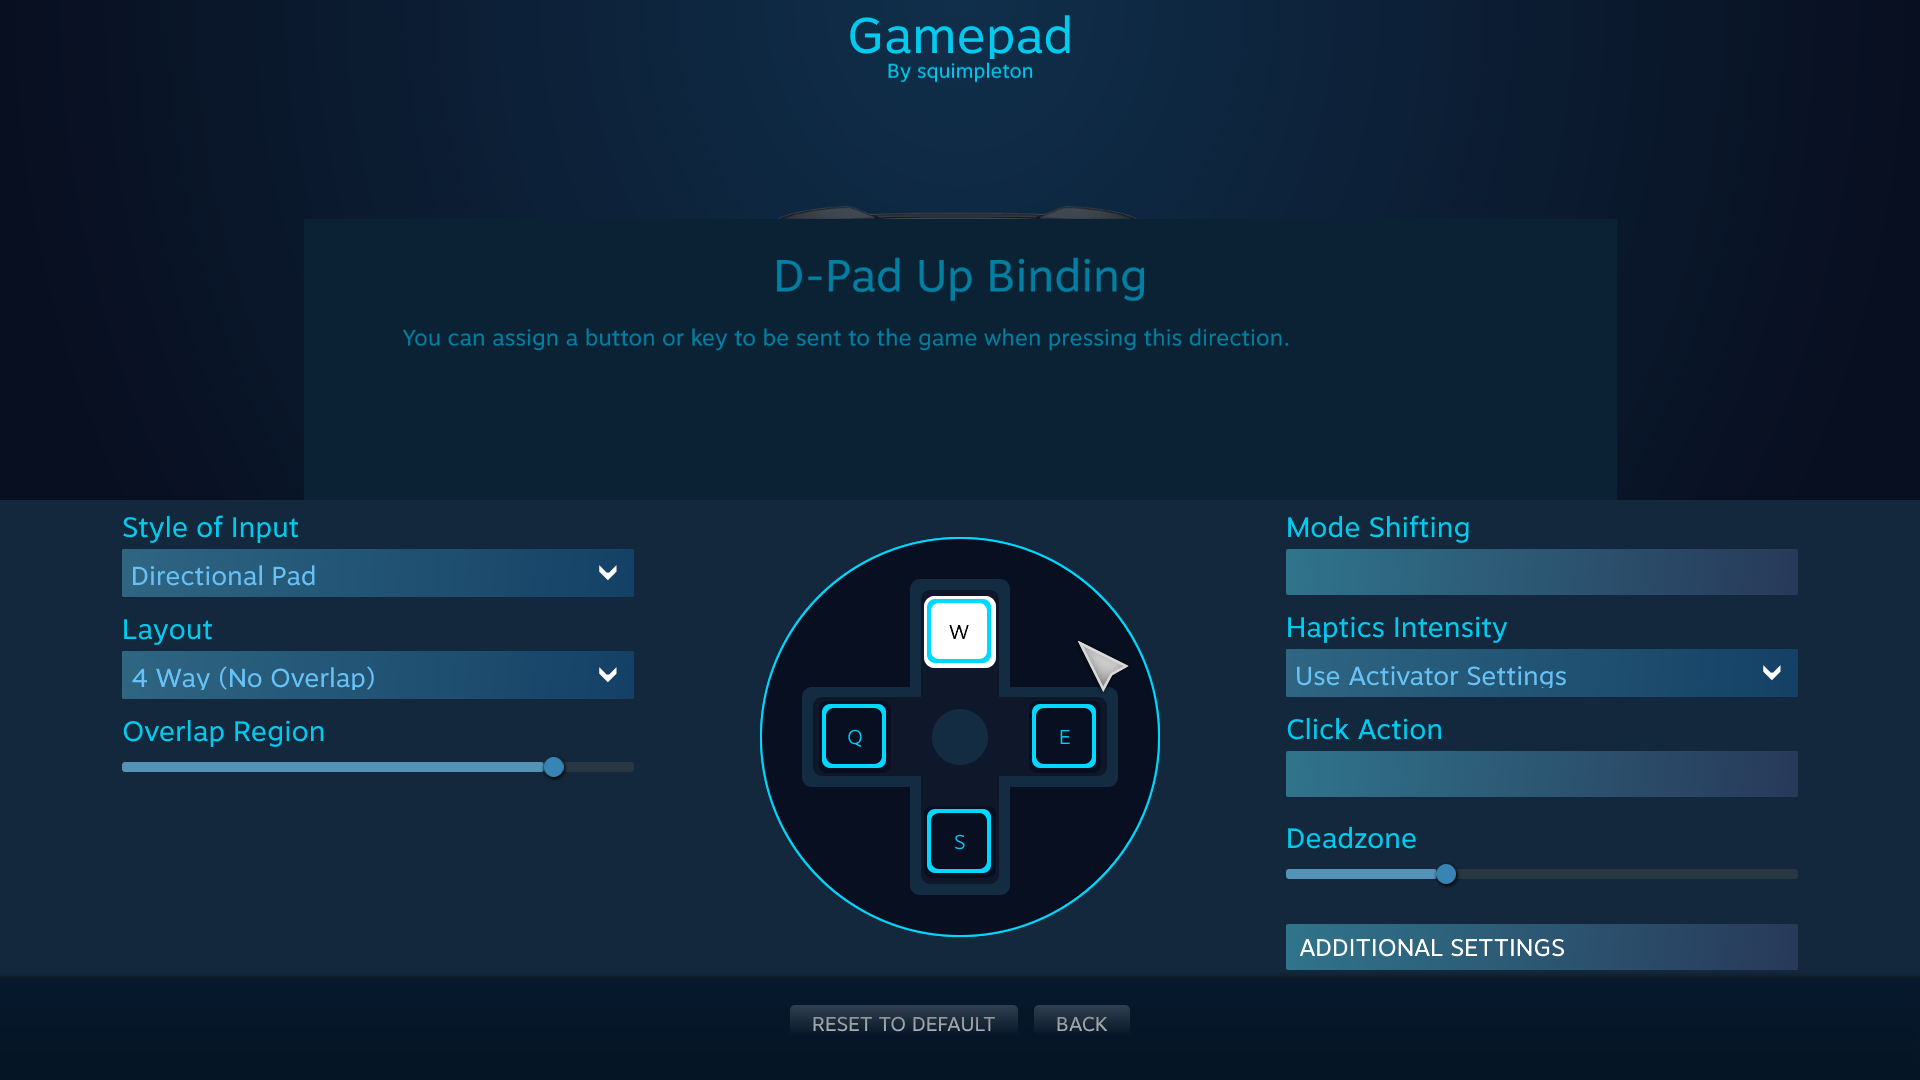
Set this virtual d-pad to the keybinds to Move Forward, Strafe Left, Strafe Right, and Move Back, which are by default: WQES. See image.
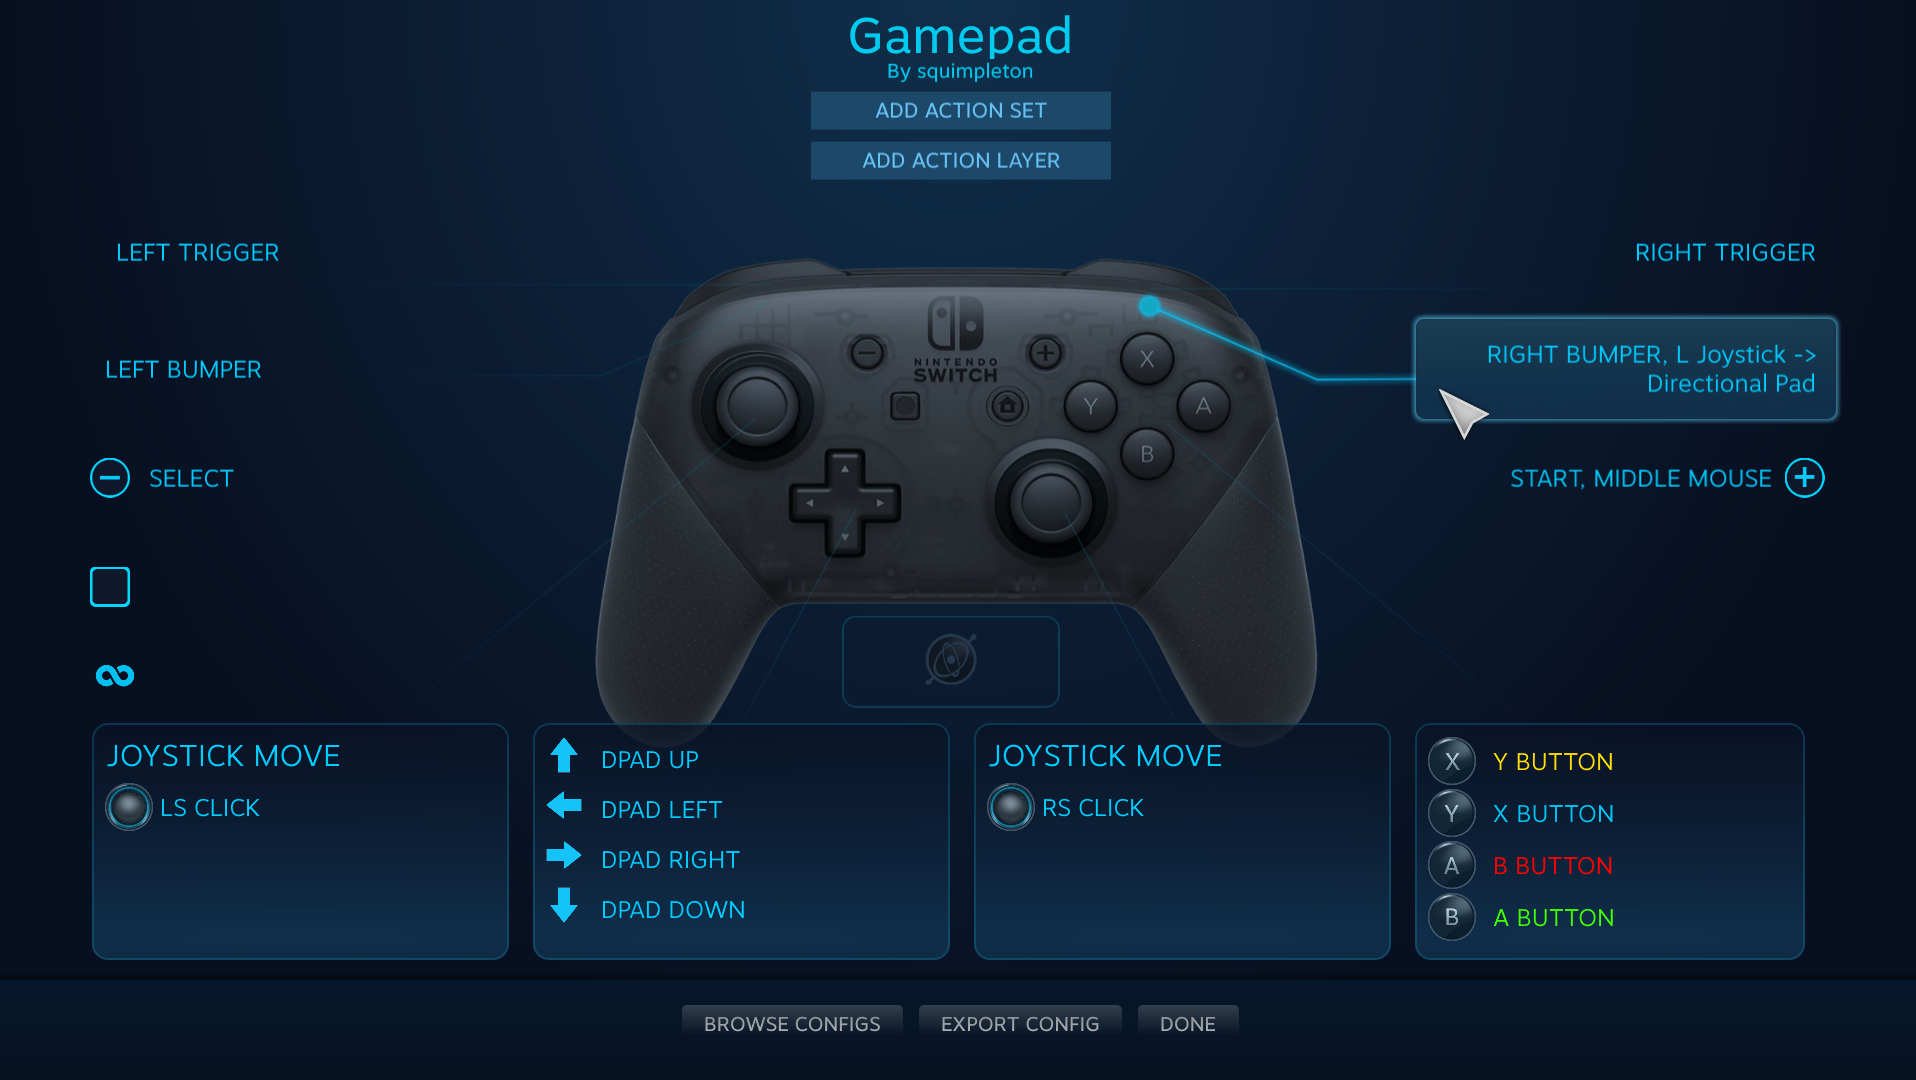
Congratulations, strafing is set up. It might be a little confusing because this binding will show up on the preview page next to the right bumper, it does say that it’s for the Joystick, so in the future you’d just have to remember that you should edit this in the Joystick.
Strafe Via Layers
Step 1: Add an Action Layer.
You can feel free to name the Action Layer whatever you want, but using the modifier name is often the least confusing. So it’ll be L1 Custom.
![]()
You should now see a layer called Default, and a new one called L1 Custom. Click on it and you’ll see that everything is showing the default settings as gray. Whatever you change here will be overwritten, and whatever you don’t change will use the default settings.
Step 2: Set up analog stick to strafe
Make sure you have the Layer selected, and select the movement stick.
- Style of Input: Directional Pad
- Layout: 4-Way (or 8-way but pick a small overlap region. 4-way is recommended)
- Set up the keys to your strafe and move up/down keys (QWES)
Step 3: Set your L1 to know what to do!
Now you need to tell the Default layer to go to the L1 custom layer, and vice versa! And we also need to make sure we don’t break the existing L1 functionality. Because of this, we will do the Custom layer first so that if you don’t finish, you don’t break your L1.
In the L1 Custom Layer:
Select the left bumper, and add an activator. If you do not see the option “Add Activator”, select “Show Activators” first. If it tells you a warning that the base Action set has existing activators, press Ok. It’s fine because we want to override. Make sure you have two activators.
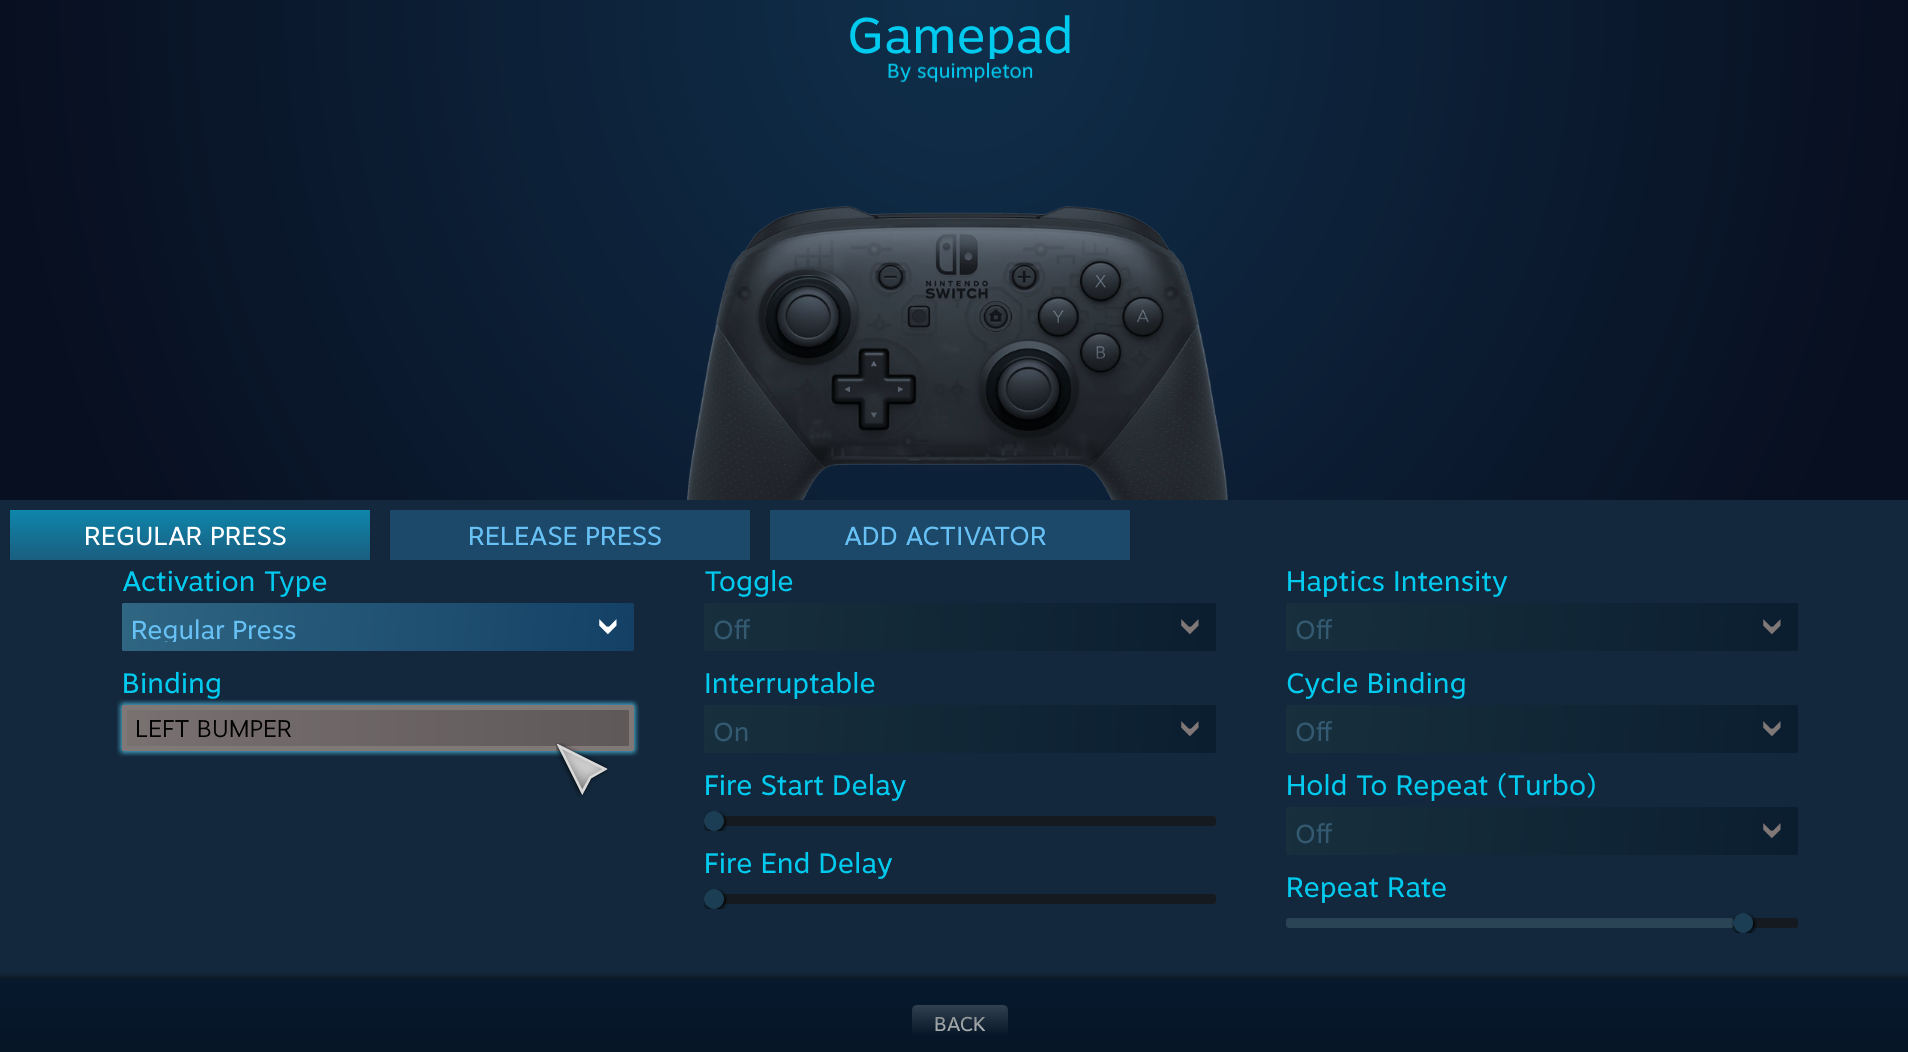
On the first activator:
- Activation Type: Regular Press
- Binding Left Bumper
On the second activator:
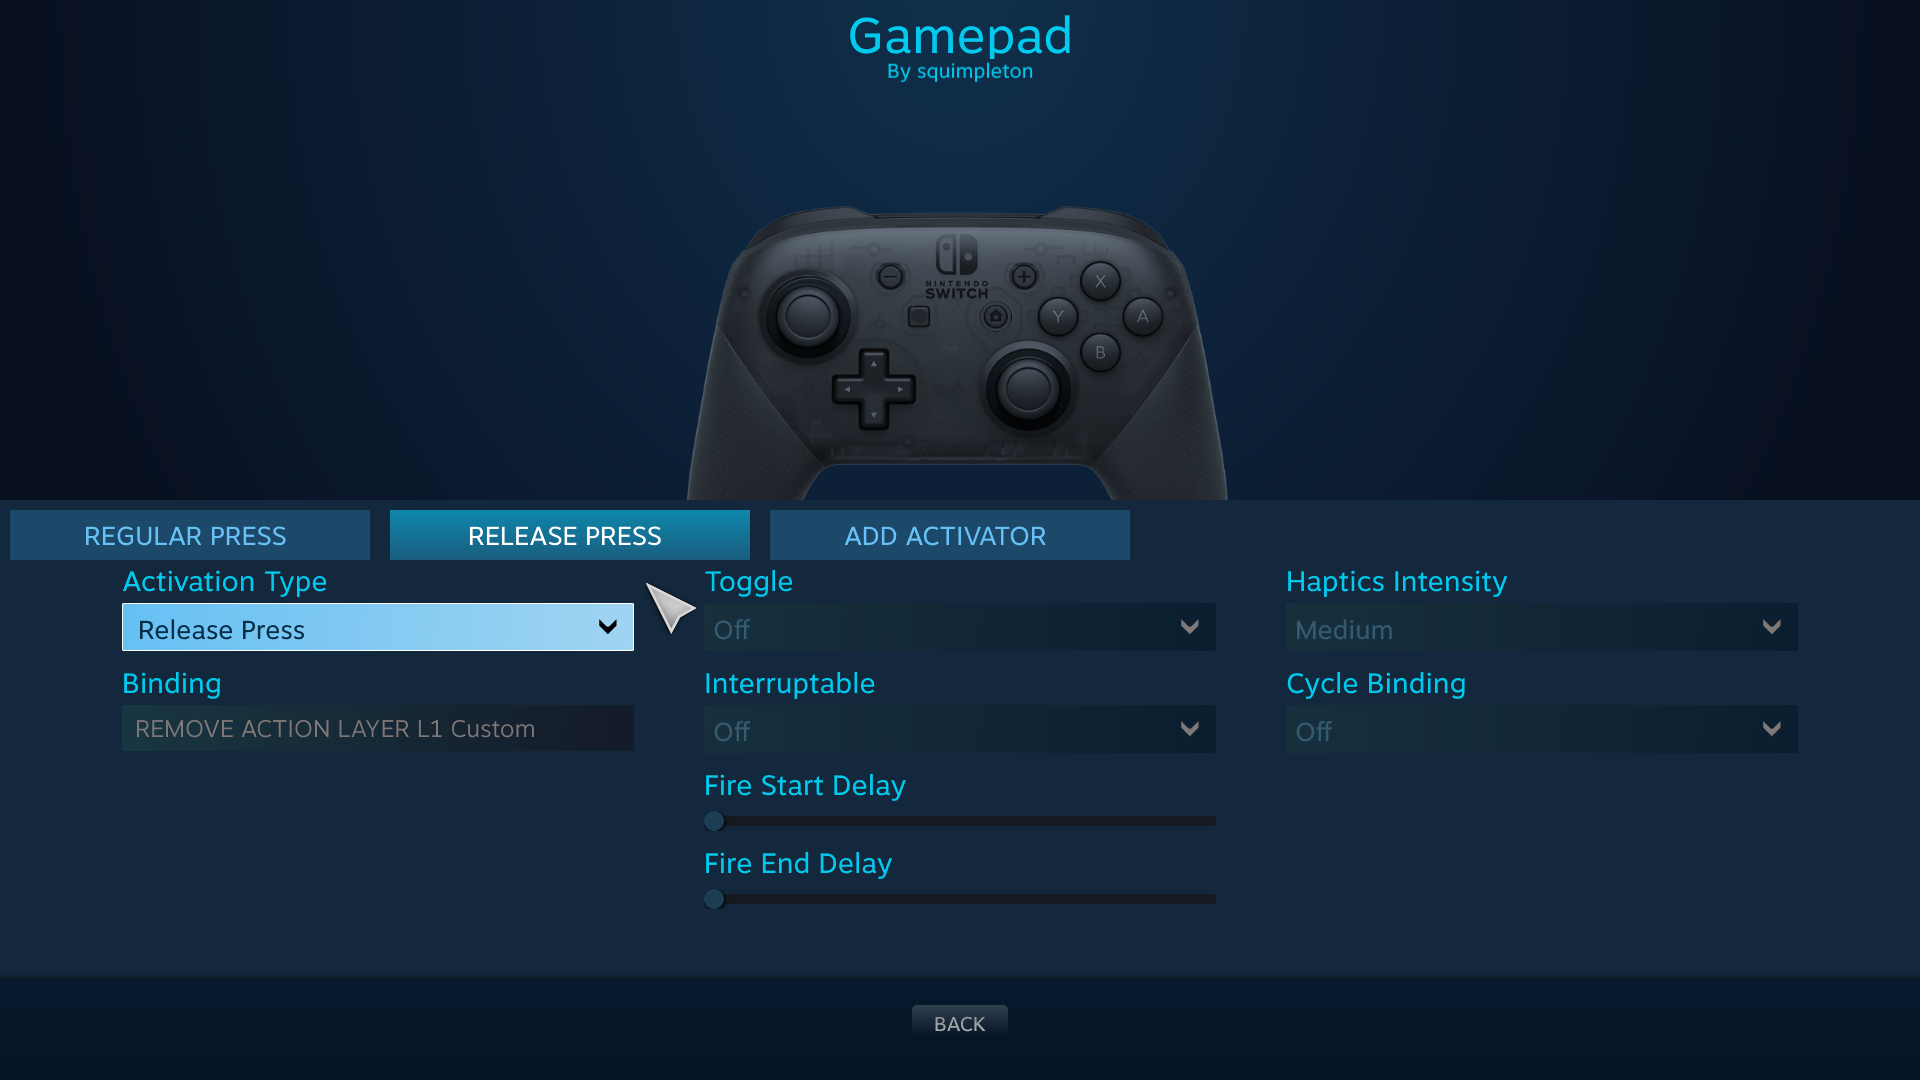
- Activation Type: Release Press
- Binding: select the Layer button (see picture)
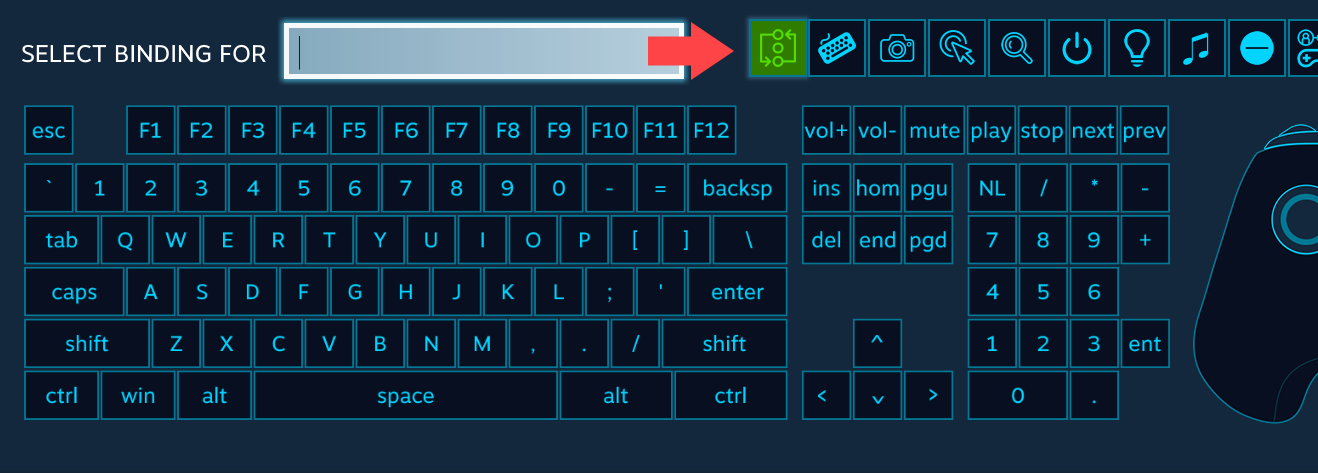
- Pick Remove Action Layer
- PIck L1 Custom, or whatever you named it as the layer. Turn off the display and beep, as that means you’d hear a sound and see an image that steam puts and that gets quite annoying.
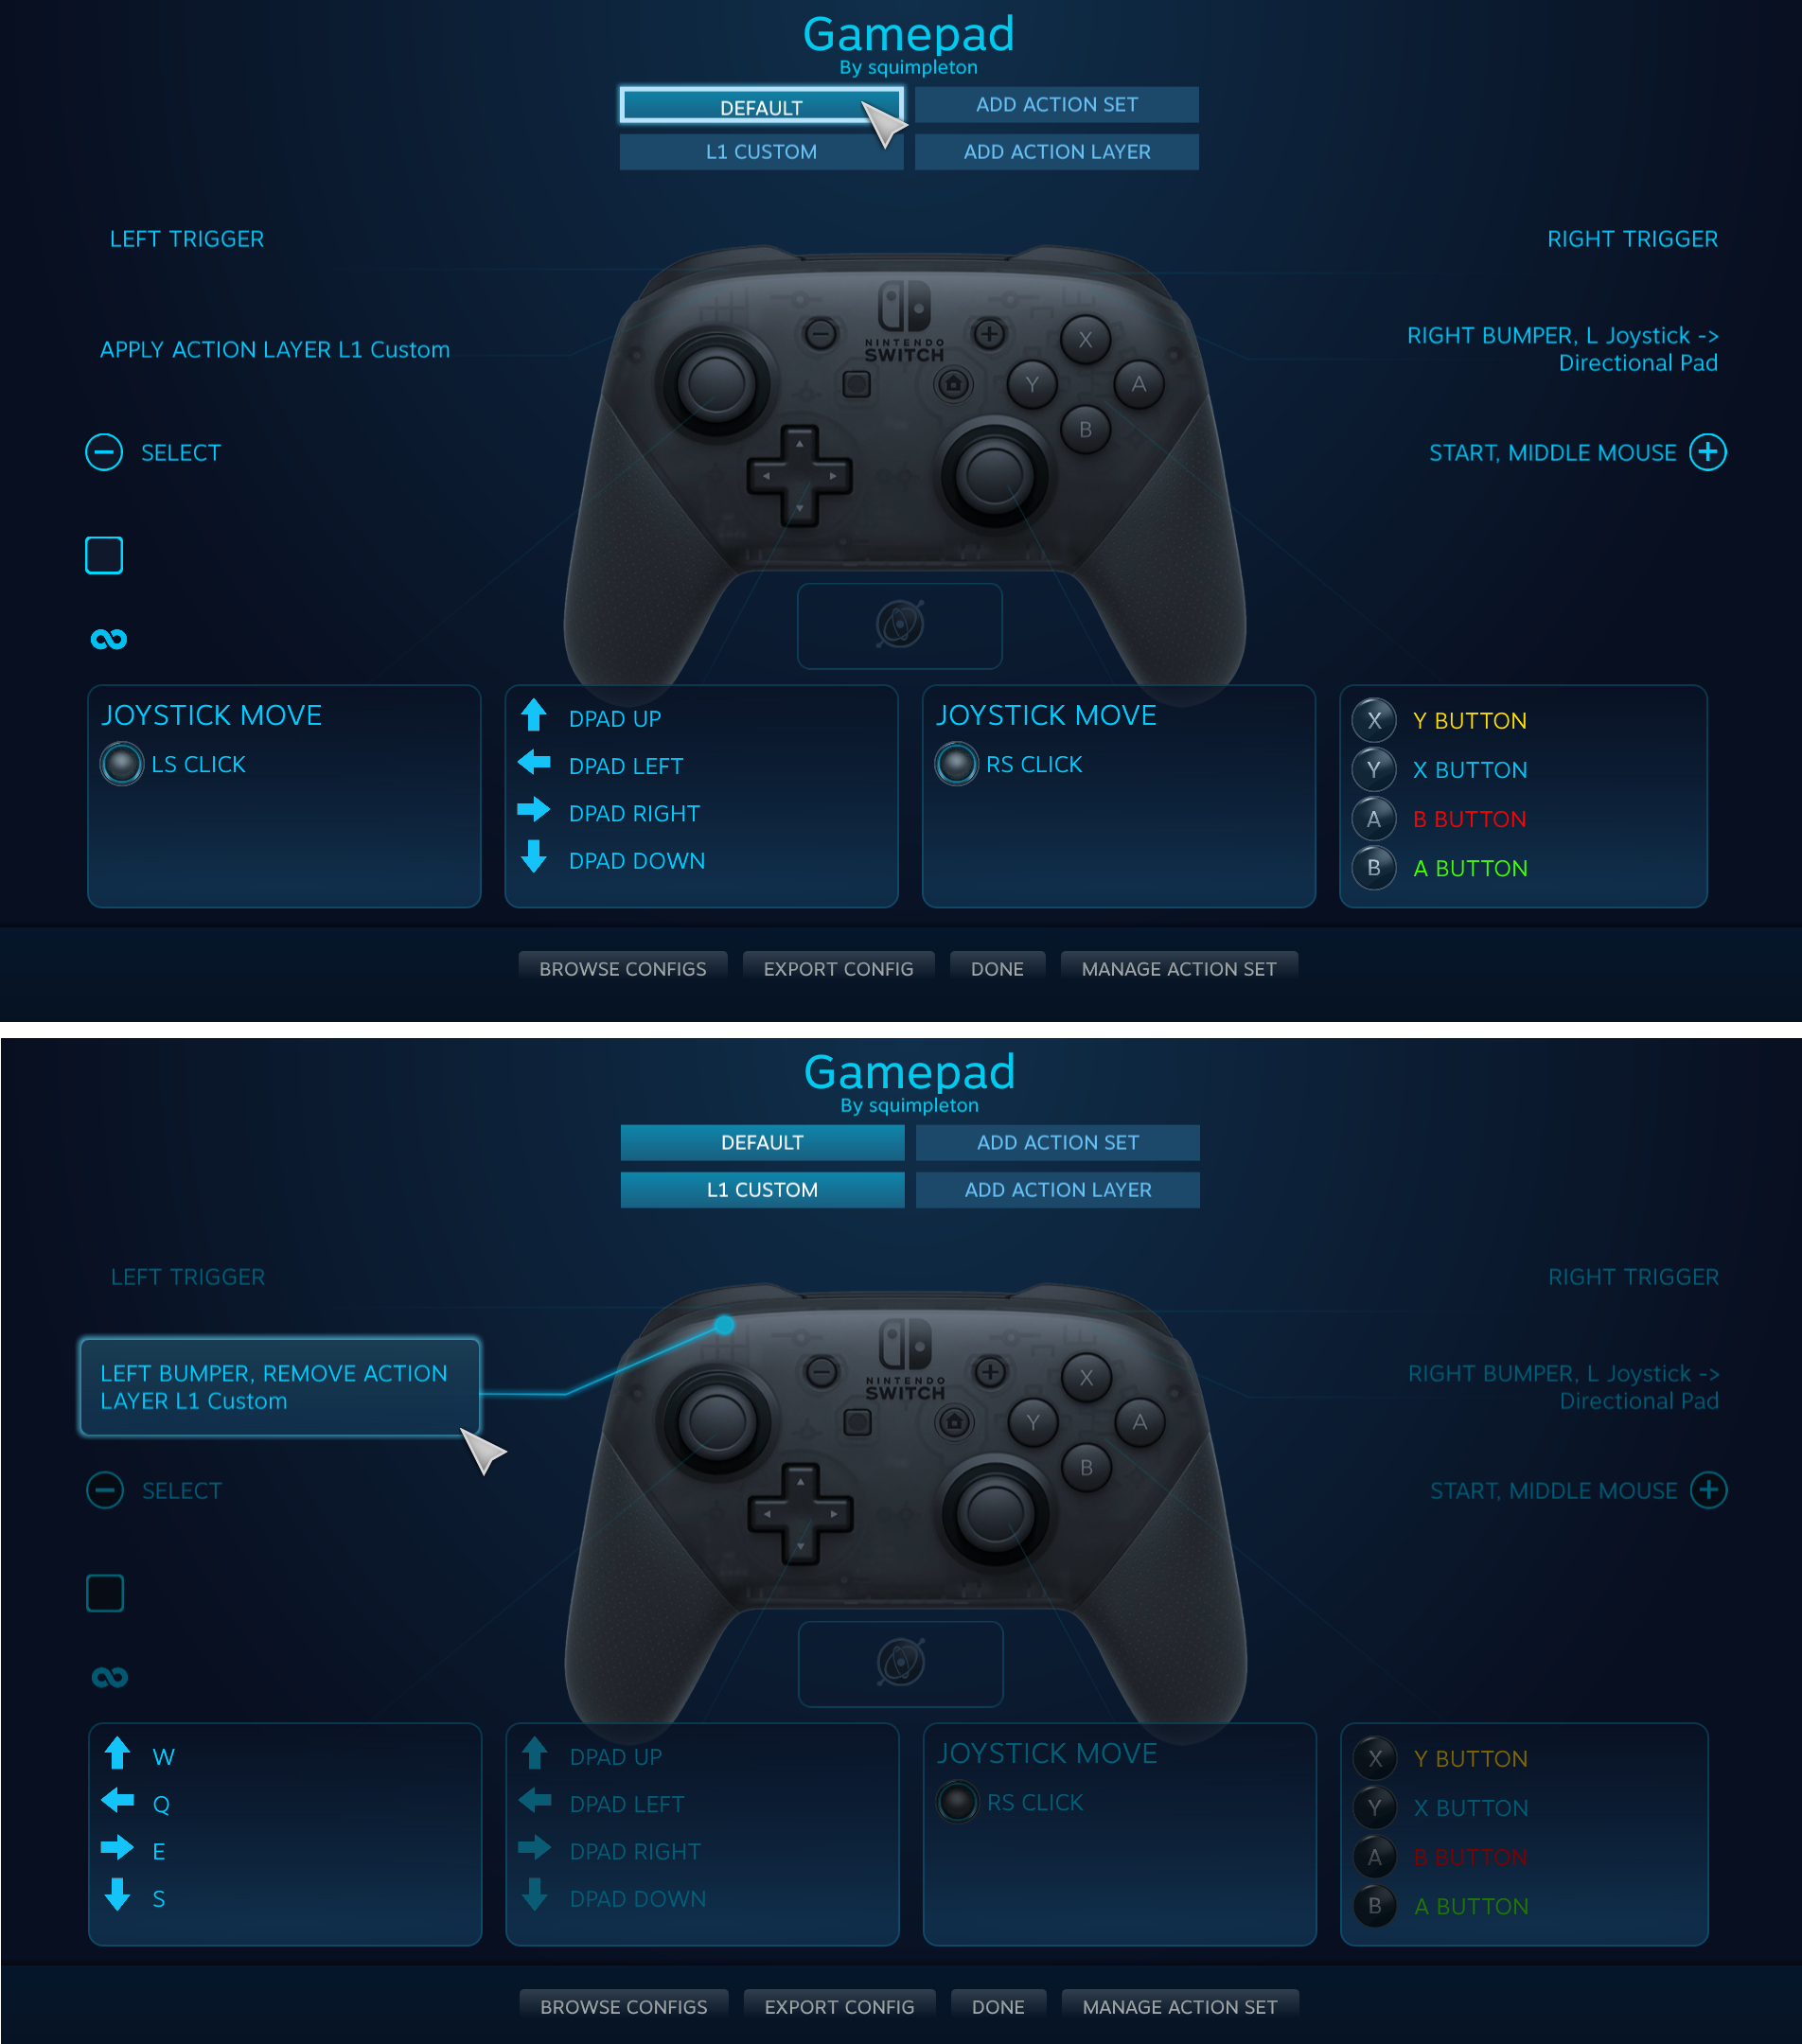
In the Default Layer:
Select the left bumper.
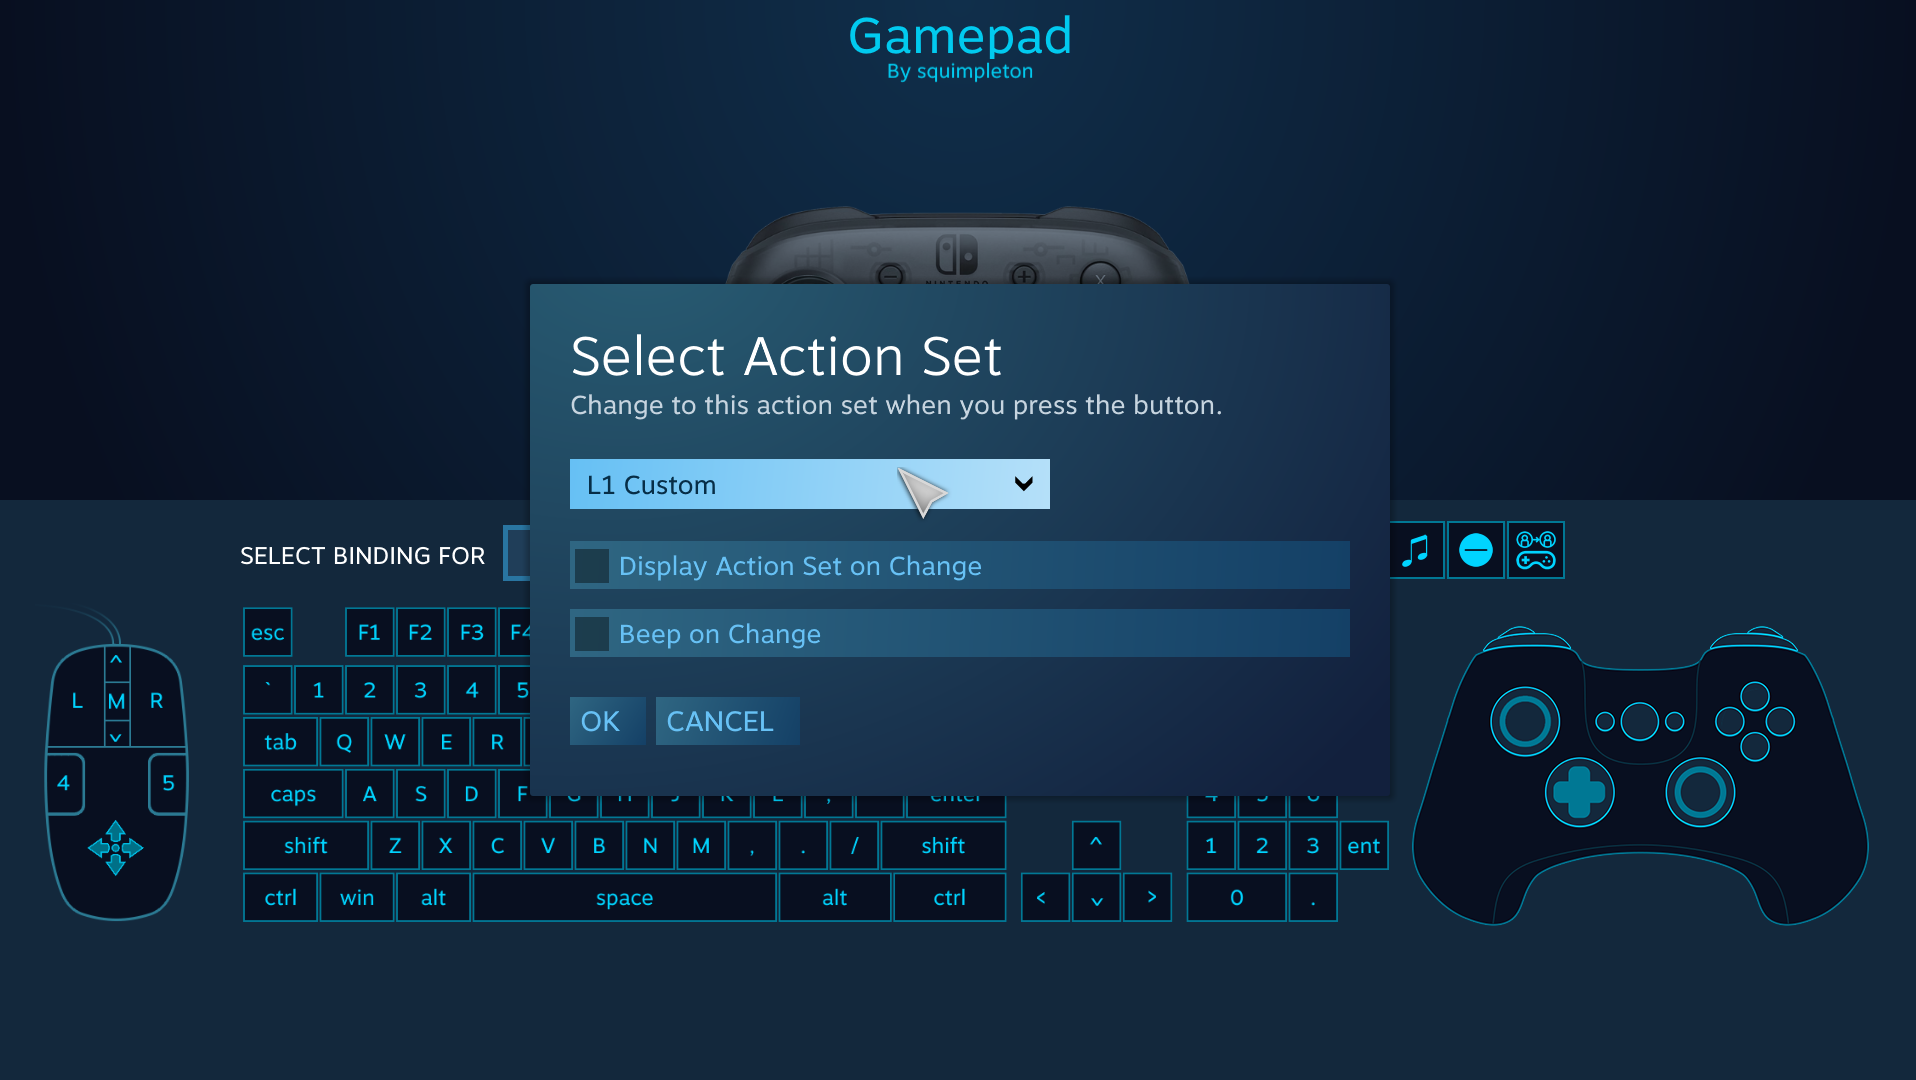
- Pick the Layer button again, but this time choose Apply Action Layer.
- Pick L1, and once again turn off the Display Action and Been on Change.
Now the Default will switch to the special Layer, which has two bindings for L1 : the regular bumper and the special strafe!
Why pick Layer method instead of Mode Shift method?
The Mode shift method is significantly easier to set up.
The benefit of the Layer method is if you plan on making other changes. For example, the above controller is a switch pro controller. So it would be possible to bind the square button to something in the Default Layer, and something else in the L1 Custom layer.
This would offer a quick way to view ALL L1 changes.
Likewise, had this method been used for R1 instead, R1 doesn’t currently have in-game bindings for R1 + Start and R1 + Select, so that would something added and it gets easier to see all of those in a Layer than making a Chord for each of these combinations.
So if you’re planning on setting up multiple rebinds, Layer method is better for remembering what you did in the long term. If you’re only doing a few rebinds, using Chords and Mode Shift is perfectly fine.
4-way or 8-way?
While 8-way does mean there will be diagonals, this can lead you to walk slowly. Doing Left/Right Strafe + Back = walk slowly in that diagonal.
This will change based on your Overlap Region. If doing 8-way because you feel confident you will only use it to go left, right, and diagonals and never backward, try to keep your overlap to about half or less.
What about Setting up a Double Tap?
You can set up Double Press activators which will indeed do the job of a double tap. However, the way the Steam API does it is unfortunately a little off. It actually seems to wait to see if you’re double tapping or not. This makes the single taps feels slow and sluggish. Furthermore, if you set it up on a layer, in the same way L1 was set up above, it can make it go the opposite direction - when you try to single tap, it might actually do the button twice, but not end up doing the double tap binding.
Not recommended except for maybe doing it on Start or an extra button if your controller has one - preferably not a button that is activating or turning off layers.
Touchpad Support (PS4 controller)
Note: This section only been tested on a PS4 controller. It is very possible that it might also work on a PS5 controller, but it has not been tested yet.
This doesn’t actually provide access to FFXIV’s touchpad support, but you can end up with the same result. This is actually recreating the support through Steam.
Because of this, you do not need to have the Gamepad Type on any particular setting. Any of them will do, even the ones that don’t say Touchpad.
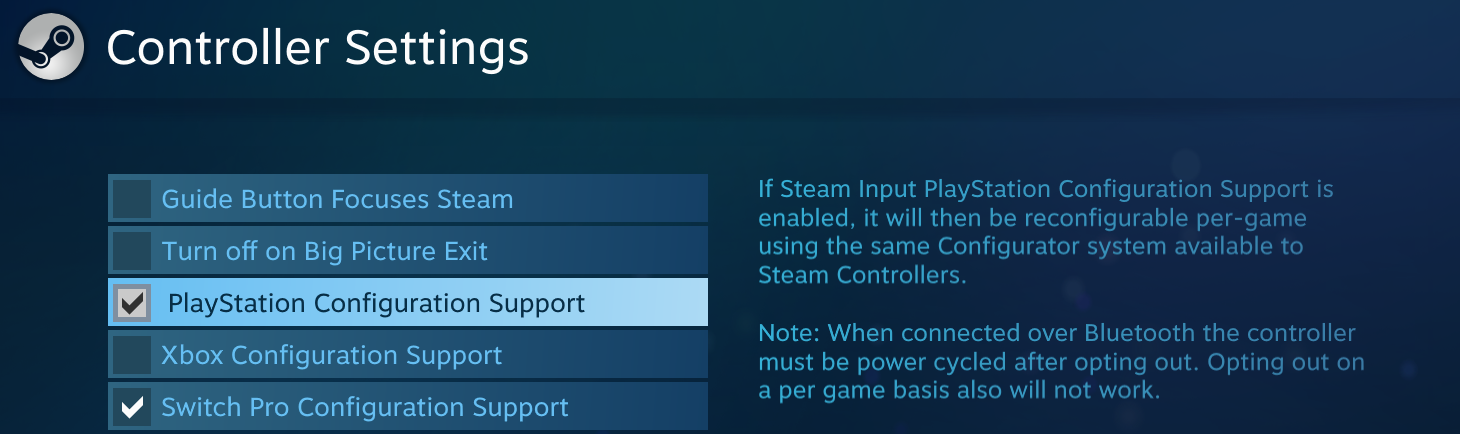
Pre-requisites: In Steam Settings, Make sure PlayStation Configuration Support is turned on
Then, in the game’s steam page, in Controller Settings, you need to notice that it has a Unified Pad, as well as a Split Pad with two sides. It’s important to realize both the unified and split pads are active at the same time. If your goal is to recreate the PS4 touchpad, both will be needed at the same time.
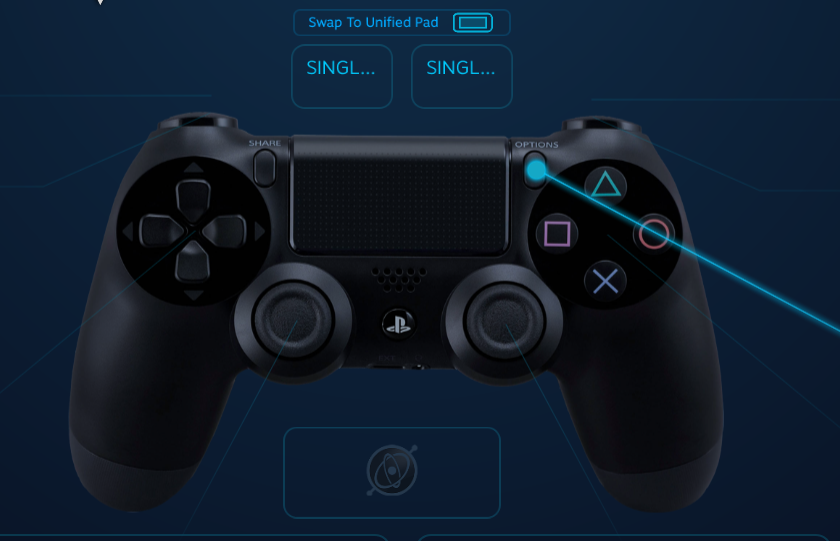
The Unified Pad
Go to Swap to Unified Pad if it’s not currently there.
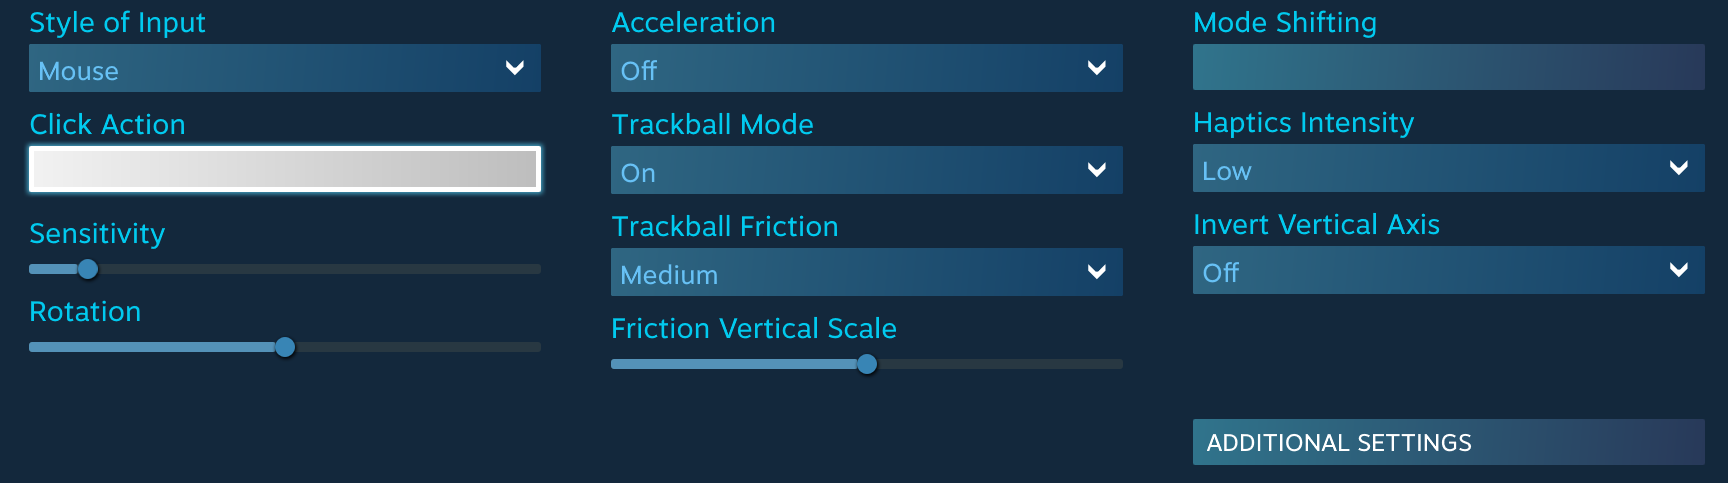
Once on the unified pad, select one of the following Style of Input:
- Mouse: will act like a mouse, with the cursor starting from where it was last left off. This is the closest to the PS4 feel.
- Mouse Region: Acts like a mouse, but the touchpad represents the screen. So if you press on the top-right of the touchpad, it will automatically go to the top-right of the screen.
This will let you control the mouse via a cursor, but what about left/right clicking? On the PS4, it’s by double tapping the touchpad on the left side for left click, and right side for right click.
Leave the Click Action empty.
The Split Pad
Click on Swap to the Split Pad if you aren’t already on the split pad.
Let’s start with the Left.
- Style of Input: Single Button
- Trackpad Click: Select. This will be your click-in. If you’re doing HUD forward on both, put Controller’s Select here.
However, if you want to do the HUD (Back), you will need to go to FF14’s Keybinds menu and bind a keyboard shortcut to System, Cycle through HUD Components (Back) and you would then bind the Trackpad Click to that keybind instead.

- Trackpad Touch: This one is tricky. If you have nothing set, you might be tempted to bind the Mouse’s left click there. Don’t. You need to first enable double-tapping! Head to “Show Activators” first!
- In Show Activators, change the Activation Type to Double Press and now you can select the Binding for Left Mouse
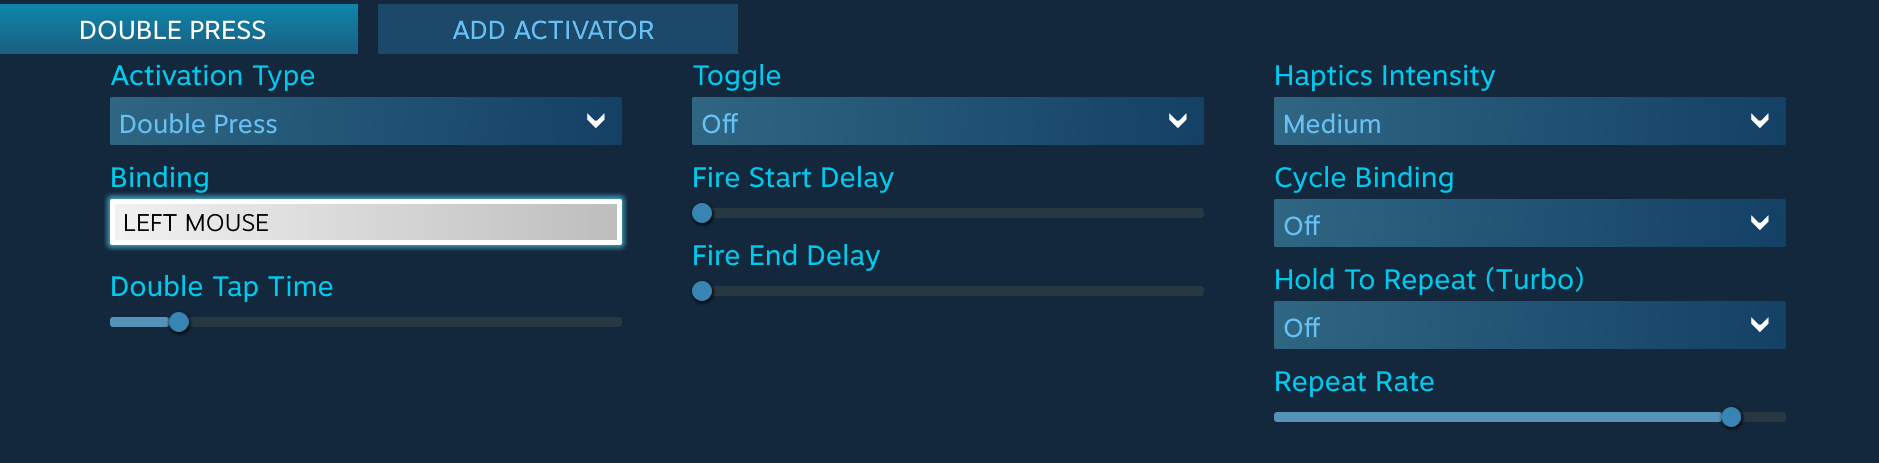
Congratulations, now your left side of the trackpad can do left-click when you double tap, and can do Controller Select (or whatever else you picked) for its click-in!
Repeat the above for the right side, but this time choosing Right Mouse as the binding, and once again feel free to customize your click in as appropriate.
Other ways to use the Touchpad in Steam
The above directions were for trying to recreate the game’s touchpad support that it normally has on the PS4 but through Steam. However, there are other ways you can use the touchpad in Steam. If you were never a fan of the touchpad mouse anyway, feel free to think of alternatives.
For example, instead of mapping the Unified Pad to Mouse, you could map it to Directional Swipe, which would let you create bindings to Swipe Up, Down, Left, and Right! You could easily create custom keybinds for one of your extra hotbars (ex: Binding Hotbar 6 slot 1 to Alt+Shift+1), and then bind these swipes to those keybinds!
In Steam’s Binding, you would need to turn on Multi-button to do something like Alt+Shift+1
So even if you don’t want the touchpad mouse features, there are other ways you can make use of your PS4’s touchpad.
BetterJoyForCemu
An alternative for those using Switch Pro controller, Switch joysticks, or Switch SNES controller. Can work wired or bluetooth, and can allow for customizing extra buttons. It also has a working rumble for those controllers, which x360ce does not.