Movement and Camera
Some of the things covered on this page might be very obvious, but not all (especially about walking backwards!). This will cover how to access your menu, and how to move your character and the camera.
How to Run
Probably pretty obvious for this one, but just use your Move Character stick, by default the Left stick. You can run in all directions*.
*please read the Walk Backwards section below for a caveat on this.
How to Jump
The default jump button is Triangle.
Do keep in mind that you can jump in different amounts based on how fast you are walking or running.
Therefore there are various levels of jumps depending on how much you are pressing your analog stick, so be careful not to have that dead zone too high. (found in Analog stick sensitivity. Higher = more dead zone)
How to Walk
So there are actually a few ways to accomplish this. The first is to press your movement stick slightly, and not all the way. However, what if you have to walk and do not want to end up accidentally running from pressing too far?
It is possible you might not be able to walk using this method if you are using a controller that doesn’t support any kind of sensitivity at all. It’s also possible you might not be able to hit the light part of the stick if your dead zone is too high.
In System Configuration, there is an Analog Stick Sensitivity. This is actually what we call a dead zone, and it applies for both sticks. For some reason they didn’t make them separate for each stick. The higher you have it, the farther you need to hit your movement stick before it starts registering. This can be great for removing what we call controller drift, which is when your character is moving by itself because the controller is being too sensitive. However, it also means if you set it too high, you might end up having it higher than the sensitivity required to be able to walk.
The second method to walk, rather than run, is to press your Cancel button, by default Circle, and keep it held while you move. With this method, it doesn’t matter how far you push your stick; this is a better method when you need to be sure to walk (like around Eureka dragons).
Please note that this section is about walking in any direction. There are actually 2 more possibilities for just walking backwards, so let’s talk about that next.
How to Walk or Run Backwards
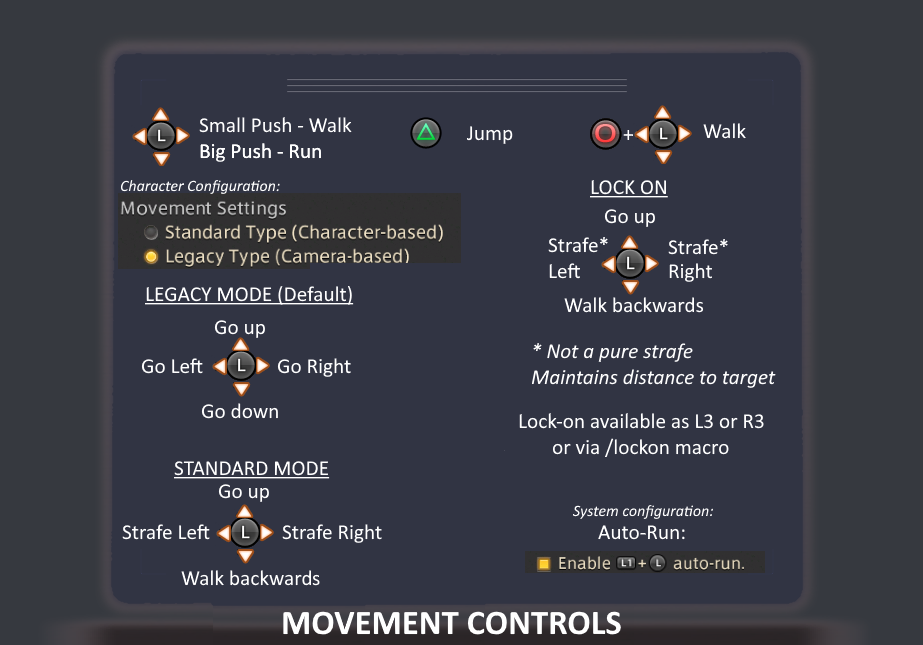
Standard vs Legacy
Before we can talk about walking backwards, first we need to talk about Standard mode V.S. Legacy Mode.
In the character configuration, you have a choice between these two movement types. By default, controller uses Legacy mode. This is also what most people would recommend.
Standard:
In Standard mode, your character keeps facing forward no matter what direction you move. You have to move the camera if you wish to change where your “forward” is. What this means is that when you press:
- left, you strafe left
- right, you strafe right
- down, you walk (not run!) backwards
All while facing forward.
Strafe means walking sideways without changing the direction you face.
Standard mode is the only way to strafe on controller, at least officially.
Legacy:
In Legacy mode, your character turns to the direction you press. So when you press:
- left, your character turns left and moves in that direction
- right, your character turns right and moves in that direction
- down, your character faces down and moves in that direction (can run!)
Generally, using Legacy is recommended because if you have to dodge a mechanic by going down, you don’t want to end up walking, and you don’t want to have to also mess with your camera at the same time - that would means both thumbs are busy utilizing the sticks, which mean neither thumb is available for any attempts at keeping uptime!
This does mean you will not be able to strafe, and walking backwards (actually walking backwards, while facing forward) will not be available except for the following…
Lock On
If you use Lock On, you will be able to walk slowly backwards and do a length-equidistant strafe (which is not a true strafe).
How to Strafe
Currently the only official way to strafe on controller, which is to move left/right while still having your character face forward, is to use Standard mode in character config. Since Standard affects your “walk backwards”, it means the only way to strafe is to also end up with the slow backwards walk, which is generally undesirable. Very few controller players would choose this kind of setup in a battle setting, though they might use it for RP or video recording.
You can do a false strafe using Lock-on.
Strafe (Standard mode): characters walks sideways while facing forwards. This can be a perfect walk left/right as long as you press left/right on the analog stick perfectly.
Length-equidistant strafe (lock on): Character walks sideway while facing forward, while also maintaining the same distance to whatever it is locked on. This means it’s actually walking at a slight angle, and not purely left/right even if you press left and right perfectly. It also means you need a target to lock on to that is also positioned in a place you can work with, since the lock-on is based on where your target is.
How to Auto Run
This is available as a System Setting by first using using your movement stick, by default the left stick, in the direction you wish to run and your Auto-Run button . This does indeed change if you change your bindings.
Some people do not like this, as the Auto Run button actually has targeting functionality in battle. This can lead to accidentally auto-running into undesirable places during fights. PC player can actually use other programs like Steam to create their own strafe binding, but this is not available to console players.
Auto-Run Standard VS Legacy
In Standard mode, you can only change the direction of your Auto-Run via the movement stick. Using the camera stick will change the camera, but not the absolute direction that your character is moving to.
In Legacy mode, you can change the direction of your Auto-Run via both the movement or camera stick. If you use the camera stick, it will cause your character to move towards your new “forward”. It is possible to look around with the camera without changing the overall direction your character is moving to, by using the virtual mouse to hold left click and then using the camera stick.
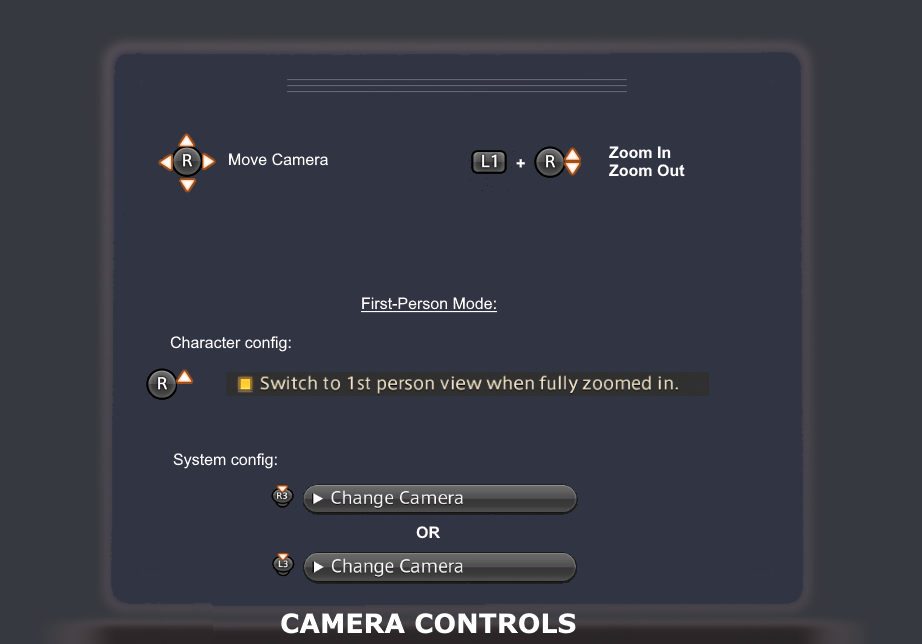
How to Move my Camera
Use the stick mapped to Move Camera, by default the right stick. If your camera seems to be moving on its own, you may need to increase the dead zone via the Analog Stick Sensitivity. Just keep in mind this will also apply the dead zone to the movement stick as well. If you still cannot get it under control, if you are:
- On PS4/PS5, time to buy a new controller (or clean it and hope it works)
- On PC, look into Third party software that will allow you to make custom dead zones
Zoom in/Out
This is one of the many reasons why it is so wrong that the game officially labels the Auto-Run buttons as “Auto Run”. It actually has many more features than that! In addition to targeting functionalities, and other system functionalities, the same button also controls Zoom.
So to zoom in you will press the Auto-Run button, by default L1, and press the camera analog stick. Up will go in, Down will go far.
Switching from Third Person view to First Person view, and vice versa
This is actually a default binding, for some unknown reason. There is no benefit to First Person view, it can actually make various mechanics harder and is typically only used for role playing, challenge runs (doing it in battle for fun), or content creation.
This is by default on the Right stick click-in, also known as R3, if you didn’t remap it. That is not recommended. Pretty much any other option for L3 and R3 is better than this.
In addition, there is another way to reach First Person view. You can put on a setting to switch to First Person view when you are fully zoomed it. It is found in Character Configuration, Control, “Switch to 1st person view when fully zoomed in”. Likewise, you would zoom out to exit First Person view.
Navigating Your HUD
Once you have your HUD elements laid out, you might need to access some of the interactive ones. To do so, you will need to use your HUD Select button .
This will cycle through your visible HUD elements such as:
- Scenario Guide
- Chat
- Duty List
- Map (if opened)
- Minimap
- Any UI component from the menu you have open (Inventory, actions, etc…)
- Status Effects (might need to use d-pad to reach debuffs), Status Info (Enhancements), Status Info (Enfeeblements)
- Various duty-specific interactive HUD elements like the Eureka magia board, Bozja Lost Actions Holster, etc…
But it will not cycle to:
- The Main Menu
- Any hotbars (regular, cross hotbar, or duty action) or job gauges
- Any non-interactive HUD element (Time, Gil, Inventory Grid)
- Targeting elements (Party list, alliance list, Enmity list, etc…), which have their own ways of being interacted with
- Status Info (Other). This is the food bar if you have your status effects separated into 3 groups
- The enemy/focus target status effects bar
The HUD Select functionality is one of the few that differs between the PC and Console (PS4/PS5) versions. Specifically, how much you can customize it.
On PC, your HUD Select button is always going to be what is referred to as Cycle through HUD Components (Forward).
It goes in one direction and if you went too far you need to go through all the other elements to go back.
However, on PS4, there are more choices, which can be customized in System Configuration.
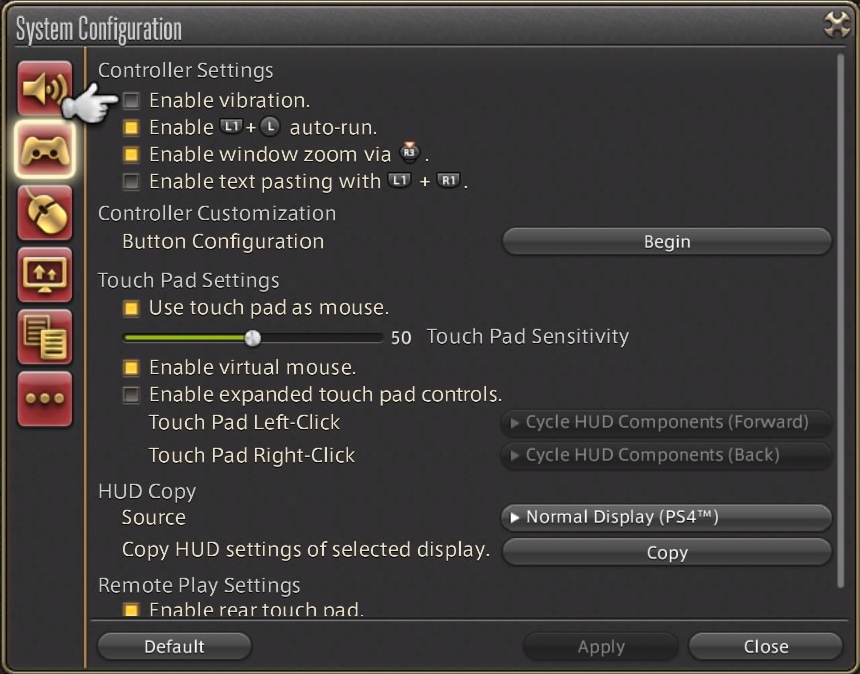
You can choose to have a HUD forward and a HUD back (cycling in the opposite direction) based on where on the touchpad you clicked. This is actually tied to the game version, so to any PC players who play using the PS4 controller, no you cannot do this directly in the game because it’s simply not available. (There are ways to do this using third party tools, but that is not covered in this guide).
Once you are in a HUD Component, you can often control aspects of it via the d-pad, confirm button, subcommand button, and sometimes via bumpers or triggers. Some of the more noteworthy ones will have their own little explanation below.
Using the HUD Select button to leave something opened
Sometimes you might open a UI element, but not want to close it - you just want to look at it and not interact with it right now - and you can do that with the HUD Select button, as long as you have one other UI element opened.
For example, let’s say you wanted to have the Materia Extraction menu opened, you could:
- Open Main Menu
- Go to Actions & Traits
- Go to Materia Extraction
- Use the HUD select button to go back to the Actions & Trains menu and close it by pressing the Cancel button, which will stop you navigating the HUD
This would then leave the Extraction Menu opened, and you could choose to go back to it via the HUD select button any time you see something that can be extracted.
Then, once you are done, but still wish to keep it opened, you can once again use the HUD select menu to go to the Chat or Duty List and press Cancel there to stop navigating the HUD.
This can be useful if you want to look at your Materia Extraction, Repair, Friends List, or anything else that you just want to monitor for changes.
Interacting with specific HUD elements
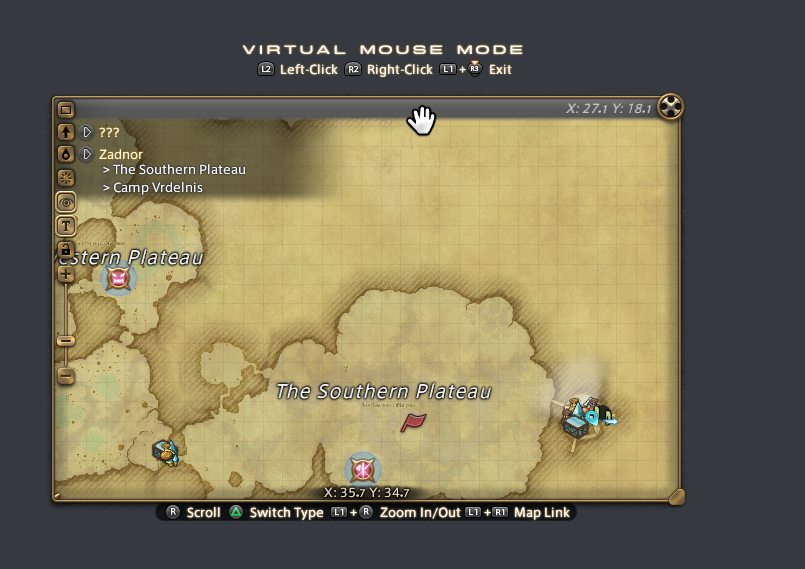
Using Your Map
Accessing the map
To access the map, press your subcommand button (Square).
Getting the hint bar underneath the Map
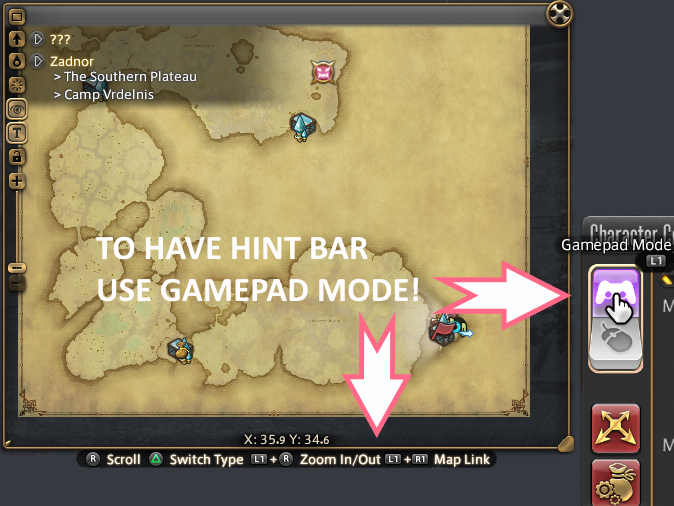
In order for the hint bar to show up, you need to be in Gamepad mode in Character configuration. This will show some, but not all, of the ways you can manipulate the map.
How to move across the map
You use the camera stick, this is actually shown on the hint bar underneath.
How to move slower
If you hold your right cross hotbar activator, you can use the movement stick to move slower on the map. This is not on the hint bar.
How to re-center the cursor of the map
Press R3 (Right-click). This will also go back to your current map if you were viewing another.
Zooming in/out within the map
Use the targeting/autorun button and the camera stick.
(L1 + R-stick)
How to navigate to other zone maps
You can use the d-pad to pick a region or zone, then press your Confirm button, which is by default X.
You also can use L1 and Triangle for the zone; This is not on the hint bar. So the Zoom button and the Jump button. This will only open up the dropdown. You will still need to use the d-pad to pick a different one, and the Confirm button to select it.
You can cycle between the zone map, the region map, and the world map via the Switch Type button, which is by default Triangle (your jump button).
You can also use the d-pad to access the side menu on the map to go up to the region map, world map, and then back to your zone.
If a zone has multiple floors, you can use R1. This will also show up in the hint bar for those not using the default controls.
Create and delete a map link
You can do so by pressing L1 and R1 at the same time, if you changed your bindings check the hint bar. You can also hold L1 and press R1. Note that if you hold R1 and then press L1, it will not create a map link and will instead go to the side menu on the map.
The delete a map link, you use the same binding while being over one. If you’re not near it, easiest way is to just create a new one and delete it.
Click on things on the map (especially teleport)?
As you move the map cursor close to a teleport, it should try to automatically move to it. Then you can either press the confirm button, by default X, or use R1, which is normally the floor switch button. The R1 shortcut is not on the hint bar.
This also works for selecting the transition to other maps.
Why does R1 do this? Probably so you don’t have to take your thumb off the stick that allows you to move the cursor!
Change the size of the map or move it around?
This is one of the very few aspects of the game that requires a mouse, unfortunately.
If you do not have one, use the virtual mouse.
Resize the map
Use your (virtual) mouse. You will need to drag the little triangle at the bottom right of the map. Move your cursor over it, then press and hold the “left click” (L2), move cursor to the desired location and then let go of “Left click”
Move the map
Use your (virtual/physical/touchpad) mouse. Move your cursor to the top bar of the map. Press and hold “Left Click” (L2) and move the cursor to the desired location. Let go of “Left Click”.
Understanding Map Mode
The following subsection will change depending on your Map Settings. In Character Config, UI Settings, General, there is a Map Settings section with the following settings:
- Shortcut display type
- Restore map when not moving
Those settings will alter the way closing your map, and keeping it open, work.
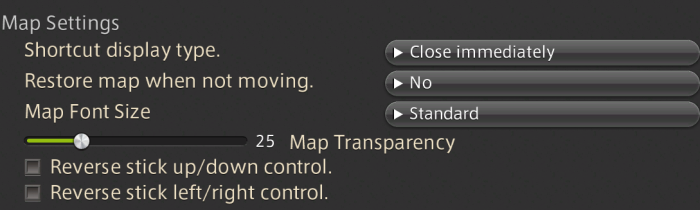
There are also other settings like transparency, font size, and whether to reverse your control. As these are not settings that affect how you will play on controller, they will not be elaborated on in this guide.
Understand Map Active VS Map Visible
In order to understand the two display types, you need to understand that a map can be active or inactive but visible.
If the map is active, you will see the hint bar (if you are on Gamepad mode) and the left side menu. If it is visible, but not active, they will not be there.
When the map is active, all of the shortcuts mentioned here will work on the map. When it is not active, they will not. For example, using the Camera stick while the map is active will navigate the map, but when it’s just visible it will do its standard feature of moving your camera.
Close Immediately
When you use your map button, the map will open as Active.
Pressing the map button while the map is open will close the map regardless of whether your map is Active or Visible.
Close When Active
When you use your map button, the map will open as Active.
Pressing the map button while the map is Active will close the map.
Pressing the map button while the map is Visible will re-activate the map.
Making the map Visible
Whether you have your map set to “Close immediately” or “Close when active”, the map will automatically change to Visible when you use your movement stick.
If you have the setting ‘Restore map when not moving’ turned on, your map will be automatically re-activated when you stop using your movement stick. Whether or not this is desirable will depend on you, but you might find it cumbersome in content where you might need to keep the map open regardless of whether you are moving or not, such as Frontlines PVP. Though you can use the separate Gamepad and Mouse mode as “profiles” to have it set differently, but that will be covered more in the HUD section.
How does this affect the flow?
If you have “Close when Active” on and you want to just quickly look at your map while moving, you may find yourself having to press your map button more often to end up closing it.
If you have “Close Immediately” on and you want to check your map, move around a bit, and re-focus it, you may end up accidentally closing it and thus having to re-open it.
Either option is perfectly fine for controller play, though “Close when Active” is the default for Gamepad mode.
Keep the map active while moving
Since moving is what changes the map from Active to Visible, you might be wondering if it’s possible to have the map Active while you are actively moving. The answer is yes.
Close When Active
To re-active the map while moving, you can either:
- Press your map button
- Press your HUD select button until it ends up back on the map
- Use a (virtual/touch/physical) mouse and left click on the map
If you wish to de-activate your map again while still moving, you would need to use the HUD select button as the map will become Visible if you end up on another HUD element. You can also just stop moving quickly and then resume moving.
Close Immediately
To re-active the map while moving, you can either:
- Press your HUD select button until ends up back on the map
- Use a (virtual/touch/physical) mouse and left click on the map
If you wish to de-activate your map again while still moving, you would need to use the HUD select button as the map will become Visible if you end up on another HUD element. You can also just stop moving quickly and then resume moving.
Notice the difference between the two is that in “Close When Active”, using your map button while you are moving will re-activate the map, while in “Close Immediately”, it will close your map.
Close the map
- Cancel button ( as long as the map is Active)
- Menu
- Map button - Any time if it’s in “Close Immediately”, or while the map is active if it’s “Close when active”
- Use a (virtual/physical/touchpad) mouse and left click on the big X on the top right. It’s very unlikely a controller player would choose this method to close their map.
For the Menu and Map button, this is assuming you did not turn on the lock on the left-hand menu in the Map.
Duty List
Mouse users are able to use quest items directly from the Duty List HUD component, and so can controller users! You just have to know how.
- If the item needs a target (ex: leve target), target it. It’s much easier if you target it before trying to use the Duty List HUD component.
- Use the Select HUD button
to navigate to the Duty List.
- Use D-pad up/down
to get to quest
- Use D-pad left/right
to get to item
- Press confirm button

Overall, this is generally how you interact with anything in the HUD. However, as there are many players who may not realize you can use the quest items from the Duty list in this way, it was worth mentioning separately.
The Level sync button for FATEs will also show up in the Duty List and can be used in the same manner.
Handling Items
Inventory Switching
If you have certain inventories open, the jump button 
Scenario 1: Chocobo Saddlebag
Using the Jump button will switch to player Inventory or Armory Chest
Using the Cancel button will go back to the Chocobo Saddlebag
Scenario 2: Retainer Inventory
Using the Jump button will switch to player Inventory, Armory Chest, or Chocobo Saddlebag
Using the Cancel button will go back to the Retainer Inventory
Scenario 3: Quests / Collectables / Supply And Provisioning Hand-Ins
Pretty much anything that allows hand ins to an NPC will have a switch for Inventory and Armory Chest.
When in “switch” mode (the inventory that’s not the original inventory), using the Confirm button will transfer the item to the inventory that spawned the switch (Saddle bag in Scenario 1, Retainer in Scenario 2) without any confirmations or sub menus. Obviously this doesn’t apply to Scenario 3 because those are NPC hand ins and not a switch from an “original” inventory.
This means adding items to retainers is a lot faster via controller than via mouse (whereas withdrawing items still uses the sub menu of needing to say “Retrieve from retainer”).
It would be safe to assume other types of inventories that I omitted, or are added in the future, would perform similarly.
Handing in Quest Items and Collectables
When you get to a hand-in box, your controller select will already be focused there by default. There are two ways to hand in items:
Method 1: Subcommand (Fast)
Use the Subcommand button 
Handing in a bunch of levequest, supply and provisioning items quickly has never been easier.
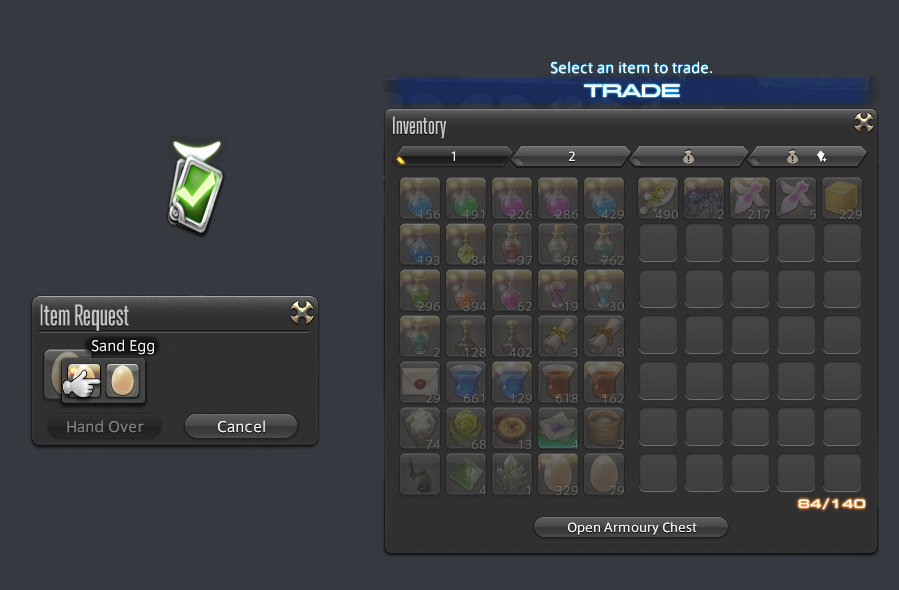
Method 2: Confirm (Slow)
When you get that pop up to hand in an item, you can choose to use the Confirm button, which will take you to the relevant inventory so you can then use the d-pad to select your item. This is not guaranteed to go the necessary item and is therefore slower than using the Subcommand button in method 1.
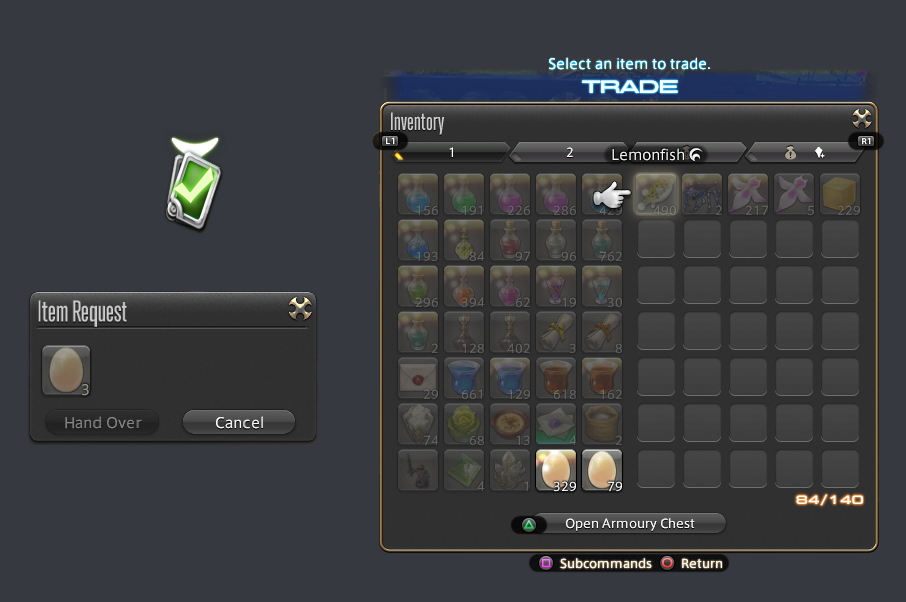
After pressing Confirm, it ended up on my Lemonfish instead. The valid items are highlighted, but it would have been faster still to use Method 1.
Switching/Hiding the tooltip

If you have an item tooltip up, it is possible to show the High-Quality variant by pressing your left hotbar highlight, or to hide the tooltip by pressing the right hotbar highlight. This will also cause your crosshotbars to be activated.
This does not apply to action tooltips.
This behavior cannot be customized, but it can be disabled via the Character Configuration, UI Settings, General section.

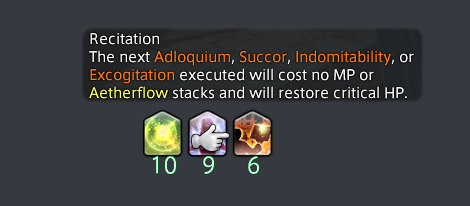
Checking For Status Effects
Checking your own status effects
You can use the HUD select button to get to your buff bar. Once there, use the d-pad to inspect your buff or debuff. If it is a removable buff, you can use the Confirm button to remove it.
If you are using the 3 separated groups of buffs, which offers:
- Buff bar (Enhancements)
- Debuff bar (Enfeeblements)
- Other (food, mounted status)
and can be configured via the UI Element Settings in the HUD Layout menu.
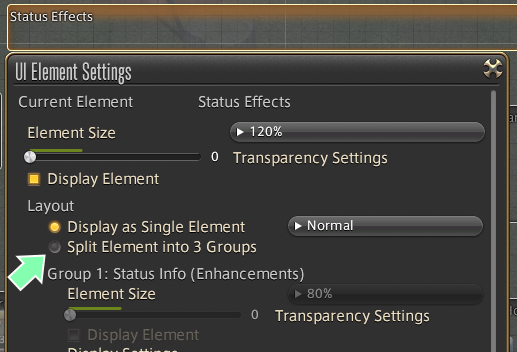
Split Elements Into 3 Groups can be turned on to have a separate UI element for your buffs, debuffs, and other (food).
The Buff bar and Debuff bar can be accessed via the HUD Select button. The “Other” bar cannot. You cannot go from the Buff bar to the Debuff bar via the d-pad, you will need to use the HUD select button to change from one to another.
This is different from using the Single Element, where you can access both your buffs and debuffs by using the d-pad. This can make it slower to check a specific enemy debuff if you have a lot of buffs. There can be benefits, if you’re planning on actually checking your buffs and debuffs, to splitting into groups to get to a particular one faster.
Of course, you also have the option to use the Virtual, Touchpad, or a physical mouse to check your buff and debuff bar(s).
You can also use a statusoff macro to remove a removable buff. This does not have any negative effects as it is not an action macro.
Checking Target status effect
Unfortunately when it comes to checking status effects that are not your own, the only way to do so is to use a mouse cursor (virtual, touchpad, physical).
This includes:
- Party List statuses
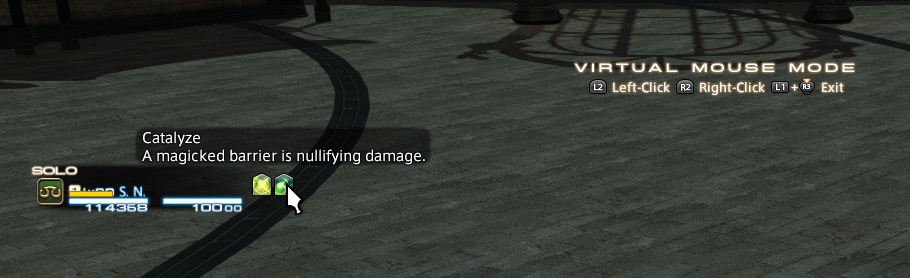
- Target Info statuses (whether you have it split or not)
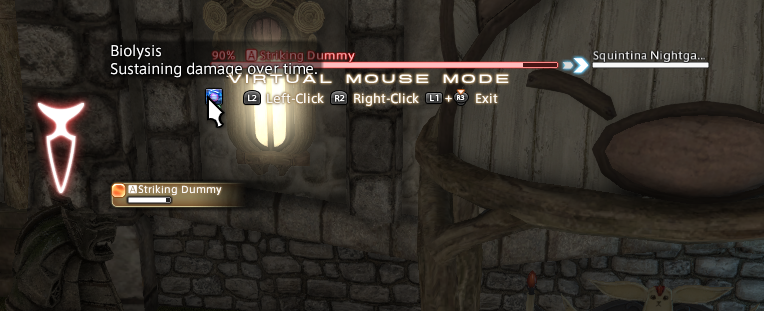
Focus target UI element cannot be used to read status names or descriptions, regardless of what method you use. This is true for mouse & keyboard players as well.
Chat Controls
Certain chat-related features require a mouse cursor. Anytime a cursor is mentioned, please assume you can use the virtual mouse, touchpad, or a physical mouse. Directions will assume a Virtual Mouse.
Managing the Chat UI
Moving the chatbox(es)
It is possible for you to separate out tabs to be placed into a separate chatbox. To do so, you will need a cursor.
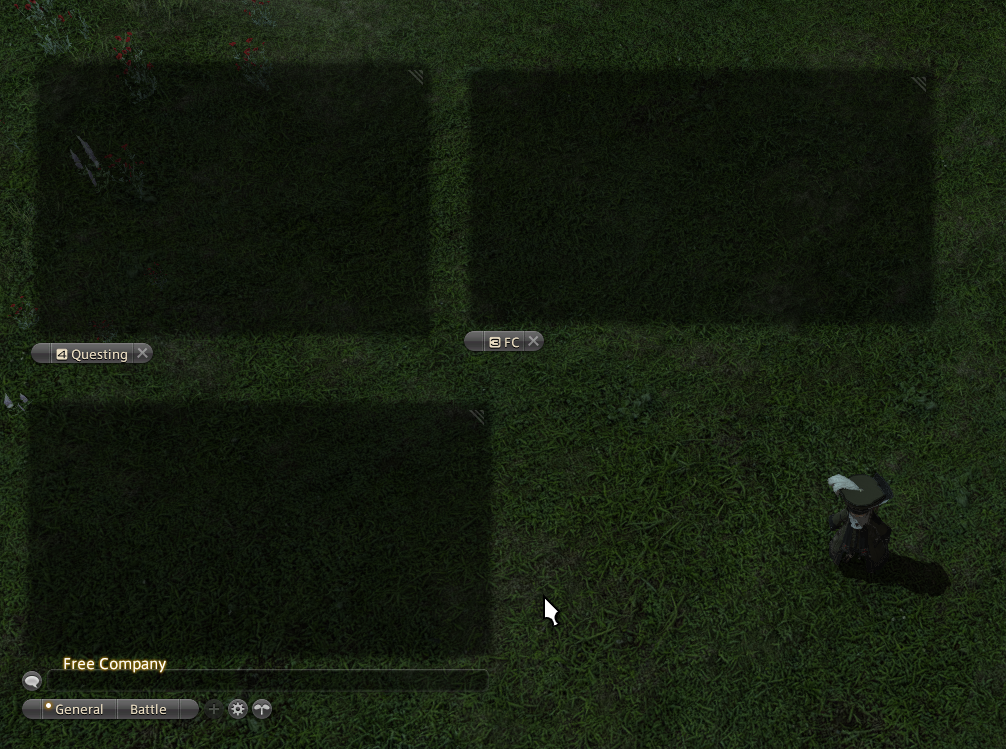
Hover over a tab with a cursor and hold Left Click (L2). Use the camera stick to drag to the desired location.
- If you do this over the General tab, it will move the primary chatbox. Only the primary chatbox will have an entry bar for you to write in.
- If you do this over any other tab, it will move that tab into a new chatbox. If it is already in its own chatbox, it will move that chatbox.
- If you wish to bring a chatbox back to the main box, drag it over to the General tab.
Resizing the chatbox
Just like with moving the chatbox, you will once again need a cursor if you need to resize it. However, instead of dragging a tab, you will be dragging the top-right corner.
If you have multiple chatboxes, each can be resized individually in the same manner.
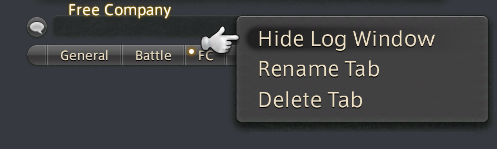
Hiding the chatbox
You can use the subcommand button to select “Hide Log Window” to hide the chat
Unhiding the chatbox
You can use your HUD select button to bring back the chat, as it will cycle to it even if it was hidden. You can also use your physical keyboard, if you have one, to bring it back, by writing into the chat, which will be covered in the next section.
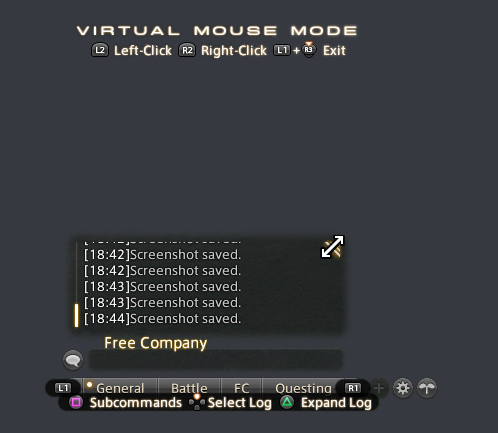
Using the Chat Log
Chat options
Around the chat are various little icons. You can access these via the d-pad left and right when you are focused on the chatbox.
If you have Gamepad mode on, you will also see various hints.

If you do not see “Toggle Tabs”, that is because this is only available if you have multiple chatboxes. To switch tabs on the same chatbox you will use the hints on the side (L1 and R1 in the screenshot)
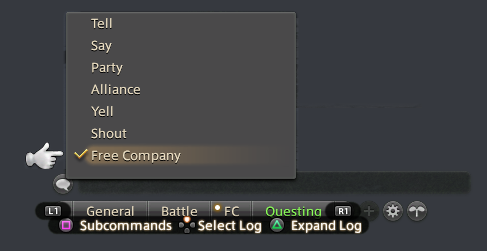
The chat bubble on the side is to change which chat type you are going to write into.
+ button is to create extra tabs. You can have up to 4 chat tabs.
The gear icon is a shortcut to the character config’s Log settings.
The leaf icon is related to the Novice Network.
Subcommands is to access extra commands. This was already shown earlier in the guide for showing how to hide the entire chat window. However, if you are on tabs that are not General or Battle, you can rename or delete those tabs.
Select Log means going into the chat log itself, which can be useful if you wish to whisper a player or interact with a chat link (covered below)
Expand Log will make the chat log significantly bigger. This is only available for tabs on the Primary Box. Other chatboxes will be hidden while you have the primary chatbox expanded.
Interacting with the Chat Log
Once you’ve used d-pad up to “Select Log” and end up inside the chat log, you can interact with player names and chat links by pressing either the confirm button (X) or the subcommand button (Square); There is no difference between using confirm or subcommand here.
- Map positions -> Opens map
- Questions names -> Opens journal
- Status effects (battle log) -> copies the effect’s name
- Item names -> Opens up subcommand for search, copy, and link. Also for comparing or trying on an item if it is a piece of gear.
Entering the chat input
In character configuration, Control Settings, General, if you have the Chat Mode Settings set to Enable direct chat, you can type on a keyboard and it will assume you wish to chat. If you have it set to to off, you will need to press Enter first (players on direct input can also use Enter to access the chatbox), as otherwise pressing letters will assume you wish to use keyboard shortcuts. By default, Enable direct chat is set to on for Gamepad mode.
There is another way to enter the chat input. If you HUD select into the chatbox, you can press the Confirm button (X) to enter the chat input.

PS4 and PS5 players will see an additional hint for the virtual keyboard (Triangle).
History refers to the history of what you have entered previously. This can be useful if you need to repeat the same message, such as if you are doing shouts in various cities to advertise an event.
If you do not see Paste, that is a System Configuration setting.
Using the virtual keyboard (PS4/PS5)
If you are on PS4/PS5 and you use the Keyboard feature (Triangle), this will bring up an on-screen keyboard. This is a feature of the console and not specific to FFXIV. It should work the same as any other application in those systems. You can use the analog stick, d-pad, or touchpad to get to the keys you wish to type, and make use of the chat recommendations.
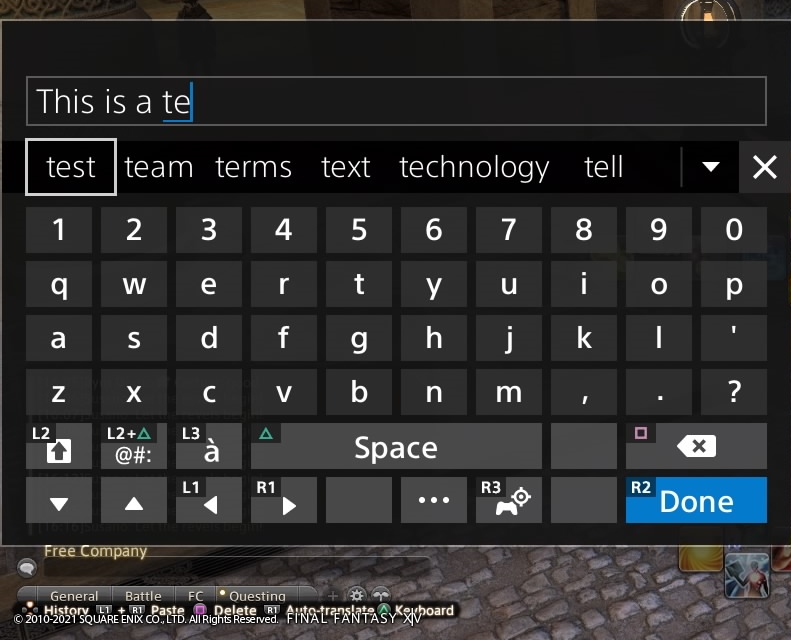
You can also choose to not use the on-screen keyboard and just hook up a USB keyboard to your console.
Working with Auto-Translate
You can use the Auto-Translate button (R1) to access set phrases that other players will see in their respective language. If you are a PS4/PS5 player using the virtual keyboard, you do need to leave the virtual keyboard (by pressing done) to be able to use this if you wish to use it mid-sentence.
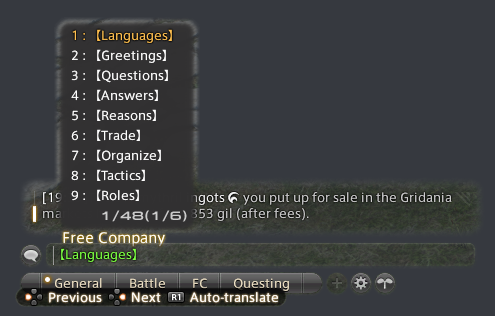
Previous and Next refer to going to the next or previous page of available categories. In this screenshot there are 6 pages of categories, though it is possible it could change in the future.
Once in auto-translate, the R1 button can be used to go down, but so can d-pad up and down. If you go down past all the choices, it will also go to the next page.
Although not shown in the hint bar, the Confirm button (X) is used to go into the category, and to pick your phrase.
If you have picked a category, but realized it is the incorrect one, you can either use the Subcommand (Square) or Cancel (Circle) buttons to go back to the Category list. If you are already at the Category list, using either of those will stop the Auto-Translate selection altogether.
Copy and Pasting
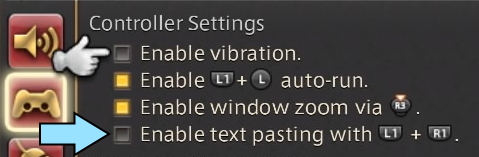
In System Settings, Gamepad settings (Controller Settings on PS4), there is an option called “Enable text pasting” and it will show you the shortcut. By default it is L1 + R1.
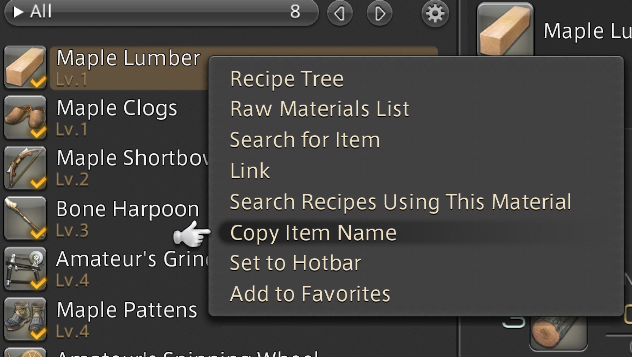
This is for pasting things that FFXIV officially supports to be copied. For example, if you go into the crafting log and use the subcommand button on recipes or their mats, there will be an option called “Copy Item Name”. Once copied, this can then be pasted using the Paste controller shortcut.
Not everything supports copying. The ability to copy is available in:
- Crafting log recipes
- Crafting log material
- Gathering Log
- Marketboard/Retainer on the Search Results for a particular item. As in, for the listings that an item has - not to be confused with the search page on the MB.
- Chat Link (Items)
- Recipe List’s recipes
- Raw Materials List recipes and mats
- Collectable Appraiser
- GC supply & Provisioning
- Custom Deliveries
- Ehcatl Nine deliveries
- FC crafting station (for providing items)
It is possible there may be other menus that provide this, though this should be fairly comprehensive.
Unfortunately copying names is not possible in the Mount, Minion, Emote, or Triple Triad lists. This makes some sense as copying is only supported for items, and those are technically no longer items once claimed. However, there are various item-related UIs, such as player inventory, or the FC crafting list, where copying is also not supported. Usually linking is still available, and it would be possible to copy from the Chat Link. It is also not possible to copy a chat, only the special copy for items linked in the chat.
So if you’re helping out a friend with some crafts and you want to check the marketboard, tell your friend to link the items to you in the chat so you can copy and paste the item name!